Keeping a preschooler happy, engaged, and away from screens all summer long is no small feat — and if you’re nodding along right now, you are absolutely not alone.
The good news is that some of the best summer craft ideas for preschoolers require almost nothing from your craft drawer and even less from your energy reserves.
These seven toddler summer activities are simple enough for little hands, forgiving enough for wiggly attention spans, and adorable enough to stick straight on the fridge.
Before we dive in, here are five Amazon-friendly supplies worth grabbing to make your whole summer of crafting easier.
Table of Contents
- 🛒 Top 5 Amazon Supplies for Preschool Crafting
- 7 Summer Craft Ideas for Preschoolers That Are Big on Fun (and Low on Stress)
- Save This — Your Summer Just Got a Whole Lot More Colorful
🛒 Top 5 Amazon Supplies for Preschool Crafting
- Crayola Washable Finger Paints (6 Colors) — A pediatrician-trusted, washable paint set that rinses off skin and most surfaces easily, making it the ultimate worry-free choice for toddler art sessions.
- Melissa & Doug Jumbo Triangular Crayons — Thick, chunky crayons designed specifically for small preschool hands that haven’t yet mastered a pencil grip, in bright colors that show up beautifully on paper.
- Colorations Simply Washable Tempera Paint Sticks — Twist-up, no-drip paint sticks that work like crayons but deliver bold, paint-like color with zero brush cleanup required.
- Hygloss Products Bright White Foam Sheets — Soft, easy-to-cut craft foam sheets that little scissors glide through safely, perfect for making shapes, stamps, and collage pieces.
- Elmer’s Washable School Glue Sticks (30 Pack) — The go-to non-toxic, mess-contained glue stick that preschoolers can apply independently without the dripping chaos of liquid glue.
7 Summer Craft Ideas for Preschoolers That Are Big on Fun (and Low on Stress)
1. Sunshine Paper Plate Suncatcher
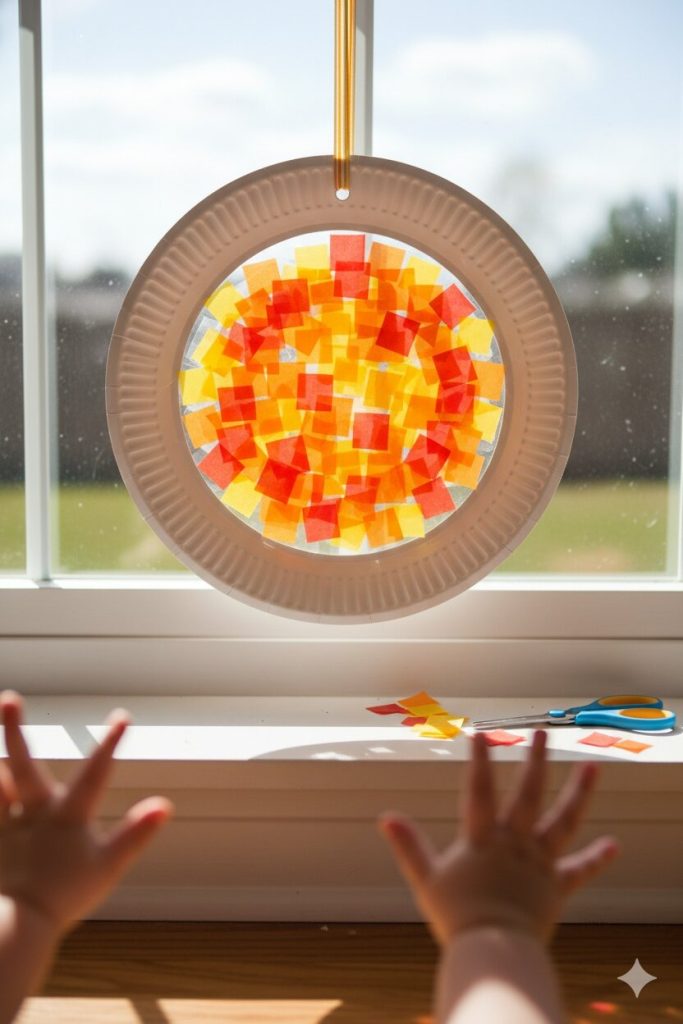
Age Range: Best for ages 2–5
Mess Level: Low — lay down a single sheet of newspaper under the plate and cleanup takes about thirty seconds.
What You’ll Need:
- Paper plate
- Yellow and orange tissue paper squares
- Contact paper or clear tape
- Scissors (adult use)
- String or ribbon for hanging
How To Do It:
- Cut the center out of the paper plate so you’re left with just the rim — this is your sun’s frame.
- Cut a piece of contact paper to fit over the hole and press it sticky-side-up onto the back of the rim.
- Let your little one press torn or pre-cut pieces of yellow and orange tissue paper onto the sticky surface in any pattern they like.
- Once the center is full of tissue paper, trim any overhanging pieces and cover the back with another layer of contact paper to seal everything in.
- Punch a hole at the top, thread through a ribbon, and hang it in a sunny window to watch it glow.
What It Teaches: Pressing tissue paper onto a sticky surface builds fine motor control and introduces color mixing when the warm tones overlap.
2. Handprint Watermelon Slice Canvas
Age Range: Best for ages 2–5
Mess Level: Medium — do this one outside or on a plastic tablecloth, and keep a damp cloth nearby for quick hand wipes between colors.
What You’ll Need:
- Small canvas or thick white cardstock
- Green, red, and black washable finger paint
- Your child’s hand
- Paintbrush (for borders, optional)
How To Do It:
- Paint your child’s palm and fingers red and press it firmly onto the canvas to create the watermelon “flesh” — the fingers become the curved top of the slice.
- Wipe the hand clean, then paint just the heel of the palm green and press it along the bottom edge of the red handprint to form the rind.
- Once the paint is dry, help your child dip a fingertip in black paint and dot “seeds” across the red section.
- Let it dry completely — then sign and date the back, because this one is a keepsake.
What It Teaches: This classic preschool art project introduces cause-and-effect thinking while building color recognition with a fun, seasonal theme.
Read More:
| 11 Easy Summer Craft Ideas for Creative DIY Fun |
| 10 Fun Summer Craft Ideas for Kids (Easy & Budget-Friendly) |
| 9 Summer Craft Ideas for Adults That Are Actually Fun |
3. Cotton Ball Cloud Collage
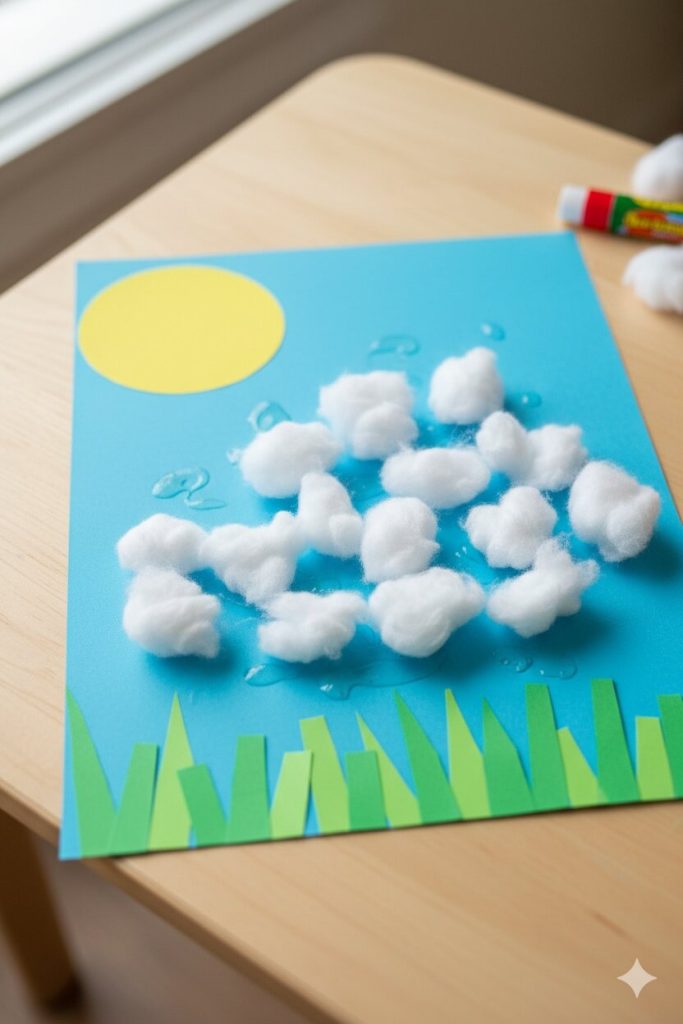
Age Range: Best for ages 2–3
Mess Level: Low — glue sticks keep this one contained and your little one can do almost all of it independently.
What You’ll Need:
- Blue cardstock or construction paper
- Cotton balls
- Glue stick
- Yellow circle (pre-cut sun) and green strips (pre-cut grass), optional
How To Do It:
- Start with a sheet of blue cardstock as your sky — hand it straight to your toddler and let them own this project from the start.
- If you’d like, pre-cut a yellow circle for the sun and green strips for grass and glue those on together first to set the scene.
- Show your child how to rub the glue stick onto the paper, then press a cotton ball down firmly.
- Let them go — add as many clouds as they want, wherever they want. Resist the urge to redirect the placement.
- Let it dry flat and display it proudly.
What It Teaches: Pulling apart and pressing cotton balls is a wonderful sensory experience that also strengthens the small hand muscles children need for writing later on.
4. Ice Cream Cone Paper Bag Puppet
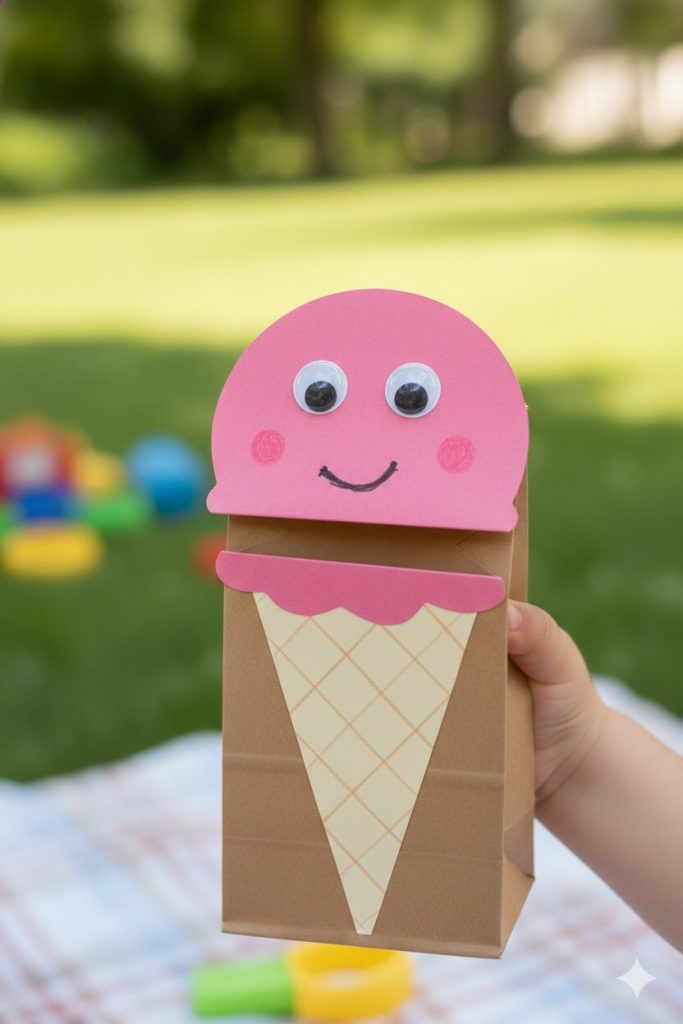
Age Range: Best for ages 3–5
Mess Level: Low — this is almost entirely a dry craft, with just a glue stick and optional marker involved.
What You’ll Need:
- Small brown paper lunch bags
- Pre-cut paper circles in pink, white, and brown (ice cream scoops)
- Glue stick
- Markers or googly eyes
- Crayons for decorating
How To Do It:
- Lay the paper bag flat with the folded bottom facing up — this flap becomes the mouth of your puppet when you slip your hand inside.
- Glue a “scoop” shape (your pre-cut circle) onto the flap of the bag so it sits right at the opening.
- Let your child add a face to the scoop using googly eyes, a marker smile, and crayon cheeks — no two will ever look alike, and that’s exactly the point.
- Draw or glue a cone shape onto the lower section of the bag below the flap.
- Slide a hand inside and put on an ice cream puppet show — even a two-minute performance counts.
What It Teaches: Puppet play is one of the best fun summer projects for little ones because it naturally encourages storytelling, imaginative thinking, and early language development all at once.
Explore More Ideas:
| 9 Summer Craft Ideas for Teens They’ll Actually Love |
| 7 Fun Summer Craft Ideas for Senior Citizens (2026 |
| 7 Fun Summer Craft Ideas for Toddlers (2026 Guide) |
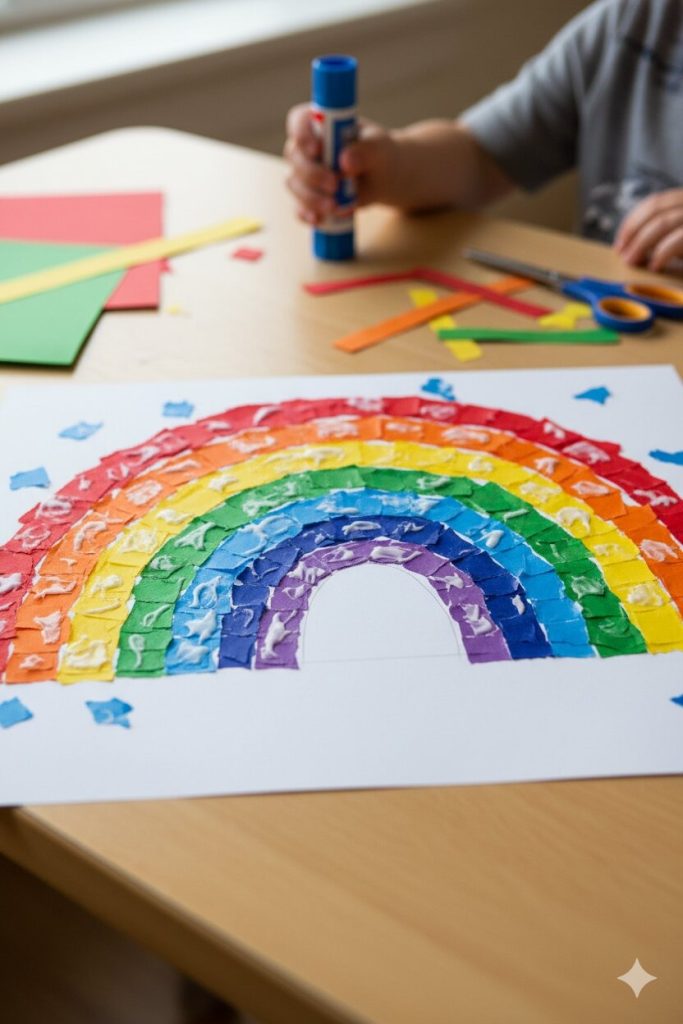
5. Torn Paper Rainbow
Age Range: Best for ages 2–4
Mess Level: Low — tearing paper is completely dry and the gluing is contained; perfect for indoor days when going outside isn’t an option.
What You’ll Need:
- White cardstock or canvas board
- Construction paper in red, orange, yellow, green, blue, and purple
- Glue stick or diluted white glue
- Pencil (for drawing rainbow arch guide, optional)
How To Do It:
- Lightly draw a simple rainbow arch on the white cardstock in pencil to give your child a loose guide — or skip this step entirely for a freer result.
- Tear the red construction paper into small, irregular pieces and show your child how to glue them along the outer arch.
- Work through each color of the rainbow inward, tearing and gluing one color band at a time.
- Fill in a blue “sky” background with torn blue pieces around the rainbow if you’d like, or leave it white.
- Let it dry flat — the textured, torn-paper effect looks genuinely beautiful when it’s finished.
What It Teaches: Tearing paper into pieces is a surprisingly powerful fine motor activity, and working through the rainbow colors in sequence is a gentle, playful introduction to color ordering and patterns.
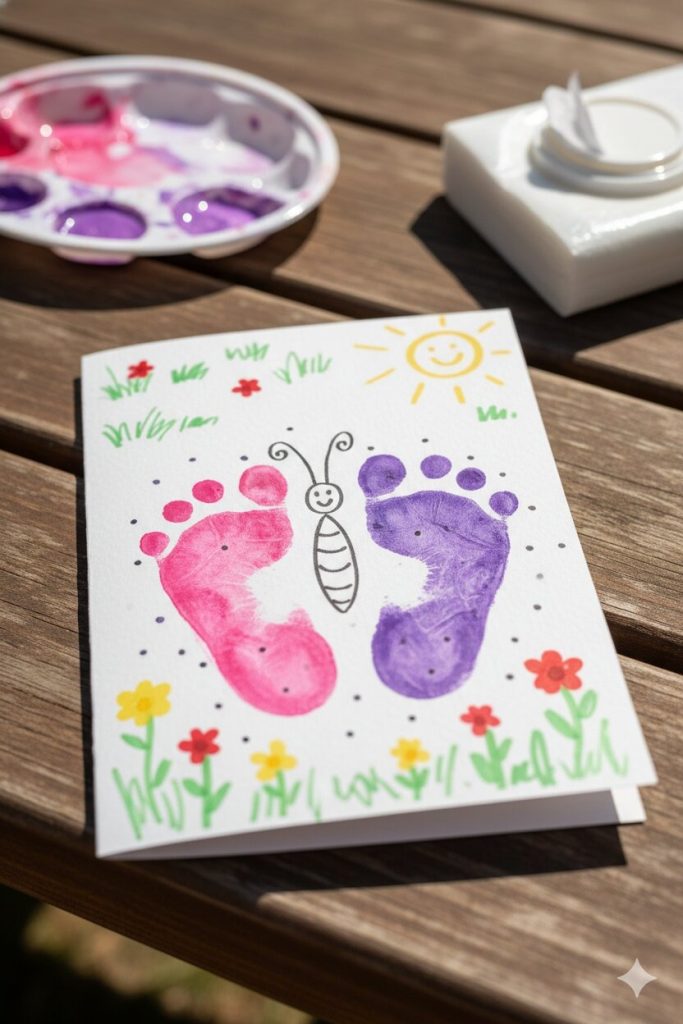
6. Footprint Butterfly Garden Card
Age Range: Best for ages 2–5
Mess Level: Medium — foot painting is gloriously fun and easily managed with a shallow tray of paint and a warm soapy water bucket nearby for rinsing.
What You’ll Need:
- Thick white cardstock or watercolor paper
- Washable tempera paint in bright colors
- Shallow paint tray or paper plate
- Marker (for adding details after)
- Wet wipes or a small bowl of soapy water
How To Do It:
- Pour a thin layer of paint into a shallow tray and help your child press one foot in, coating the sole evenly.
- Press the painted foot onto the cardstock, then repeat with the other foot overlapping the first at the heel — the two footprints together create butterfly wings.
- Wipe feet clean immediately, then let the paint dry completely before moving on.
- Once dry, draw a simple oval body between the two heels and add antennae with a marker — your butterfly is done.
- Write a sweet message inside and mail it to grandparents or hang it as summer wall art.
What It Teaches: Beyond being one of the most memorable easy crafts for kids, this activity supports body awareness as children learn to recognize their own footprint as part of a larger creation.
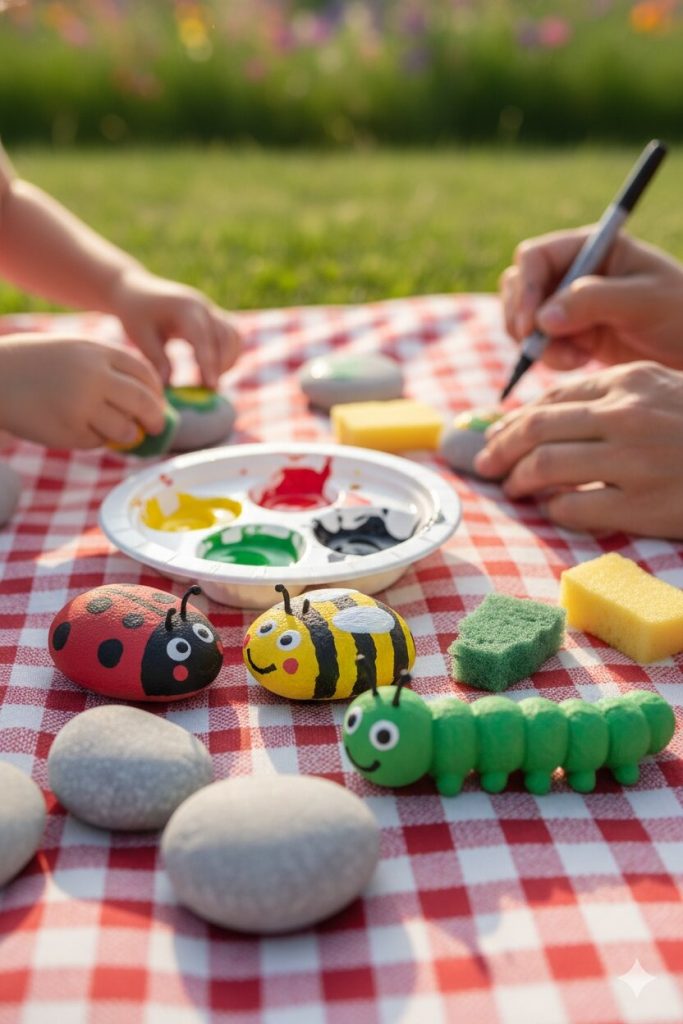
7. Sponge-Painted Summer Bug Rocks
Age Range: Best for ages 3–5
Mess Level: Medium — set up outside on a picnic blanket with paint in muffin tins to keep colors separate and make the whole thing feel like a proper art studio.
What You’ll Need:
- Smooth, flat rocks (collected on a walk or from a garden center)
- Washable acrylic or tempera paint
- Small sponge pieces or a foam brush
- Black marker (for details, adult use)
- Mod Podge or clear sealer (optional, for durability)
How To Do It:
- Wash and dry the rocks completely — paint sticks best to a clean surface.
- Let your child sponge-paint the rock in a base color: red for a ladybug, yellow for a bee, green for a caterpillar.
- Once the base coat is dry, add a second color if your bug needs it — yellow stripes on a bee, for example.
- When fully dry, use a black marker to add spots, stripes, legs, antennae, and eyes to bring the bug to life (this part is best done by a grown-up or an older child).
- Seal with a thin coat of Mod Podge if you’d like the rocks to live outside in the garden — or display them on a windowsill just as they are.
What It Teaches: Choosing colors, applying paint with a sponge, and watching a plain rock transform into a character is one of those summer craft ideas for preschoolers that quietly builds creative confidence alongside color recognition.
Save This — Your Summer Just Got a Whole Lot More Colorful
The most important thing to remember about preschool art projects? The process is always more valuable than the product.
A lopsided butterfly, a rainbow in the “wrong” colors, a suncatcher that’s more scrunched tissue paper than sunshine — those are the ones that end up meaning the most.
These summer craft ideas for preschoolers are designed to create memories, not masterpieces. Pin this article now, grab a few supplies, and get ready to make this the most creative, giggly, paint-splattered summer yet.

Jenny is a passionate writer specializing in home decor, design, and styling. With years of experience in transforming spaces, she shares expert tips on creating beautiful, functional homes. From interior design trends to DIY decor ideas, Jenny’s work helps homeowners craft spaces that reflect their unique style. Whether it’s a cozy living room, a modern kitchen, or a serene bedroom, her articles offer practical advice and inspiration to elevate any home.