I love the holiday season, don’t you? There’s something special about sitting down with a cup of hot cocoa, festive music playing, and creating something heartfelt for the people you care about.
Handmade Christmas cards are a perfect way to share that warmth. They’re personal, budget-friendly, and let you express your creativity.

In this article, I’m sharing 15 easy, beginner-friendly Christmas card ideas that anyone can make. Whether you’re crafting for family, friends, or coworkers, these ideas will spark joy. Let’s dive in!
Table of Contents
- Materials and Tools Overview
- 15 Handmade Christmas Card Ideas
- 1. Watercolor Tree Card
- 2. Button Wreath Card
- 3. Fingerprint Reindeer Card
- 4. Pop-Up Snowman Card
- 5. Washi Tape Ornament Card
- 6. Glitter Starry Night Card
- 7. Hand-Stitched Snowflake Card
- 8. Photo Frame Card
- 9. Chalkboard Greeting Card
- 10. Felt Holly Leaf Card
- 11. Paper Snowflake Cutout Card
- 12. Pom-Pom Tree Card
- 13. Quilled Poinsettia Card
- 14. Lace Doily Angel Card
- 15. Crayon Melt Ornament Card
- Conclusion
Materials and Tools Overview
You likely have most of what you need at home. For basic cards, grab cardstock, glue, scissors, and markers. These are your foundation. Want to add some flair?
Ribbons, stickers, glitter, or washi tape work wonders. You can find these at craft stores, dollar stores, or even online. If you’re on a budget, check your home for scraps like old wrapping paper or buttons.
You don’t need a ton of tools. A ruler, pencil, and eraser help with precision. For some projects, a needle or paintbrush comes in handy. I’ll list specific materials for each card idea, so you’re never caught off guard.
These projects are designed for beginners, so you won’t need advanced skills or expensive gadgets.
Where can you get supplies? Craft stores like Michaels or Hobby Lobby are great. Dollar stores have surprisingly good options for cardstock and decorations.
You can also recycle household items—think cereal boxes for sturdy bases or leftover yarn for texture. Keep it simple, and you’re ready to create!
15 Handmade Christmas Card Ideas
Here are 15 card ideas, each with a description, materials, steps, time estimate, and skill level. Let’s make some holiday magic!
1. Watercolor Tree Card

This card features a simple Christmas tree painted with watercolors. It’s vibrant and perfect for beginners.
Materials: Watercolor paints, white cardstock, paintbrush, black pen, cup of water, paper towel.
Steps:
- Fold cardstock in half to make your card.
- Lightly sketch a triangle for the tree.
- Paint the triangle green with watercolors.
- Add colorful dots for ornaments using red, yellow, and blue paint.
- Let it dry, then outline the tree with a black pen for definition.
- Write a festive message inside.
Time: 15 minutes.
Skill Level: Beginner.
This card is quick and forgiving. If your tree isn’t perfect, it still looks charming!
2. Button Wreath Card

A wreath made of buttons is cute and festive. It’s a great way to use spare buttons.
Materials: Green and red buttons, cardstock, glue, red ribbon.
Steps:
- Fold cardstock in half.
- Arrange green buttons in a circle on the front.
- Glue each button down carefully.
- Add a few red buttons as berries.
- Tie a small red ribbon into a bow and glue it at the top.
- Write your greeting inside.
Time: 20 minutes.
Skill Level: Beginner.
This card feels rustic and cozy. It’s a fun way to recycle buttons from old clothes.
3. Fingerprint Reindeer Card

Kids love this one! Use thumbprints to create adorable reindeer faces.
Materials: Brown and red ink pads, cardstock, googly eyes, black marker, glue.
Steps:
- Fold cardstock in half.
- Press your thumb into the brown ink and stamp it on the card.
- Add a red thumbprint for the nose (think Rudolph!).
- Glue on googly eyes above the nose.
- Draw antlers and a mouth with a black marker.
- Add a sweet message inside.
Time: 10 minutes.
Skill Level: Beginner (kid-friendly).
This card is a hit with little ones. It’s quick and makes everyone smile.
4. Pop-Up Snowman Card

A snowman that pops up when you open the card adds a fun surprise.
Materials: White and colored cardstock, scissors, glue, markers.
Steps:
- Fold cardstock in half for the card base.
- Cut three white circles (small, medium, large) for the snowman.
- Fold each circle in half and glue them together to form a 3D shape.
- Glue the snowman inside the card so it pops up when opened.
- Draw a scarf, hat, and face with markers.
- Write your message inside.
Time: 25 minutes.
Skill Level: Intermediate.
This card takes a bit more effort, but the pop-up effect is worth it!
5. Washi Tape Ornament Card
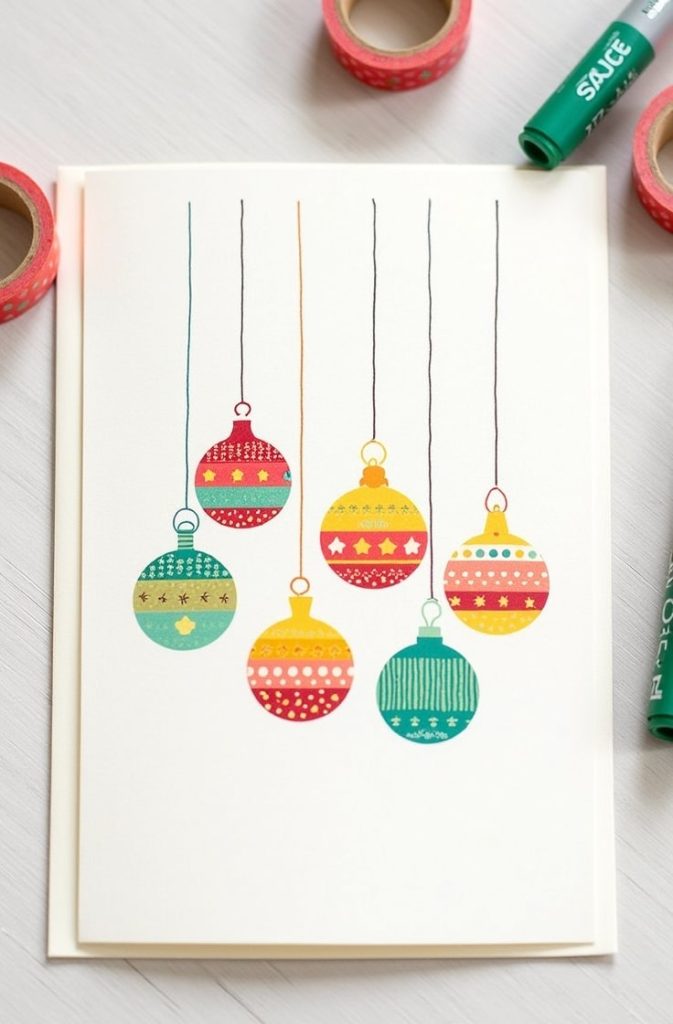
Washi tape makes colorful ornaments that pop. It’s super easy and looks polished.
Materials: Washi tape (various colors), cardstock, string, markers.
Steps:
- Fold cardstock in half.
- Cut strips of washi tape and layer them into circle shapes for ornaments.
- Stick them on the card front.
- Glue a small piece of string to each ornament to mimic a hanging loop.
- Draw a small bow or hook with markers.
- Add a greeting inside.
Time: 15 minutes.
Skill Level: Beginner.
Washi tape is a game-changer. You can mix patterns for a playful look.
6. Glitter Starry Night Card

This card sparkles with a glittery night sky. It’s simple but stunning.
Materials: Black cardstock, glitter, glue, white paint, paintbrush.
Steps:
- Fold black cardstock in half.
- Paint a light blue background on the front for a night sky.
- Sprinkle glitter over wet glue to form stars.
- Let it dry completely (shake off excess glitter).
- Add a festive phrase like “Merry Christmas” with white paint.
- Write your message inside.
Time: 20 minutes.
Skill Level: Beginner.
The glitter makes this card feel magical. Just be ready for a bit of sparkle everywhere!
7. Hand-Stitched Snowflake Card

A sewn snowflake adds a delicate touch. It’s a bit more advanced but worth it.
Materials: Needle, white thread, cardstock, pencil, ruler.
Steps:
- Fold cardstock in half.
- Lightly draw a snowflake design with a pencil.
- Poke holes along the lines with a needle.
- Thread the needle and stitch through the holes to form the snowflake.
- Tie off the thread and erase pencil marks.
- Add a message inside.
Time: 30 minutes.
Skill Level: Intermediate.
This card feels elegant. Take your time with the stitching for a clean look.
8. Photo Frame Card

Add a personal touch with a mini photo frame. It’s a keepsake card.
Materials: Cardstock, small photo, decorative paper, glue, scissors.
Steps:
- Fold cardstock in half.
- Cut a rectangle from decorative paper to frame your photo.
- Glue the photo behind the frame.
- Attach the frame to the card front.
- Decorate the edges with markers or stickers.
- Write a heartfelt message inside.
Time: 20 minutes.
Skill Level: Beginner.
This card is perfect for family or close friends. Choose a photo that means something special.
9. Chalkboard Greeting Card

A chalkboard-style card looks trendy and is easy to make.
Materials: Black cardstock, white chalk marker, red ribbon.
Steps:
- Fold black cardstock in half.
- Use a white chalk marker to write a festive message on the front.
- Tie a red ribbon around the card for a pop of color.
- Let the marker dry fully.
- Add a greeting inside.
Time: 15 minutes.
Skill Level: Beginner.
This card is sleek and modern. The chalk marker makes it look professional.
10. Felt Holly Leaf Card

Holly leaves made from felt give this card a cozy, festive vibe.
Materials: Green and red felt, cardstock, glue, scissors.
Steps:
- Fold cardstock in half.
- Cut green felt into holly leaf shapes.
- Cut small red felt circles for berries.
- Glue leaves and berries to the card front.
- Add details with a marker if you like.
- Write your message inside.
Time: 20 minutes.
Skill Level: Beginner.
Felt adds texture that makes this card stand out. It’s simple but festive.
11. Paper Snowflake Cutout Card

Intricate snowflakes layered on colored cardstock create a wintry effect.
Materials: White paper, colored cardstock, scissors, glue.
Steps:
- Fold white paper into a square and cut out a snowflake design.
- Fold colored cardstock in half for the base.
- Glue the snowflake to the card front.
- Add a small message or decoration around it.
- Write your greeting inside.
Time: 25 minutes.
Skill Level: Intermediate.
Cutting snowflakes is relaxing. Each one is unique, just like your card!
12. Pom-Pom Tree Card

A fluffy Christmas tree made from pom-poms is adorable and quick.
Materials: Green pom-poms, cardstock, glue, star sticker.
Steps:
- Fold cardstock in half.
- Arrange green pom-poms in a triangle shape for a tree.
- Glue each pom-pom to the card.
- Place a star sticker at the top.
- Write a festive message inside.
Time: 15 minutes.
Skill Level: Beginner.
This card is so cute! Pom-poms add a fun, tactile element.
13. Quilled Poinsettia Card

Paper quilling creates a vibrant poinsettia. It’s a bit tricky but rewarding.
Materials: Red and green quilling paper, cardstock, glue, quilling tool.
Steps:
- Fold cardstock in half.
- Roll red quilling paper into tight coils for petals.
- Shape coils into teardrop forms and glue to form a poinsettia.
- Add green coils for leaves.
- Attach the flower to the card front.
- Write your message inside.
Time: 35 minutes.
Skill Level: Intermediate.
Quilling takes patience, but the result is stunning. It’s a showstopper!
14. Lace Doily Angel Card

An angel with lace doily wings feels elegant and vintage.
Materials: Lace doily, cardstock, gold paper, glue, scissors.
Steps:
- Fold cardstock in half.
- Fold a lace doily in half to form wings.
- Cut a circle from gold paper for the head and a small ring for the halo.
- Glue the wings, head, and halo to the card front.
- Add a simple message inside.
Time: 20 minutes.
Skill Level: Beginner.
This card has a classic charm. It’s perfect for someone who loves vintage style.
15. Crayon Melt Ornament Card

Melted crayons create colorful ornaments. It’s messy but fun!
Materials: Crayons, cardstock, hairdryer, string, glue.
Steps:
- Fold cardstock in half.
- Shave crayons into small bits using a sharpener or knife.
- Sprinkle crayon bits in a circle on the card front.
- Use a hairdryer to melt the crayons into an ornament shape.
- Glue a string to mimic a hanging loop.
- Write a greeting inside.
Time: 30 minutes.
Skill Level: Intermediate.
This card is vibrant and unique. Just protect your workspace from melted crayon!
Conclusion
Making handmade Christmas cards is such a joyful way to spread holiday cheer. Each card you create carries a piece of your heart.
I hope these 15 ideas inspire you to grab some supplies and start crafting. Whether you’re making a glittery starry night or a pop-up snowman, your loved ones will feel the love.
So, put on some holiday tunes, gather your materials, and have fun! Share your creations with friends or on social media—I’d love to see what you make.

Jenny is a passionate writer specializing in home decor, design, and styling. With years of experience in transforming spaces, she shares expert tips on creating beautiful, functional homes. From interior design trends to DIY decor ideas, Jenny’s work helps homeowners craft spaces that reflect their unique style. Whether it’s a cozy living room, a modern kitchen, or a serene bedroom, her articles offer practical advice and inspiration to elevate any home.