The Christmas season is my absolute favorite time of year to craft with kids. There’s something magical about turning everyday materials into festive treasures that make your home sparkle with joy.
These easy and fun Christmas craft ideas for kids are perfect for every age group—from toddlers to older children.
Each one includes step-by-step instructions that will guide you from start to finish, so you can enjoy stress-free crafting sessions full of laughter and creativity.
Table of Contents
- 1. Paper Plate Santa Craft – Easy Christmas Craft for Kids
- 2. Reindeer Handprint Ornaments – Personalized Christmas Crafts for Children
- 3. Snowman Popsicle Stick Craft – Winter Craft for Kids
- 4. Paper Christmas Tree Garland – DIY Holiday Decorations Kids Can Make
- 5. Salt Dough Ornaments – Classic Handmade Christmas Gifts Kids Can Make
- 6. Paper Roll Christmas Characters – Fun and Recycled Christmas Crafts for Kids
- 7. DIY Christmas Cards – Heartfelt Holiday Craft Projects for Children
- Final Thoughts: Making Memories Through Crafts
1. Paper Plate Santa Craft – Easy Christmas Craft for Kids
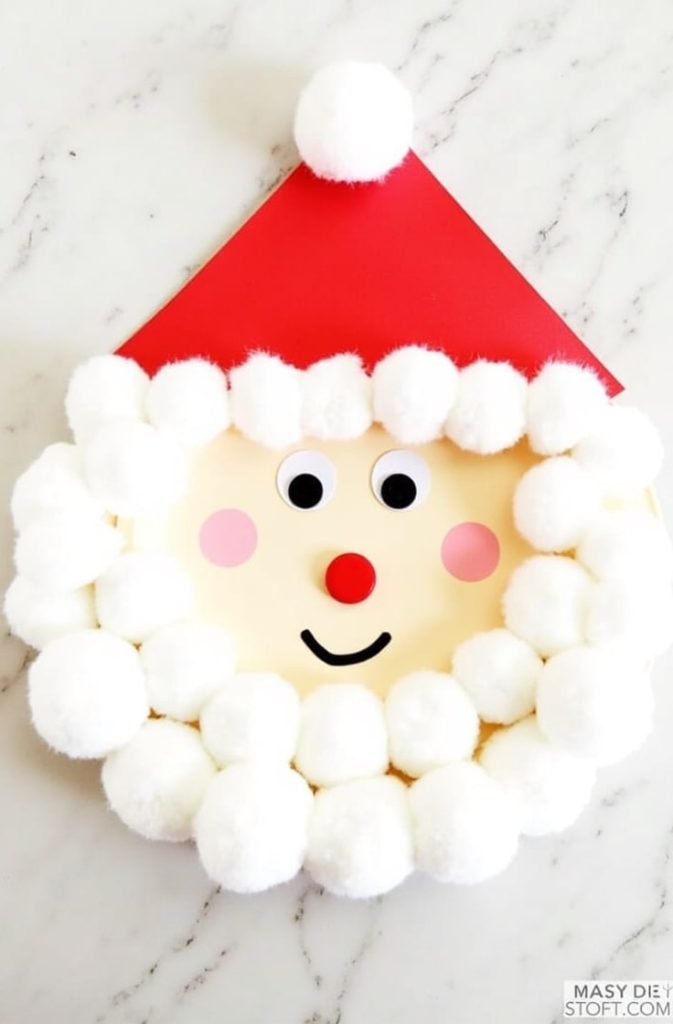
This Santa craft for kids is a timeless favorite that’s simple, festive, and great for little hands. Kids get to glue, cut, and create their very own Santa face with fluffy cotton beards. It’s an excellent project for developing fine motor skills and following directions.
What You’ll Need:
- 1 paper plate
- Red construction paper
- Cotton balls
- Googly eyes
- Glue stick or school glue
- Black marker
- Scissors
- Pink crayon (for rosy cheeks)
Step-by-Step Guide:
- Prepare Santa’s Hat: Cut a large triangle from red paper for Santa’s hat. Make sure it’s wide enough to cover the top edge of the plate.
- Assemble the Hat: Glue the red triangle to the top of the plate.
- Add the Fluffy Trim: Line the bottom of the hat with cotton balls to make the white trim. Add one more cotton ball at the tip for a pom-pom.
- Create Santa’s Face: Glue the googly eyes below the hat. Draw a small oval for the nose and a big smile using a black marker.
- Make the Beard: Cover the bottom half of the plate with cotton balls. Kids can layer them to make it extra fluffy!
- Add Finishing Touches: Use a pink crayon to add rosy cheeks. Optional: Sprinkle some glitter for a snowy effect.
Pro Tip: If you want this craft to last, laminate the finished Santa face or back it with cardstock for extra durability.
2. Reindeer Handprint Ornaments – Personalized Christmas Crafts for Children
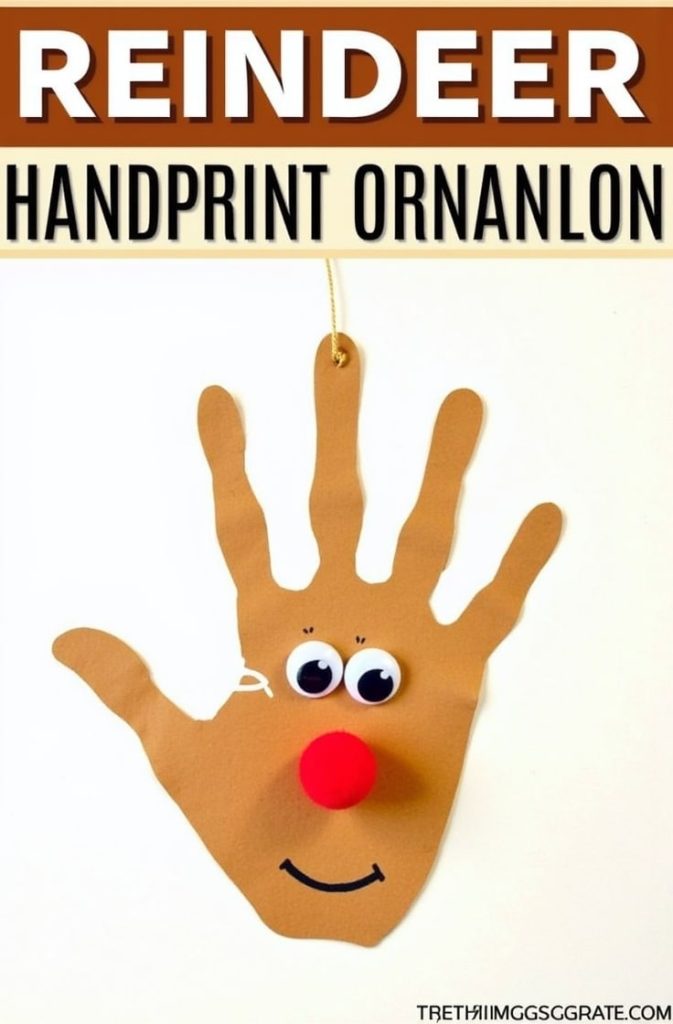
This craft doubles as a keepsake that captures your child’s handprint forever. These reindeer crafts for kids are adorable and make heartfelt gifts for grandparents.
What You’ll Need:
- Brown cardstock or foam sheet
- Red pom-poms
- Googly eyes
- Ribbon or twine
- Glue
- Scissors
- Pencil
- Hole punch (optional)
Step-by-Step Guide:
- Trace and Cut: Have your child trace their hand onto brown cardstock. Cut it out carefully—this forms the reindeer’s antlers.
- Create the Face: Cut an oval or circle from the same paper for the reindeer’s face and glue the handprints behind it like antlers.
- Add Rudolph’s Features: Glue googly eyes and a red pom-pom for the nose. Use a marker to draw a friendly smile.
- Attach a String: Punch a hole at the top and thread ribbon or twine through it for hanging.
- Personalize: Write your child’s name and the year on the back to turn it into a memory ornament.
Variation: Make a whole reindeer family by tracing each family member’s handprint in different sizes.
3. Snowman Popsicle Stick Craft – Winter Craft for Kids
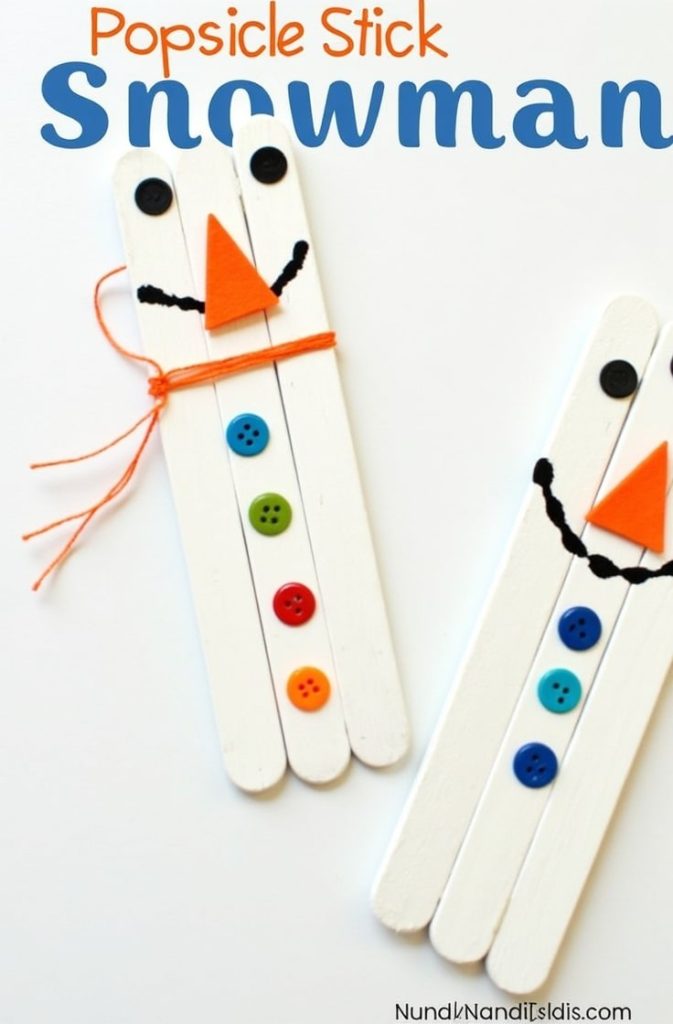
A snowman craft never goes out of style. This simple winter craft for kids uses popsicle sticks and imagination to create adorable snowmen that can decorate your tree, fridge, or windowsill.
What You’ll Need:
- 3–4 popsicle sticks
- White paint and paintbrush
- Black marker
- Orange paper or felt
- Buttons, sequins, or beads
- Glue
- Small piece of fabric or ribbon (for scarf)
Step-by-Step Guide:
- Paint and Prepare: Paint the popsicle sticks white and allow them to dry completely.
- Build the Body: Glue 3 sticks side-by-side for the body and use an extra stick across the back to secure them.
- Create the Face: Cut a small orange triangle for the carrot nose and glue it in place. Use a black marker to draw eyes and a smile.
- Add Details: Glue buttons or sequins down the middle for decoration.
- Make a Scarf: Wrap a strip of fabric or ribbon around the neck area and glue it down.
- Hang or Display: Attach a loop of string on the back to hang it up.
Extra Idea: Add a mini top hat using black paper or felt to make your snowman even cuter!
4. Paper Christmas Tree Garland – DIY Holiday Decorations Kids Can Make
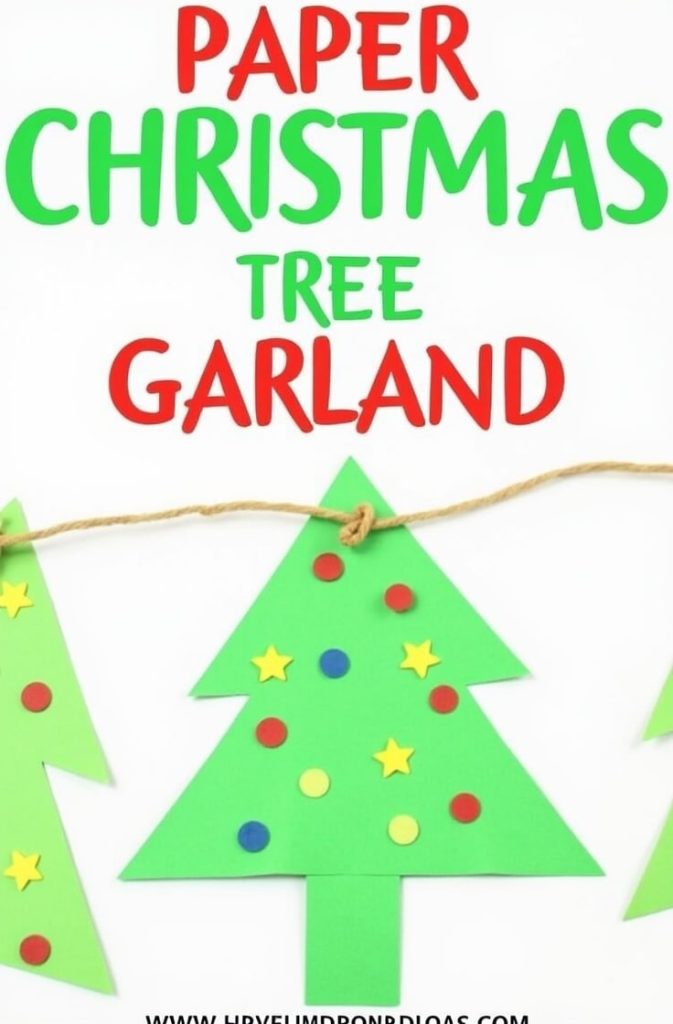
This colorful paper Christmas craft for kids brightens up any wall or window. It’s a fantastic group project that encourages teamwork and creativity.
What You’ll Need:
- Green construction paper
- Colored paper scraps or glitter foam sheets
- Glue stick
- Scissors
- Hole punch
- String, twine, or ribbon
Step-by-Step Guide:
- Cut Out Trees: Draw a simple Christmas tree shape on green paper and cut out multiple copies. Each child can make several.
- Decorate Trees: Use paper scraps, glitter, or foam pieces to make ornaments. Kids can also draw on decorations with markers.
- Punch and Thread: Punch a hole at the top of each tree and thread them onto a long piece of string.
- Arrange: Space them evenly and secure with a dab of glue if needed.
- Display: Hang across a doorway, window, or mantle.
Tip: Mix in stars or bells between the trees for a more festive garland.
5. Salt Dough Ornaments – Classic Handmade Christmas Gifts Kids Can Make
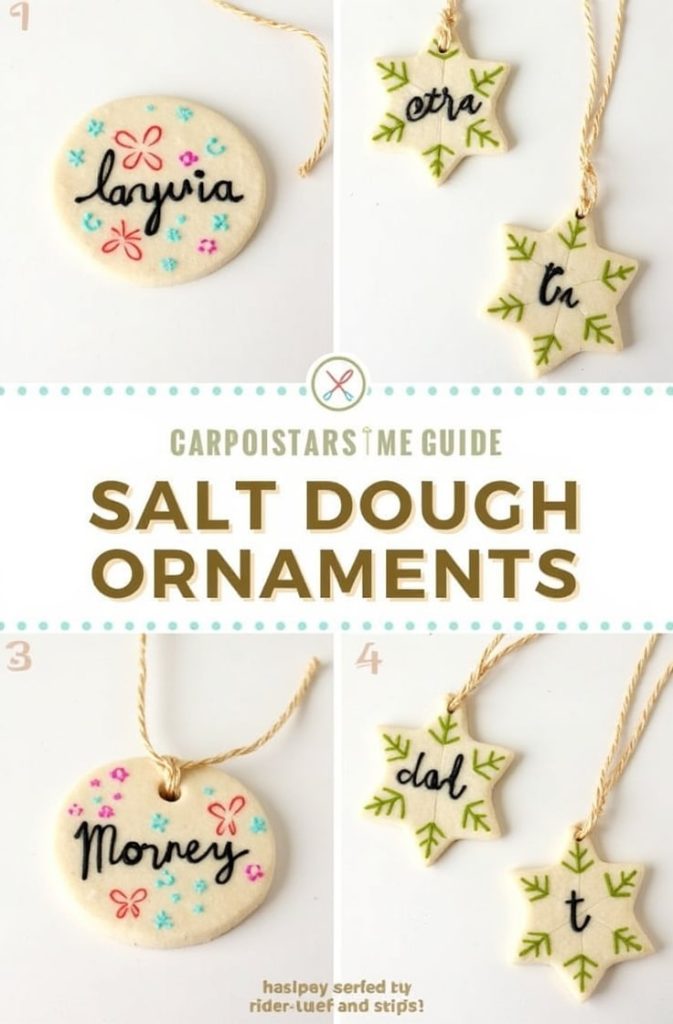
Salt dough ornaments are timeless. These DIY Christmas ornaments kids can make can last for years and are perfect for personalizing with names, paint, or glitter.
What You’ll Need:
- 2 cups flour
- 1 cup salt
- 1 cup water
- Rolling pin
- Cookie cutters (stars, trees, snowflakes)
- Straw (for holes)
- Paints and brushes
- Ribbon or twine
Step-by-Step Guide:
- Make the Dough: Combine flour, salt, and water in a large bowl. Mix until a dough forms.
- Knead and Roll: Sprinkle flour on your work surface and roll the dough out to about 1/4 inch thickness.
- Cut Shapes: Use cookie cutters to create festive shapes.
- Make Hanging Holes: Use a straw to poke a hole at the top of each ornament.
- Bake: Place on a lined baking tray and bake at 200°F (90°C) for 2–3 hours or until hard.
- Cool and Paint: Let the ornaments cool completely, then paint and decorate.
- Thread Ribbon: Once dry, add ribbon or twine through the hole for hanging.
Variation: Mix glitter into the dough before baking for sparkling results.
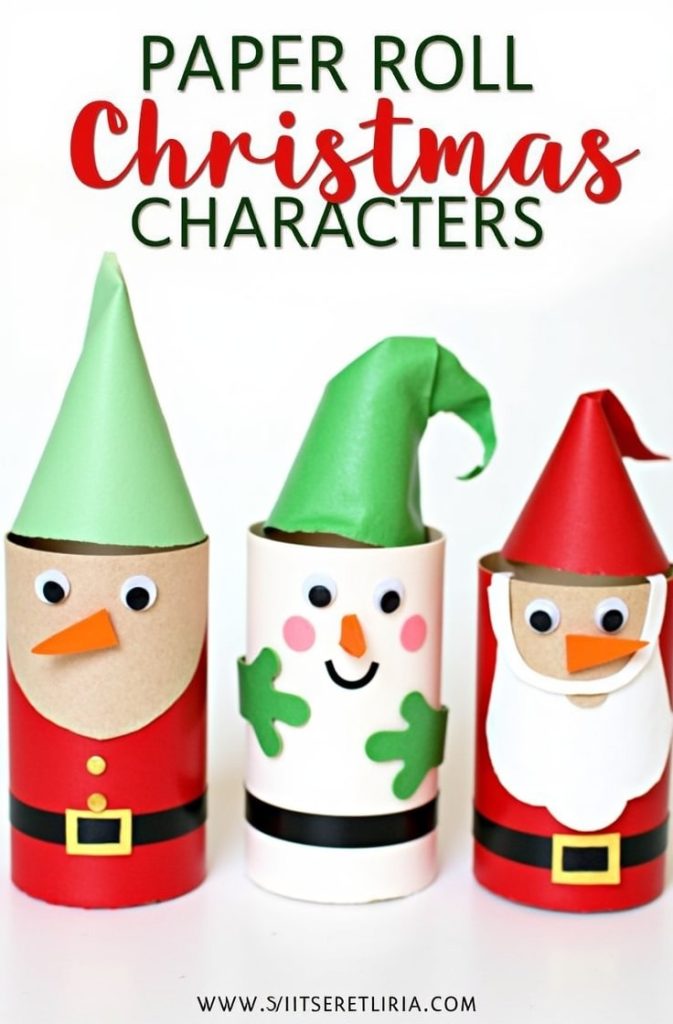
6. Paper Roll Christmas Characters – Fun and Recycled Christmas Crafts for Kids

Get creative and eco-friendly with this recycled Christmas craft for kids. Turn toilet paper rolls into Santa, elves, snowmen, or even penguins. The possibilities are endless!
What You’ll Need:
- Empty toilet paper rolls
- Colored paper (red, green, white, black)
- Scissors
- Glue stick
- Markers
- Cotton balls or felt (optional)
- Buttons or small decorations
Step-by-Step Guide:
- Wrap the Roll: Cover each toilet paper roll with colored paper to create the base (red for Santa, green for elves, white for snowmen).
- Add Details: Cut out small shapes for faces, hats, belts, or scarves.
- Glue and Decorate: Glue on facial features, draw smiles, and add cotton for Santa’s beard or felt for scarves.
- Add Accessories: Use buttons, glitter, or stickers to make each character unique.
- Display: Arrange them as a Christmas village or line them up on a shelf.
Eco Tip: Use recycled paper scraps or leftover wrapping paper for decoration.
7. DIY Christmas Cards – Heartfelt Holiday Craft Projects for Children
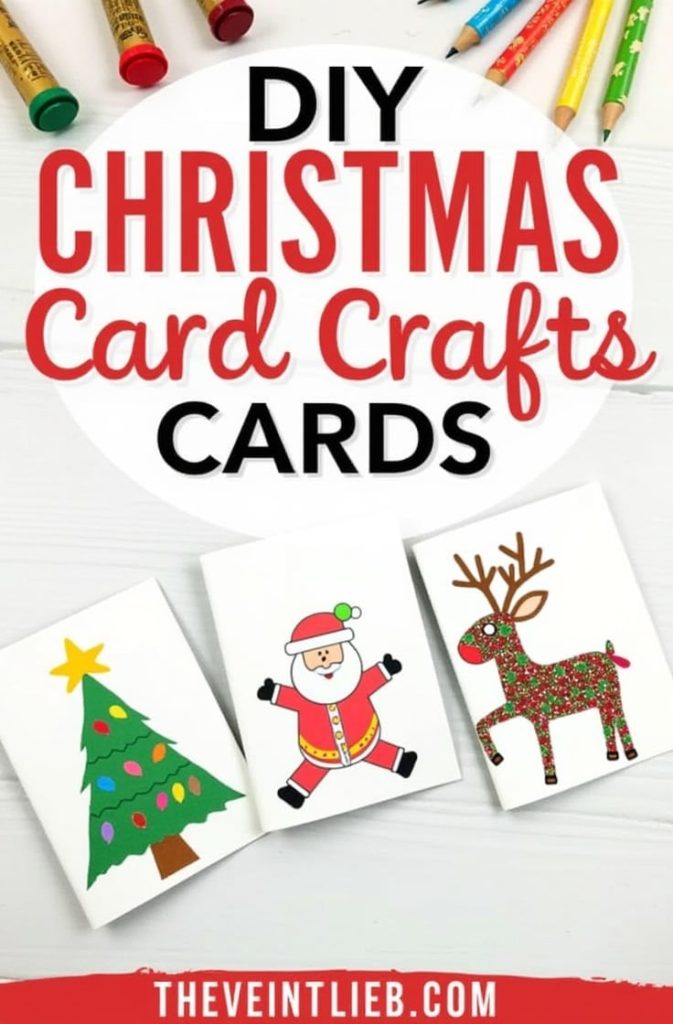
Homemade cards never go out of style. These Christmas card crafts for kids are perfect for spreading love and cheer during the holidays.
What You’ll Need:
- Blank cardstock or folded construction paper
- Markers, colored pencils, or crayons
- Glue
- Scissors
- Stickers, glitter, or ribbon
- Envelopes
Step-by-Step Guide:
- Fold the Card: Take a sheet of cardstock and fold it in half to make your base.
- Plan the Design: Lightly sketch a tree, Santa, or reindeer design on the front.
- Decorate: Color it in, add stickers or glitter, and glue on ribbons or bows.
- Write a Message: Inside, write a short greeting like “Merry Christmas” or “Wishing You Joy and Peace.”
- Personalize: Have your child sign their name and draw a small doodle or date the card.
- Send or Gift: Hand-deliver or mail them to family and friends.
Bonus Idea: Turn fingerprints into Christmas lights or reindeer faces for an extra personal touch.
Final Thoughts: Making Memories Through Crafts
Crafting during Christmas isn’t just about creating decorations—it’s about making memories. Each ornament, card, or garland tells a story of joy, laughter, and love. With these 7 Christmas craft ideas for kids, your home will be filled with warmth, creativity, and the unmistakable spirit of the holidays.
So grab your scissors, glue, and imagination. Let’s turn simple supplies into cherished memories that will last long after the holidays are over.

Jenny is a passionate writer specializing in home decor, design, and styling. With years of experience in transforming spaces, she shares expert tips on creating beautiful, functional homes. From interior design trends to DIY decor ideas, Jenny’s work helps homeowners craft spaces that reflect their unique style. Whether it’s a cozy living room, a modern kitchen, or a serene bedroom, her articles offer practical advice and inspiration to elevate any home.