Let’s be honest — the best 4th of July moments aren’t the ones you planned perfectly. They’re the ones where your little one holds up something they made and beams with pride. These 7 crafts are designed for exactly that.
Each one is simple enough for toddlers and preschoolers to do mostly on their own, uses supplies you can grab at the dollar store or Amazon, and won’t turn your kitchen into a disaster zone.
No complicated steps, no toxic materials, no meltdowns (fingers crossed!). Just festive, fun, and totally doable. Before you dive in, here’s a quick shopping list to make sure you’re all set:
Table of Contents
🛒 Grab These Before You Start
- Crayola Washable Dot Markers 24-Pack — These chunky, toddler-grip markers make perfect patriotic dots and stars with zero mess and easy washability for little hands.
- Melissa & Doug Jumbo Triangular Crayons (Patriotic Colors Set) — Their thick triangular shape is designed so tiny hands can grip, color, and create without frustration or rolling off the table.
- Colorations Simply Washable Tempera Paint (Red, White & Blue Set) — This non-toxic, super-washable tempera paint is the gold standard for toddler art because it rinses clean off skin, clothes, and most surfaces.
- Creativity Street White Paper Plates Jumbo Pack (50 count) — Sturdy, oversized plates that serve as the perfect canvas or base for at least four of the crafts on this list.
- Avery Removable Star Stickers Sheet Pack (Red, White & Blue) — Peel-and-stick patriotic stars that even 2-year-olds can place independently, making any craft instantly festive without glue or mess.
7 Easy 4th Of July Crafts for Kids
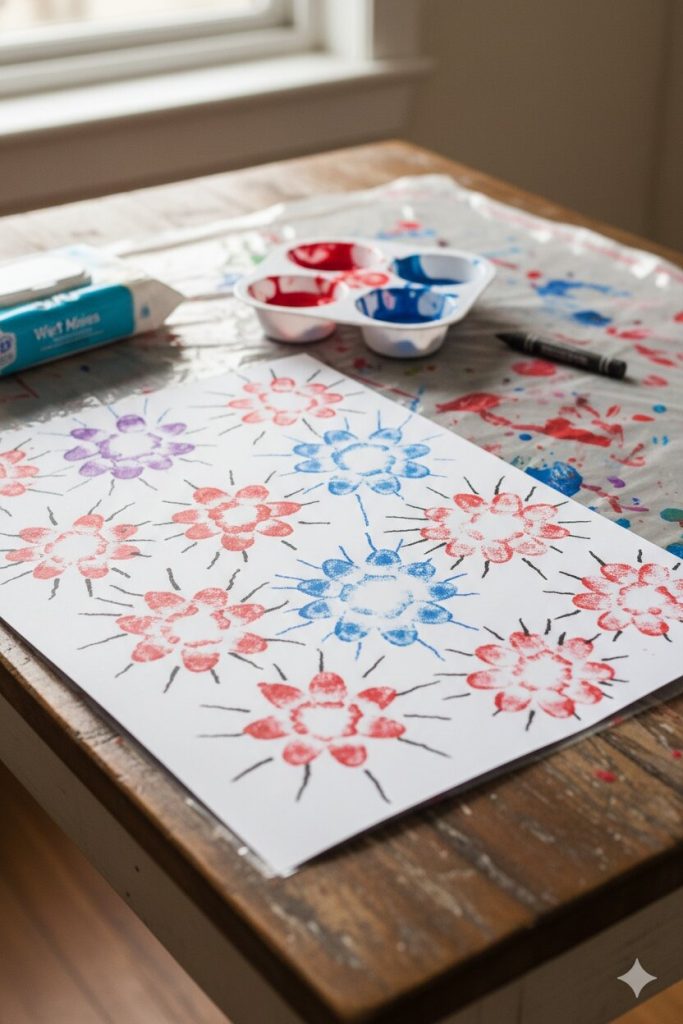
Fingerprint Firecracker Art 🎇
Best for: Ages 2 and up
Time needed: 10 minutes
Adult help needed: Just squeeze out the paint and set up the paper!
Supplies:
- White cardstock or thick paper
- Red and blue washable tempera paint
- Wet wipes
- Black crayon or marker (for grown-up use)
Kid-Friendly Step-by-Step Instructions:
- Look at all that red and blue paint — let’s make fireworks with your fingers!
- Dip one finger into the red paint and press it onto the paper like a little dot.
- Now lift your finger and press again in a circle shape — keep going all the way around!
- Wipe your finger clean and dip it in the blue paint now.
- Make another circle of dots right next to your red one.
- Keep going until your whole page is full of beautiful fingerprint fireworks!
What the Grown-Up Does: Draw small burst lines radiating out from each fingerprint circle with a black marker after the paint dries to make them look like real exploding fireworks.
Pro Tip: Put a small amount of paint in a muffin tin so kids can switch colors easily without knocking over bottles — and lay down a plastic tablecloth first for stress-free cleanup.
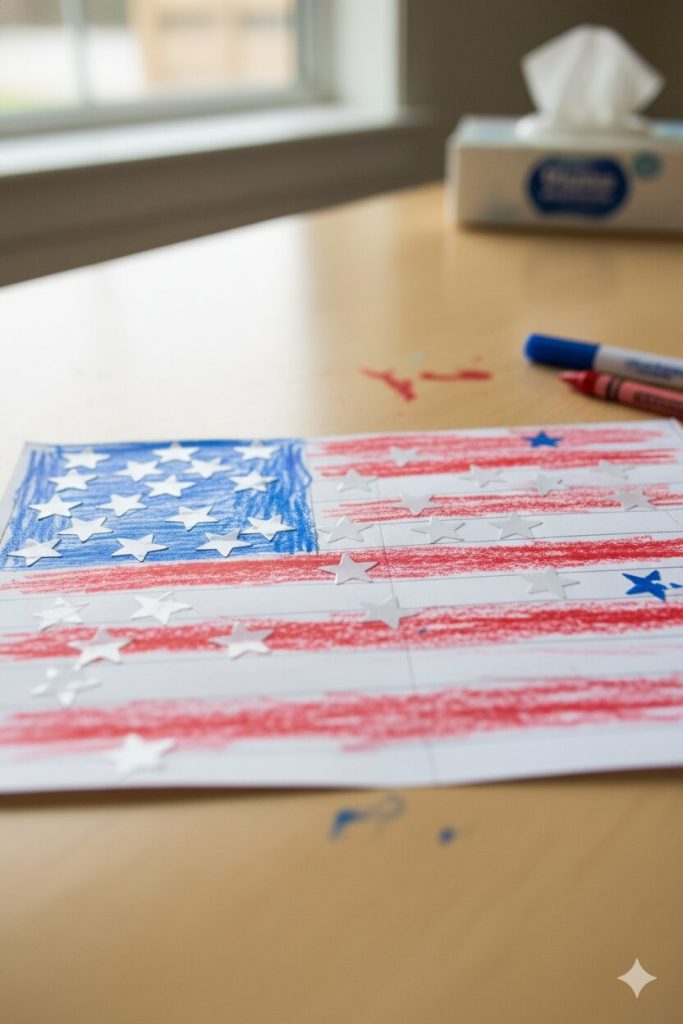
Patriotic Star Sticker Flag 🎇
Best for: Ages 2 and up
Time needed: 10 minutes
Adult help needed: Minimal — just draw the flag outline first!
Supplies:
- White cardstock
- Red washable marker or crayon
- Red, white, and blue star stickers
- Blue dot marker or crayon
⭐ This one doubles as a party decoration — tape it to the wall or front door!
Kid-Friendly Step-by-Step Instructions:
- See those lines on the paper? Let’s color every other stripe red!
- Grab your red crayon and color inside the stripes — stay in the lines if you can, but it’s okay if you don’t!
- Now find the blue corner box and color it in with your blue marker.
- Peel a white star sticker and press it right in the middle of the blue box.
- Keep adding stars until the blue box is full of them — how many can you fit?
- Hold up your flag — you made it! 🇺🇸
What the Grown-Up Does: Pre-draw the flag outline with pencil — 13 stripes and a rectangle in the top left corner — before handing it to your child.
Pro Tip: This is genuinely mess-free, making it the perfect craft for the car, a restaurant, or anywhere you need a quiet activity while waiting for the fireworks to start.
Paper Plate Firework Spinner 🎇

Best for: Ages 2 and up
Time needed: 12 minutes
Adult help needed: Punch the hole and tie the string!
Supplies:
- White paper plate
- Red and blue dot markers or crayons
- Hole punch
- 12 inches of red or blue ribbon
- Star stickers
⭐ This one doubles as a party decoration — hang it from the porch or a tree!
Kid-Friendly Step-by-Step Instructions:
- Grab your dot marker and make big red dots all around the edge of your plate — boom, boom, boom!
- Now switch to blue and fill in the middle with blue dots.
- Press some star stickers anywhere you like — this is YOUR firework!
- Flip your plate over and stick more stars on the back too.
- When your grown-up puts the ribbon through the hole, hold it up and spin it around!
- Watch your firework spin — doesn’t it look amazing?
What the Grown-Up Does: Use a hole punch to make a hole at the top of the finished plate, then thread and tie the ribbon through so it’s ready to hang or spin.
Pro Tip: Make a bunch of these ahead of a party and hang them at different heights from a tree branch outside — free patriotic decorations your kids made themselves!
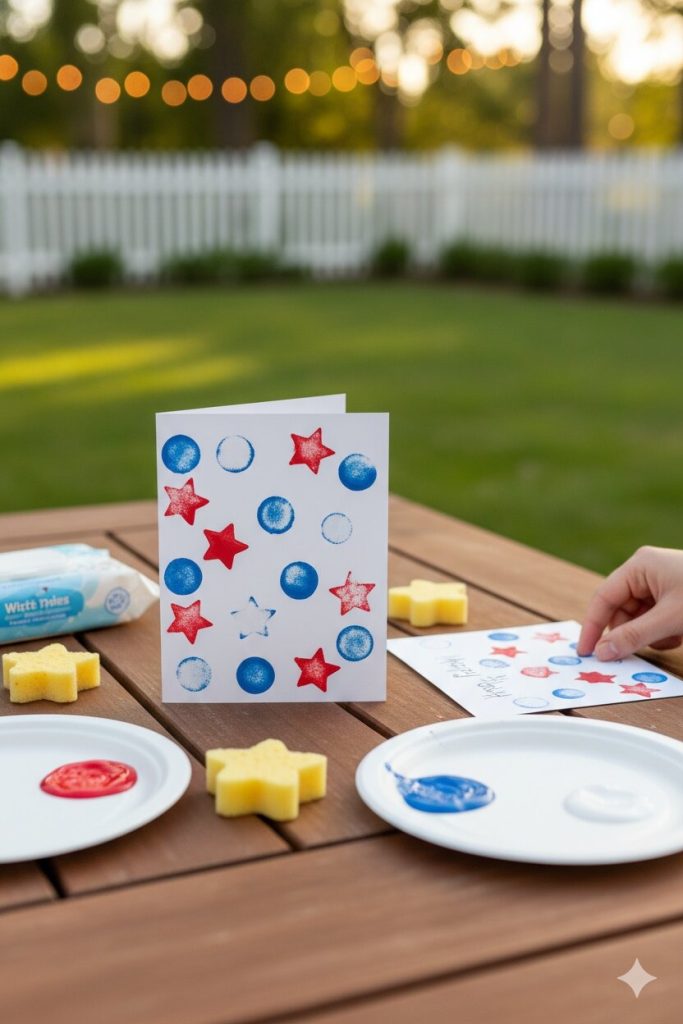
Red, White & Blue Sponge Stamp Card 🎇
Best for: Ages 3 and up
Time needed: 12 minutes
Adult help needed: Cut the sponges into shapes beforehand!
Supplies:
- White cardstock folded in half (like a card)
- Kitchen sponges cut into star and circle shapes
- Red, white, and blue washable tempera paint
- Small paper plates (for paint palettes)
- Wet wipes
Kid-Friendly Step-by-Step Instructions:
- Pick up the star sponge and dip the flat side into the red paint — just a little dip!
- Now press it onto your card firmly and lift it straight up — look, a star!
- Try the circle sponge in blue paint next and stamp it right next to your star.
- Keep stamping all over your card with different shapes and colors.
- Let the white spaces show through — that’s the white in red, white, and blue!
- When it’s dry, write “Happy 4th!” inside and give it to someone you love.
What the Grown-Up Does: Cut kitchen sponges into star and circle shapes using scissors before craft time, and pour small amounts of each paint color onto separate paper plates.
Pro Tip: This is a wonderful craft for older siblings too — they can write messages inside and turn it into a card for grandparents, making everyone feel included.
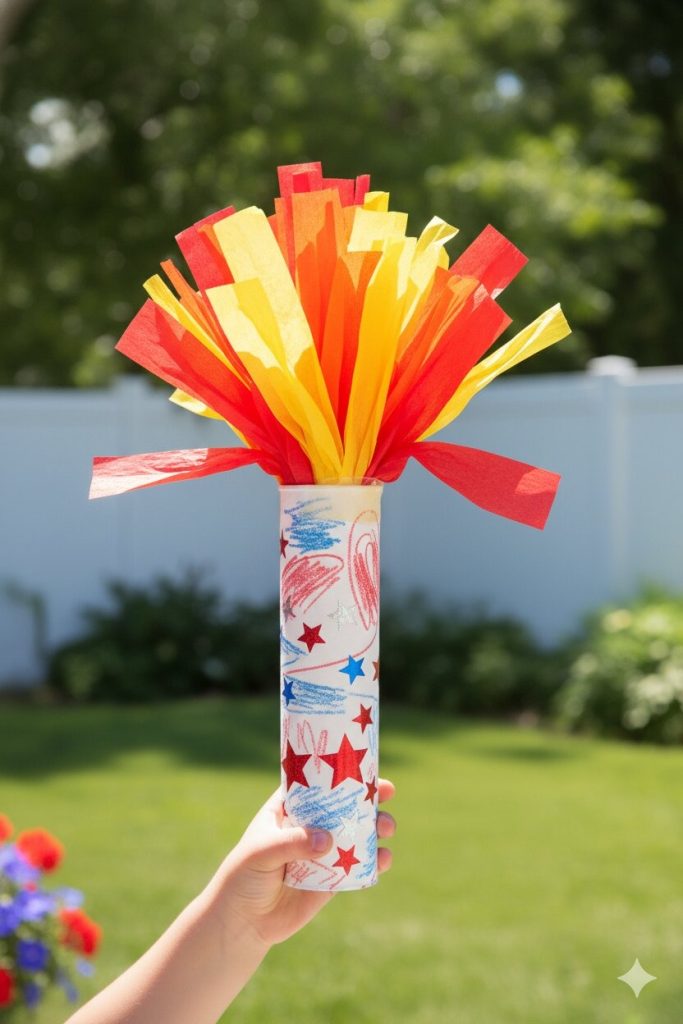
Tissue Paper Torch 🎇
Best for: Ages 3 and up
Time needed: 15 minutes
Adult help needed: Help roll the paper towel tube and secure the base!
Supplies:
- Empty paper towel tube
- Red, orange, and yellow tissue paper strips
- Red, white, and blue star stickers
- Clear tape
- Crayons or dot markers
Kid-Friendly Step-by-Step Instructions:
- Decorate your paper towel tube with star stickers — press them on all around!
- Now grab some red and blue crayons and add your own designs anywhere you like.
- Take a big handful of tissue paper strips — red, orange, and yellow ones.
- Stuff them into the top of your tube so they stick out like a big flame!
- Fluff the tissue paper out with your fingers so it looks like it’s flickering.
- Hold your torch up high — you look just like the Statue of Liberty!
What the Grown-Up Does: Secure the tissue paper inside the tube with a small piece of tape so it doesn’t fall out when kids wave it around enthusiastically (and they will!).
Pro Tip: Make this one the day before your 4th of July celebration so kids can carry their torches in a mini backyard parade — pair it with the ribbon wand craft for extra festive flair.
Dot Marker Fireworks Placemat 🎇
Best for: Ages 5 and up
Time needed: 15 minutes
Adult help needed: Laminate or cover with contact paper when done!
Supplies:
- White cardstock (legal size works great)
- Red, white, and blue washable dot markers
- Black crayon
- Clear contact paper or laminator (grown-up step)
⭐ This one doubles as a party decoration — use it as a placemat at your 4th of July table!
Kid-Friendly Step-by-Step Instructions:
- Draw some big X shapes or plus signs on your paper with your black crayon — those are your firework bursts!
- Now take your red dot marker and make dots at the end of every line of your X.
- Switch to blue and add more dots in between the red ones.
- Make as many fireworks as you want — big ones, small ones, fill the whole page!
- Add white dots in the middle of each burst to make it sparkle.
- Show a grown-up when you’re done so they can make it into a real placemat for the party!
What the Grown-Up Does: Once the marker is fully dry, cover both sides of the placemat with clear contact paper or run it through a laminator to make it waterproof and reusable.
Pro Tip: Write each family member’s name on their own placemat before laminating — kids love having their own special spot at the table and it doubles as a keepsake.
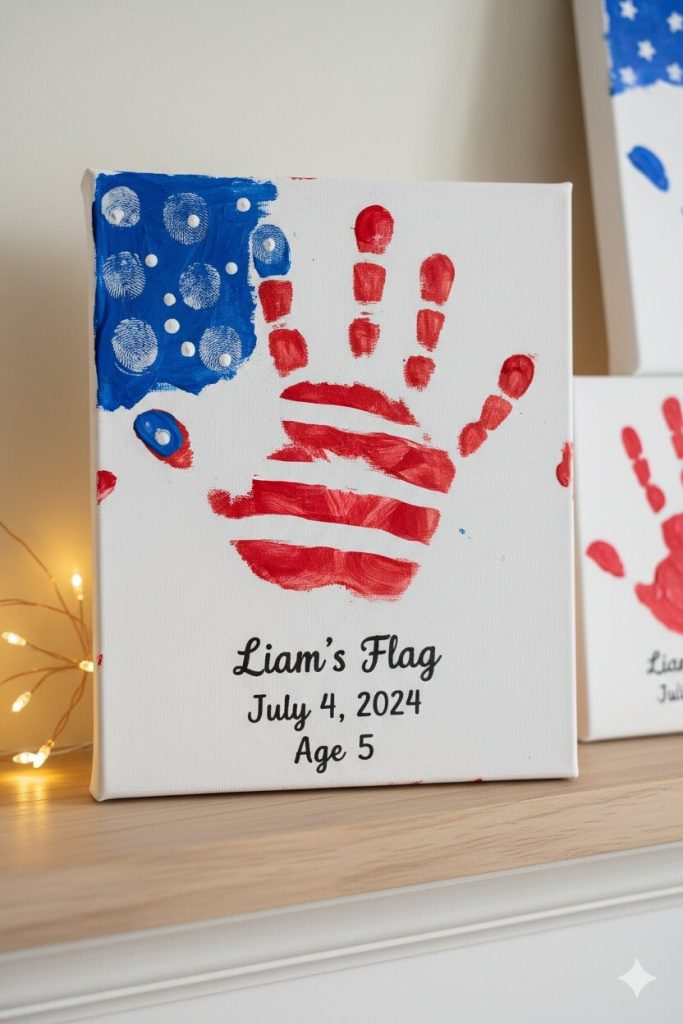
Handprint Flag Keepsake 🎇
Best for: Ages 5 and up
Time needed: 15 minutes (plus drying time)
Adult help needed: Paint your child’s hand and guide the placement!
Supplies:
- White canvas board (5×7 or larger)
- Red and blue washable tempera paint
- Paintbrush
- Wet wipes
- Black fine-tip marker (for grown-up use)
- Date stamp or pen
Kid-Friendly Step-by-Step Instructions:
- Hold your hand out flat and let your grown-up paint your fingers red — try not to wiggle!
- Now press your whole hand firmly down on the canvas and hold it still for three seconds.
- Lift your hand straight up — wow, look at that handprint!
- Wipe your hand clean and let your grown-up paint just your palm blue this time.
- Press your hand in the top left corner of your handprint to make the blue flag section.
- Now wash your hands while it dries — you just made something really special!
What the Grown-Up Does: After everything dries, use a fine-tip black marker to add the date, your child’s name, and their age — this one is a keepsake you’ll treasure for years.
Pro Tip: Do this craft every year on the 4th of July and watch the handprints grow — by the time they’re 10, you’ll have the most precious collection of memories on your shelf.
Final Thoughts
You just set your little one up for a 4th of July they’ll talk about for weeks — and honestly, that’s no small thing. The best part about crafts like these isn’t the finished product (though they really do turn out adorable).
It’s that moment when your child looks at what their hands made and feels genuinely proud. Whether you do all seven or just pick one on a whim with supplies you already have, you’re creating the kind of memory that sticks. Happy 4th of July, mama — you’re doing an amazing job.

Jenny is a passionate writer specializing in home decor, design, and styling. With years of experience in transforming spaces, she shares expert tips on creating beautiful, functional homes. From interior design trends to DIY decor ideas, Jenny’s work helps homeowners craft spaces that reflect their unique style. Whether it’s a cozy living room, a modern kitchen, or a serene bedroom, her articles offer practical advice and inspiration to elevate any home.