There’s something truly magical about the preschool years — your little one can finally follow steps, squeeze a glue stick, and create something they’re bursting to show off.
Whether you’re a mom looking for a festive holiday activity or a Pre-K teacher planning your classroom’s Independence Day week, these 7 crafts were made for you.
Every project is preschool-friendly, packed with fine motor skill practice, and includes a touch of patriotic learning your kids will actually absorb.
Several work beautifully as classroom display pieces, and printable templates are noted wherever they’ll save you time. Before you dive in, here’s your supply list:
Table of Contents
🛒 Grab These Before You Start
- Fiskars 5-Inch Blunt-Tip Kids Scissors (12-Pack) — These spring-action scissors are specifically engineered for preschool hand strength, making cutting practice frustration-free and classroom-ready with a full class set in one pack.
- Elmer’s Washable School Glue Sticks (30-Pack) — A bulk pack of non-toxic, washable glue sticks means every child at the table has their own without sharing delays, and dried glue peels cleanly off desks and fingers.
- Crayola Washable Kids Paint (10-Color Set) — This classroom-staple paint set is fully washable from skin, fabric, and most surfaces, giving preschoolers the creative freedom to paint boldly without stressing the adults nearby.
- Colorations Jumbo Triangular Crayons (Patriotic Colors, 36-Pack) — The extra-wide triangular barrel is perfectly sized for developing preschool grips, encouraging the correct three-finger hold that supports early writing skills.
- Hygloss Products White Paper Lunch Bags (50-Pack) — These sturdy flat-bottomed bags serve as the base for puppet and lantern crafts, are easy for preschoolers to decorate independently, and cost pennies per child for classroom use.
7 Fun 4th of July Crafts for Preschoolers (Easy & Cute!)
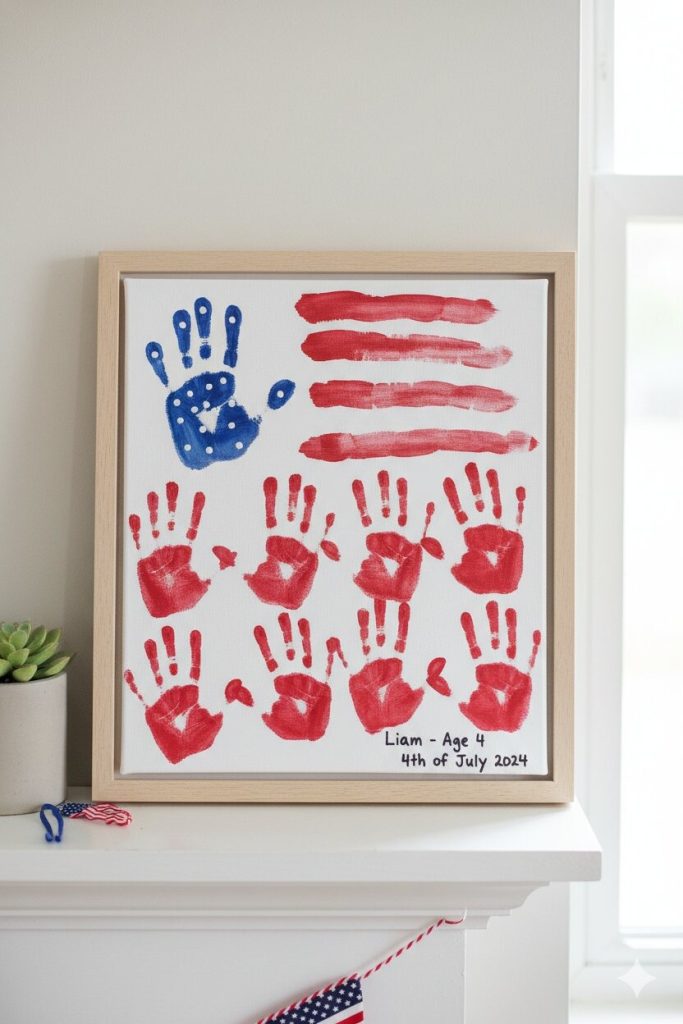
Handprint American Flag Canvas 🎇
Best for: Ages 3–5
Time needed: 15 minutes
Works for: Both
Fine motor skill practiced: Palm pressing, finger isolation, brush control
Mess level: 🟡 Low-Mess
Keepsake? Yes — frame this one!
Supplies:
- White canvas board (5×7 or 8×10 inches)
- Red, white, and blue washable kids paint
- Foam brush
- Wet wipes
- Fine-tip permanent marker (adult use after drying)
Step-by-Step Instructions:
- Talk with your child about the American flag — how many stripes does it have? What do the colors mean? This two-minute conversation turns a craft into a genuine learning moment before a single paintbrush is lifted.
- Help your child paint their entire hand red using a foam brush, then guide them to press it firmly across the lower portion of the canvas in a row — lift straight up and repeat to build the red stripes.
- Wipe their hand clean, then paint just their palm blue and press it into the top left corner to form the flag’s union — preschoolers aged 4–5 can often do this step independently with just a little coaching.
- Once dry, let your child dip a fingertip in white paint and press small dots into the blue section to represent stars — encourage them to count as they go.
- When everything is fully dry, use a permanent marker to add their name, age, and the date — “4th of July, Age 4” written in small letters on the back makes this a forever keepsake.
What Kids Learn: This craft introduces the symbolism of the American flag’s colors and stars while practicing color recognition, counting, and intentional hand placement.
Classroom Tip: Pre-cut a production line — set up three paint stations (red, blue, white) and rotate children through in groups of three so no one waits more than two minutes for their turn.
Pro Tip: For 3-year-olds, skip counting the stars and just let them dot freely — the result is just as beautiful, and the independence is more important than the accuracy at this age.
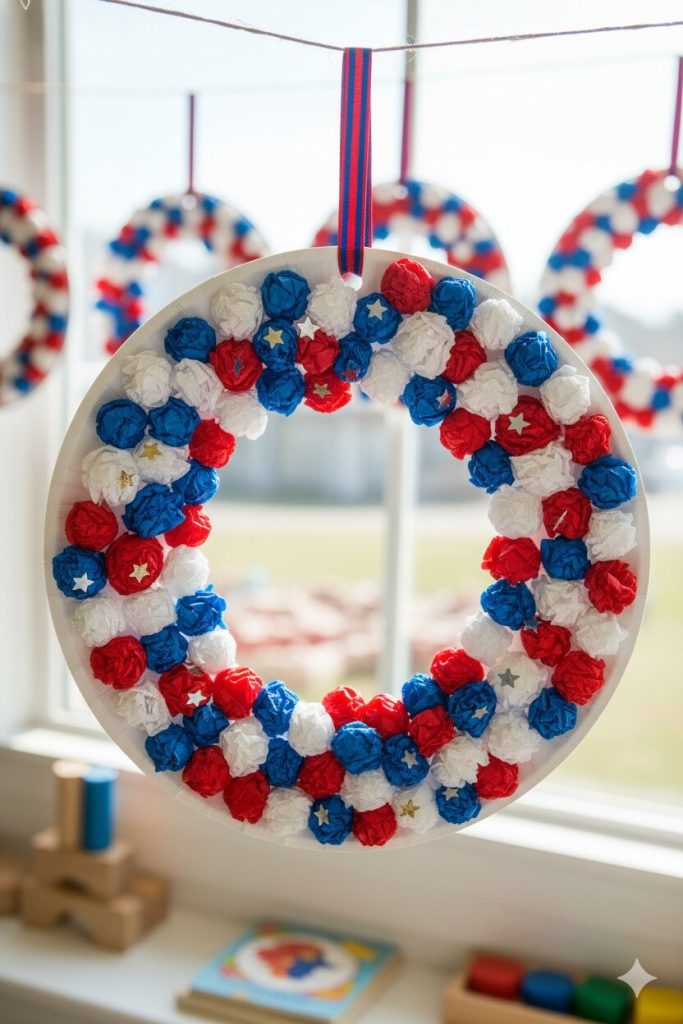
Patriotic Paper Plate Wreath
Best for: Ages 4–5
Time needed: 20 minutes
Works for: Both
Fine motor skill practiced: Cutting, tearing, gluing, pinching
Mess level: 🟡 Low-Mess
Keepsake? Great classroom display!
Supplies:
- White paper plate (1 per child)
- Red, white, and blue tissue paper torn into small squares
- Washable glue stick or liquid glue in a small cup
- Child-safe scissors
- Red and blue ribbon (6 inches for hanging)
- Star stickers
Step-by-Step Instructions:
- Help each child cut or tear the center out of their paper plate to create a wreath ring — for 3-year-olds, pre-cut the center yourself; for 4–5-year-olds, let them cut along a pencil-drawn circle with their Fiskars scissors.
- Show children how to scrunch a small square of tissue paper between their fingers into a little ball — this pinching and squeezing motion is wonderful for hand strength and will keep them busy and delighted.
- Let children glue their tissue paper balls all around the wreath ring in any red, white, and blue pattern they choose — there is no wrong arrangement, and this is where creative pride really kicks in.
- Press star stickers onto the wreath between the tissue paper clusters, encouraging children to space them out and press each one firmly to make it stick.
- Help each child thread a short loop of ribbon through the top of the plate and tie it for hanging — even this small threading step is excellent fine motor practice for preschool hands.
What Kids Learn: Tearing, scrunching, and gluing different materials in sequence builds hand strength and bilateral coordination, while choosing a red-white-blue pattern practices color sequencing.
Classroom Tip: Pre-tear all tissue paper into squares the night before and sort into three bowls per table — this one prep step cuts hands-on time by five minutes and keeps the activity moving smoothly for a full class.
Pro Tip: Hang finished wreaths in a row along a classroom window or string them on a length of twine across the front of your house — the display effect of 15 little wreaths together is genuinely stunning.
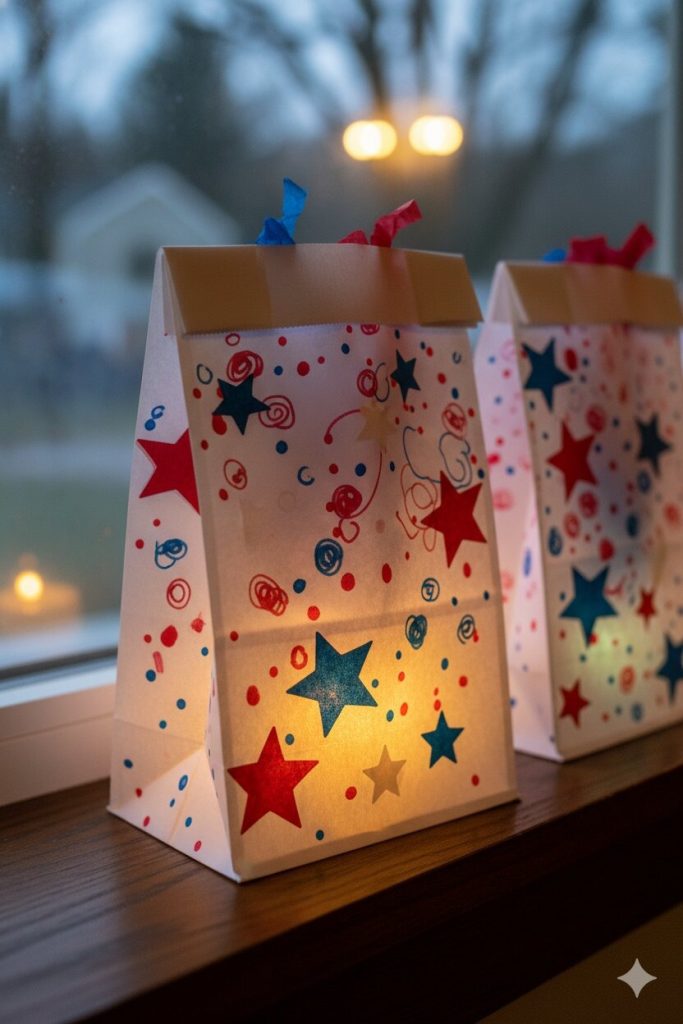
Star-Spangled Paper Bag Lantern
Best for: Ages 3–4
Time needed: 15 minutes
Works for: Both
Fine motor skill practiced: Folding, gluing, sticker placement
Mess level: 🟢 Mess-Free
Keepsake? Not a keepsake
Supplies:
- White paper lunch bags (1 per child)
- Red and blue washable dot markers or crayons
- Large star stickers in red, white, and blue
- Battery-operated tea light (1 per child)
- Optional: tissue paper scraps for stuffing color
Step-by-Step Instructions:
- Give each child a white paper lunch bag and invite them to decorate the outside freely using red and blue dot markers or crayons — stripes, dots, swirls, and scribbles all look wonderfully festive.
- Let children press large star stickers all over their bag in any arrangement they like — hand them one at a time and encourage pressing each star firmly with their whole palm.
- Once decorated, help each child fold the top edge of the bag down about one inch and crease it firmly with their fingers — this folding step adds structure to the bag and gives little hands a satisfying task.
- Open the bag gently and place a battery-operated tea light inside, then set the finished lantern on a flat surface and switch it on together — the glow through the paper is genuinely magical and preschoolers absolutely love this moment.
- If using in a classroom display, line finished lanterns along a windowsill or bookshelf for a warm, festive Independence Day glow that parents will love at pickup time.
What Kids Learn: This craft builds the concept of cause and effect — decorating the outside changes what the light looks like on the inside — while practicing intentional mark-making and folding.
Classroom Tip: Purchase battery tea lights in bulk packs of 50 on Amazon for under $15 — they’re reusable, safe for preschoolers to handle, and create a genuinely beautiful classroom display without any fire risk.
Pro Tip: For an extra sensory element at home, let your 3-year-old crumple and stuff red and blue tissue paper loosely inside the bag before placing the tea light — the added color makes the glow even more vibrant and gives little hands something wonderfully tactile to do.
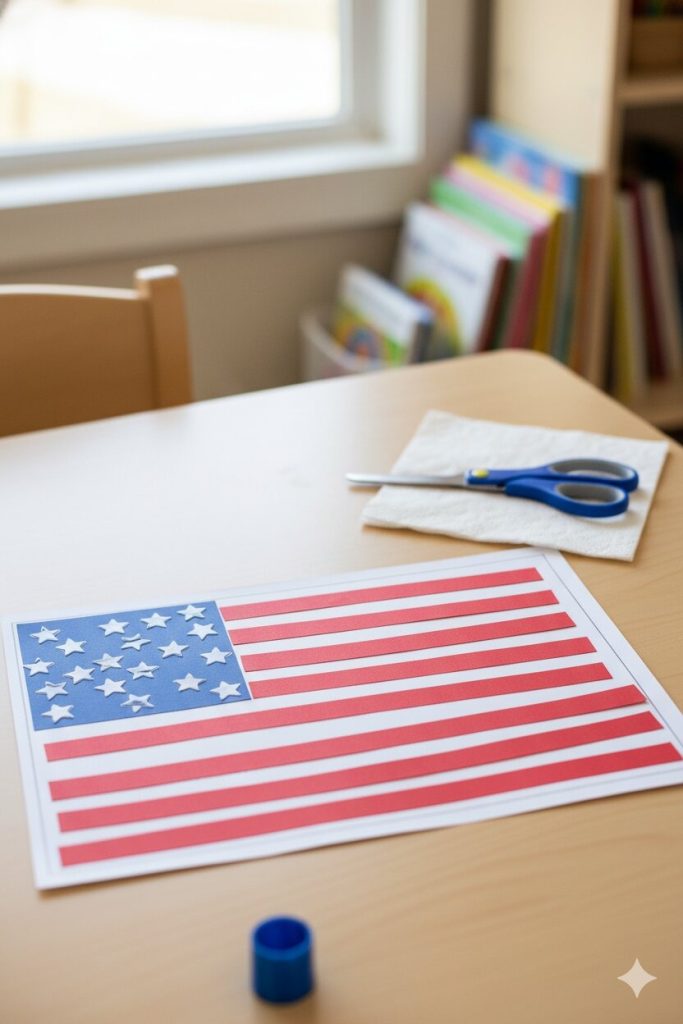
Scissor-Practice Flag Strip Collage
Best for: Ages 4–5
Time needed: 20 minutes
Works for: Both
Fine motor skill practiced: Cutting straight lines, gluing, alignment
Mess level: 🟢 Mess-Free
Keepsake? Great classroom display!
Supplies:
- White cardstock (1 sheet per child)
- Pre-ruled red construction paper strips (draw lines for children to cut along)
- Blue construction paper rectangle (pre-cut by adult, approx. 3×4 inches)
- White star stickers or white crayon for stars
- Washable glue stick
- Child-safe scissors
- Pencil-drawn flag outline on white cardstock (or print a free template)
Step-by-Step Instructions:
- Print a free American flag outline template or draw one lightly in pencil on white cardstock — explain to children that you’re going to build the flag together using real paper strips, just like a puzzle.
- Hand children their pre-ruled red construction paper and let them cut along the lines independently using their child scissors — cutting straight lines is a key Pre-K milestone, and this step gives them meaningful, purposeful practice.
- Help children apply a glue stick to the back of each red strip and press them across the flag outline in the correct stripe positions — older 5-year-olds can often align these strips with minimal help, while 4-year-olds may need gentle guidance.
- Glue the pre-cut blue rectangle into the top left corner of the flag together, pressing firmly with flat palms to make it stick.
- Let children press white star stickers into the blue section and count them aloud together — “one star, two stars, three stars!” — connecting the craft to early number sense in the most natural way.
- Display finished flags on a classroom bulletin board under the heading “We Made the Flag!” or send them home in a folder as a proud keepsake of what they built with their own hands.
What Kids Learn: Cutting along ruled lines is a foundational Pre-K scissor skill, and assembling flag stripes in order introduces sequencing, spatial reasoning, and a genuine understanding of the American flag’s design.
Classroom Tip: Pre-draw cutting lines on red construction paper strips the evening before — stack 20 sheets and draw lines on the top sheet, then press firmly so the impression carries through to save yourself significant prep time.
Pro Tip: For 4-year-olds still developing scissor control, widen the cutting lines to half an inch apart — a wider target reduces frustration dramatically and keeps the activity feeling like a success rather than a challenge.
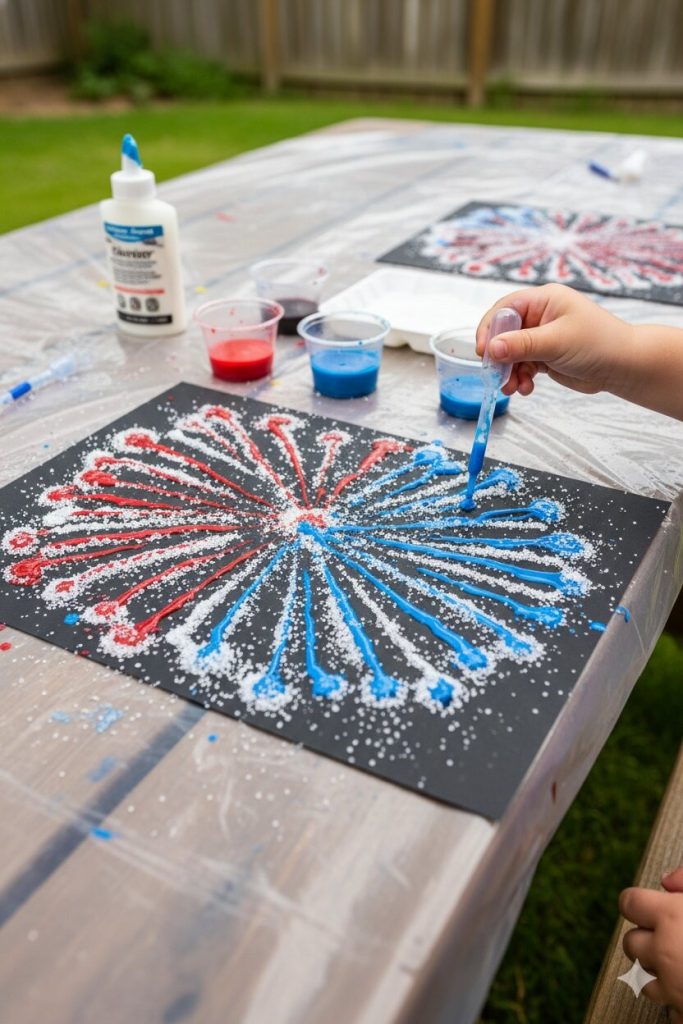
Firework Salt Painting
Best for: Ages 3–4
Time needed: 15 minutes (plus drying time)
Works for: Both
Fine motor skill practiced: Squeezing, pouring, pincer grip
Mess level: 🔴 Messy-but-Worth-It
Keepsake? Yes — frame this one!
Supplies:
- Black cardstock (1 sheet per child)
- White school glue in a squeeze bottle
- Table salt in a small shaker or bowl
- Red, white, and blue liquid watercolor or very watered-down washable paint
- Pipettes or small paintbrushes
- Tray to catch excess salt
Step-by-Step Instructions:
- Give each child a sheet of black cardstock and a squeeze bottle of white glue — invite them to draw firework burst shapes by squeezing glue lines outward from a central point, like an exploding star (demonstrate once, then step back and let them create freely).
- While the glue is still wet, help children sprinkle or pour table salt generously over their entire design — the salt sticks to the glue and creates a beautiful raised texture that preschoolers find deeply satisfying to touch.
- Gently shake the excess salt off the cardstock onto the tray, then set the salted design aside for two minutes to let it set slightly — use this waiting moment to talk about what fireworks look like in the night sky.
- Give children pipettes or small paintbrushes loaded with red, white, and blue watercolor — show them how to touch just the tip of the pipette to the salt lines and watch the color travel and bloom like magic.
- Let children add as many colors as they like, then set flat to dry completely — the finished result looks like a professional piece of art and is genuinely frame-worthy against the black background.
What Kids Learn: Squeezing a glue bottle builds hand strength and directional control, while watching color travel through salt introduces a beautiful, age-appropriate introduction to capillary action.
Classroom Tip: Fill squeeze bottles with glue the night before and set one per child at their place — this eliminates the glue-bottle sharing bottleneck that slows group craft time and lets every child start simultaneously.
Pro Tip: Do this craft outside or on a large plastic tablecloth — the salt goes everywhere, and that’s genuinely half the fun, so give yourself permission to embrace the mess and just enjoy the process with your child.
Uncle Sam Paper Bag Puppet
Best for: Ages 3–4
Time needed: 15 minutes
Works for: Both
Fine motor skill practiced: Gluing, tearing, pressing, creative placement
Mess level: 🟢 Mess-Free
Keepsake? Not a keepsake
Supplies:
- White paper lunch bag (1 per child)
- Pre-cut hat shape from red and blue construction paper (adult prep)
- White and blue crayon or washable marker
- Star stickers
- Cotton balls (for beard — pull apart for fluffy texture)
- Washable glue stick
- Googly eyes (large size, safe for ages 3+)
Step-by-Step Instructions:
- Give each child their paper bag flat with the flap facing up — explain that the flap will be Uncle Sam’s face and the bottom of the bag will be his body, then show them a picture of Uncle Sam so they know who they’re creating.
- Let children press two large googly eyes onto the flap section and draw a big smile underneath with a blue crayon — the googly eyes alone will generate immediate giggles and keep engagement high.
- Pull apart cotton balls into fluffy pieces and let children glue them below the smile to create Uncle Sam’s famous white beard — tearing and pulling cotton balls is wonderful sensory and fine motor work.
- Help children glue the pre-cut hat onto the top of the bag’s flap, then press star stickers across the hat band and add red stripes with crayon or marker.
- Once complete, slide a hand inside the bag and put on an impromptu Uncle Sam puppet show — preschoolers are enormously proud to perform with something they made themselves, and this is a wonderful language development opportunity too.
What Kids Learn: Creating a recognizable American historical figure through craft builds cultural awareness and introduces the concept of national symbols in the most playful, memorable way possible.
Classroom Tip: Pre-cut hat shapes from construction paper in a production line assembly — stack five sheets of blue paper, draw one hat shape on top, and cut through all five layers at once to prep a class set in minutes.
Pro Tip: For 3-year-olds who struggle with glue placement, use a glue stick and pre-apply glue to each piece yourself, then let your child press each element into place — they still get all the creative satisfaction with none of the frustration.
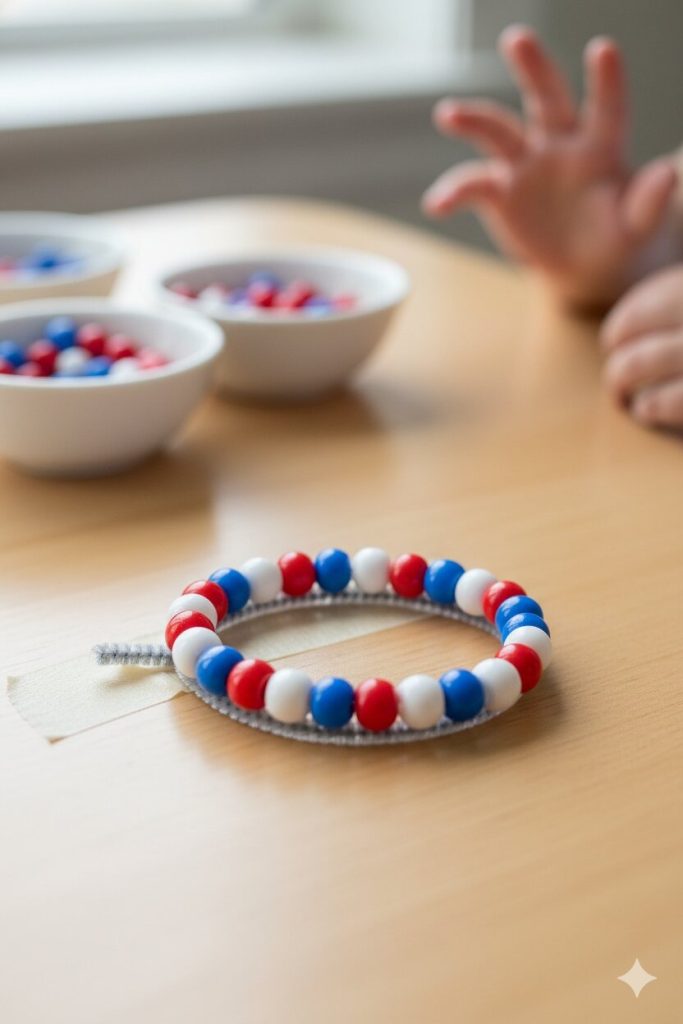
Patriotic Beaded Bracelet
Best for: Ages 4–5
Time needed: 20 minutes
Works for: Both
Fine motor skill practiced: Threading, pinching, sequencing, fine grip
Mess level: 🟢 Mess-Free
Keepsake? Yes — they’ll wear this one!
Supplies:
- Red, white, and blue pony beads (large size, safe for ages 4+)
- Plastic craft lacing or thick pipe cleaner (1 per child)
- Small bowls to sort bead colors
- Tape (to secure one end while threading)
Step-by-Step Instructions:
- Sort red, white, and blue pony beads into three separate small bowls at the center of the table — invite children to look at the colors and ask if they know what those three colors remind them of (most preschoolers will shout “the flag!” with great pride).
- Give each child a length of plastic lacing or pipe cleaner with one end taped to the table or folded over to stop beads from falling off — this small setup step prevents the single most common threading frustration for preschool hands.
- Show children how to pick up one bead at a time using their thumb and pointer finger and thread it onto the lacing — this pincer grip motion directly supports the pencil grip they’ll need for writing in kindergarten.
- Encourage children to create a red-white-blue repeating pattern as they thread — for 4-year-olds, keep the pattern loose and celebrate any sequence; for 5-year-olds, challenge them to keep the exact pattern going all the way around.
- When the bracelet is long enough to fit around their wrist, help tie or knot the ends securely — let children wear their finished bracelet immediately, because the pride of wearing something they made is one of the best feelings in early childhood.
What Kids Learn: Threading beads in a color pattern is one of the most powerful fine motor and early math activities in the preschool toolkit, directly building the pincer grip, bilateral coordination, and AB pattern recognition needed for kindergarten readiness.
Classroom Tip: Pre-cut lacing to wrist length plus 4 inches for each child before class, and pre-tape one end — this two-minute prep step means every child can start threading immediately without waiting for adult help getting set up.
Pro Tip: For 4-year-olds just starting to thread, use pipe cleaners instead of soft lacing — the stiffness makes guiding the bead onto the strand dramatically easier, and the bracelet can be twisted closed without needing a knot at the end.
Final Thoughts
Whether you just did one of these crafts at your kitchen table or set up all seven across a week of classroom activity centers, you did something genuinely meaningful today.
You gave a preschooler the experience of starting something, working through it, and finishing it — and that feeling of “I made this” is one of the most important things we can hand a child at this age.
To the mom who cleared the table and taped down the tablecloth and said “let’s try it” — that effort matters more than you know. To the teacher who prepped the supplies the night before and managed twenty tiny scissors at once — you are extraordinary, and your classroom is a better place because of what you do.
Whatever they made today, frame it, hang it, or send it home in a proud little folder — because ten years from now, you’ll both look back on the 4th of July they were four years old and made something beautiful with their own hands.

Jenny is a passionate writer specializing in home decor, design, and styling. With years of experience in transforming spaces, she shares expert tips on creating beautiful, functional homes. From interior design trends to DIY decor ideas, Jenny’s work helps homeowners craft spaces that reflect their unique style. Whether it’s a cozy living room, a modern kitchen, or a serene bedroom, her articles offer practical advice and inspiration to elevate any home.