The first time I carved a mouse ears silhouette into a pumpkin, I honestly did not expect much of a reaction.
But when I set it out on the porch that night, three different trick or treaters stopped just to point at it before they even reached for candy.
That little moment sold me completely on Disney inspired pumpkins. They turn a regular front porch into something that feels like a piece of the parks, and you do not need to be an artist to pull it off. If you are dreaming up a Disney Halloween pumpkin of your own this year, these five ideas will get you there.
A quick note before we dive in. I am not reproducing any official Disney artwork here, and I would encourage you to do the same.
Instead, every idea below uses simple, iconic silhouettes and fan inspired shapes you can freehand or find through separately sold fan made and licensed stencil kits.
Table of Contents
- Top 3 Products You Will Want for These Projects
- The Classic Mouse Ears Silhouette Pumpkin
- The Magical Castle Skyline Pumpkin
- The Haunted Wallpaper Pattern Pumpkin
- The Villain-Inspired Skull and Rose Pumpkin
- The No-Carve Character Ears Family Pumpkin Set
- Best Tools for Carving Detailed Designs
- Where to Find Stencils and Templates Safely
- Tips for Making Your Carved Pumpkin Last
- FAQs
Top 3 Products You Will Want for These Projects
- A stainless steel pumpkin carving tool kit with fine detail blades makes it far easier to carve clean curves and small shapes, which matters a lot once you start working with rounded silhouettes.
- A poker or transfer tool set lets you trace a printed stencil onto your pumpkin with small pin pricks, so you carve exactly on the lines instead of guessing.
- Flameless LED pumpkin lights keep your finished design glowing safely for weeks without the fire risk or wax mess of a real candle.
The Classic Mouse Ears Silhouette Pumpkin
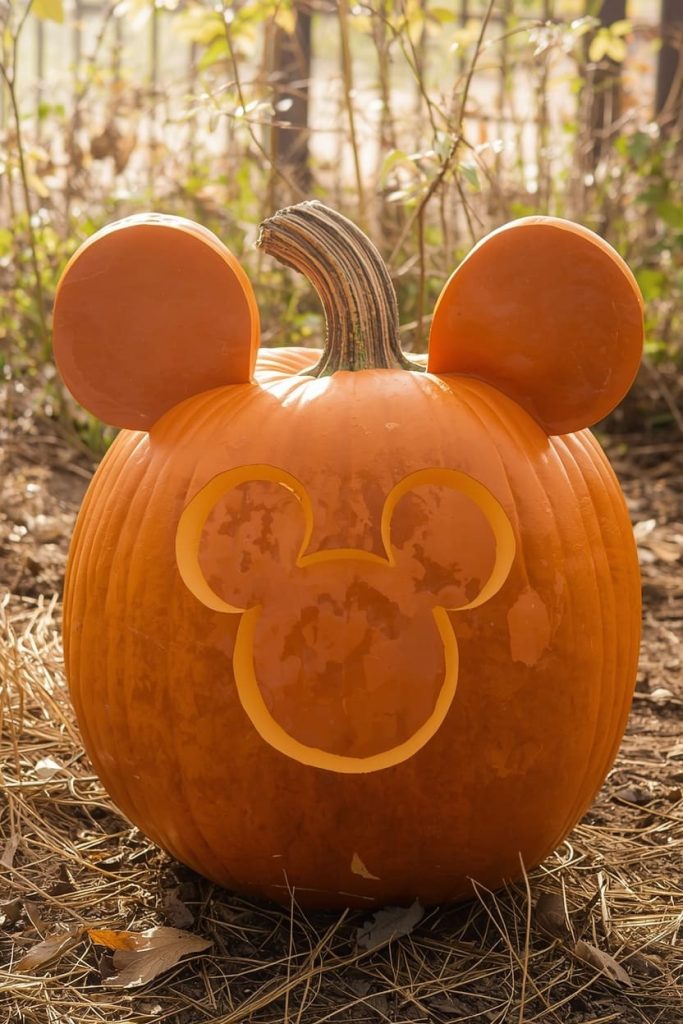
This is the single most recognizable Disney inspired design out there, and it is also one of the easiest to carve.
What you need:
- 1 medium to large pumpkin, cleaned and gutted
- A printed or hand drawn circle template (one large circle for the head, two smaller circles for the ears)
- A poker tool for tracing
- A small carving saw
Steps:
- Clean out your pumpkin fully so the walls are thin enough to carve smoothly.
- Position your circle template on the front of the pumpkin and trace the outline with your poker tool.
- Carve along the connected circle shape slowly, keeping your blade angled slightly inward.
- Push out the cut piece gently from the inside and clean up any rough edges.
Styling tip: Keep the circles perfectly round and evenly spaced. That symmetry is what makes this silhouette instantly readable from across the yard.
The Magical Castle Skyline Pumpkin
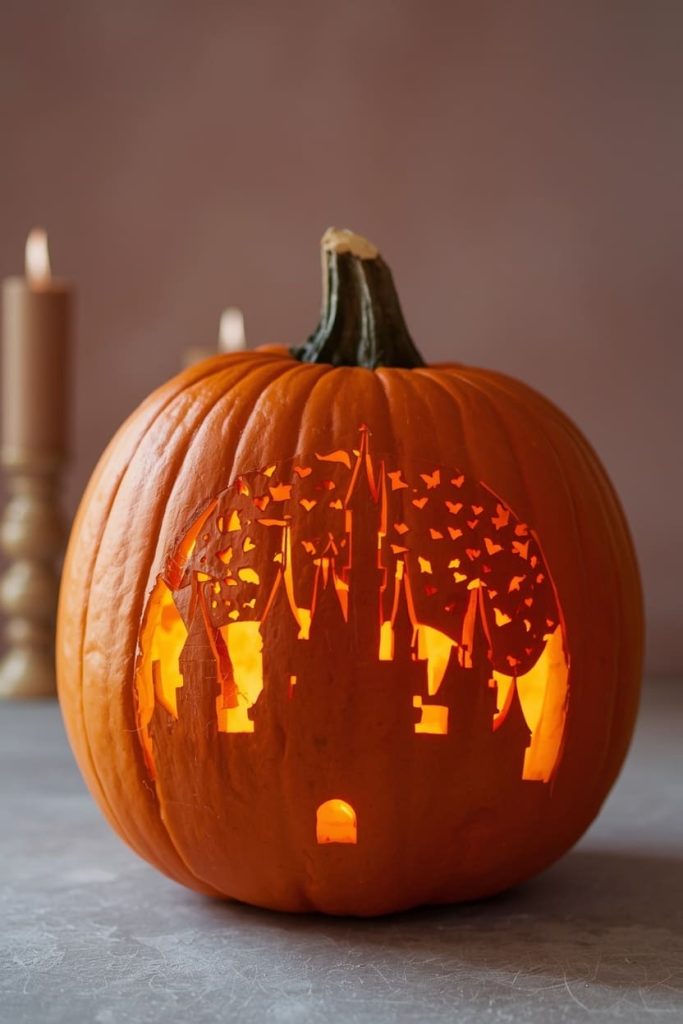
If you want something a little more detailed, a fairytale castle skyline is a beautiful showpiece for any Disney Halloween pumpkin display.
What you need:
- 1 large pumpkin with a flat, wide front surface
- A printed castle skyline template with turrets and flags
- A fine detail carving saw
- A poker tool for pattern transfer
Steps:
- Choose a template with varied turret heights so the silhouette has visual interest.
- Transfer the outline onto the pumpkin using your poker tool, working slowly around each spire.
- Carve the larger sections first, then move to the smaller turret details.
- Clean out any leftover pulp from behind the cut areas so light shines through evenly.
Styling tip: Place an LED light low inside the pumpkin so the light source sits behind the tallest turret, giving the whole castle a soft glow at the base.
The Haunted Wallpaper Pattern Pumpkin
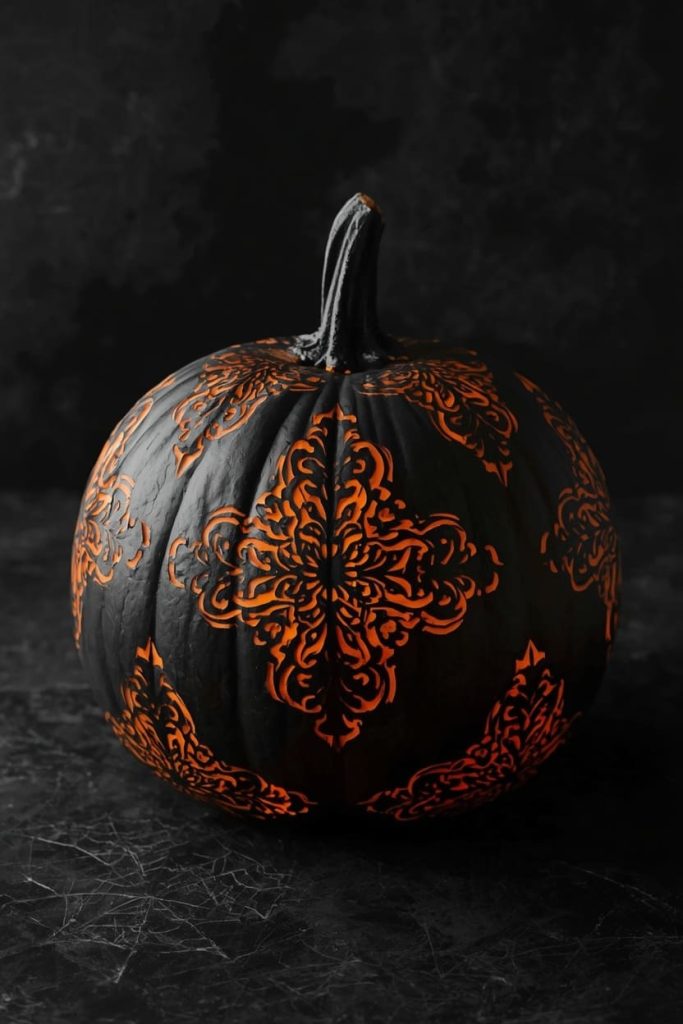
This idea is inspired by the moody, ornate wallpaper patterns found in classic haunted attraction decor, and it is a great pick if you want something spookier than cute.
What you need:
- 1 medium pumpkin
- A damask or ornate wallpaper style stencil pattern
- A small etching tool
- A carving saw for any larger cutout sections
Steps:
- Wrap your stencil pattern around the widest part of the pumpkin and secure it with tape.
- Use your etching tool to score the repeating pattern into the surface without cutting all the way through.
- For a bolder effect, fully carve through select sections of the pattern instead of just etching.
- Remove the stencil carefully once you are finished tracing and carving.
Styling tip: Etch rather than fully carve most of the design. The shallow, shadowy texture looks eerie and elegant once lit from inside, much like an old wallpapered hallway.
The Villain-Inspired Skull and Rose Pumpkin
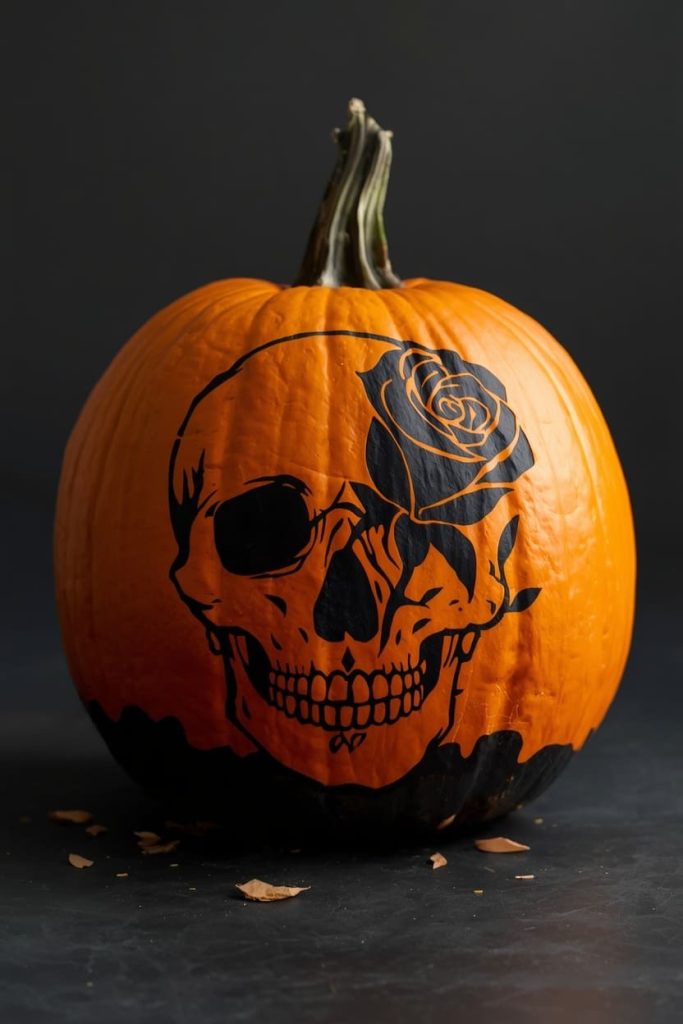
For anyone who leans toward the darker, dramatic side of Disney inspired Halloween decor, a skull paired with a rose silhouette makes a striking statement piece.
What you need:
- 1 medium pumpkin
- A skull and rose combination stencil
- A fine detail carving saw
- A poker tool
Steps:
- Position the skull design on the front of the pumpkin and the rose slightly overlapping at one side.
- Trace both shapes with your poker tool before making any cuts.
- Carve the skull first, working carefully around the eye and jaw details.
- Carve the rose petals last, since they tend to be the most delicate part of the design.
Styling tip: Use a black matte spray paint around the base of the pumpkin instead of leaving it natural orange. It gives the whole piece a moodier, more dramatic finish that suits this design.
The No-Carve Character Ears Family Pumpkin Set
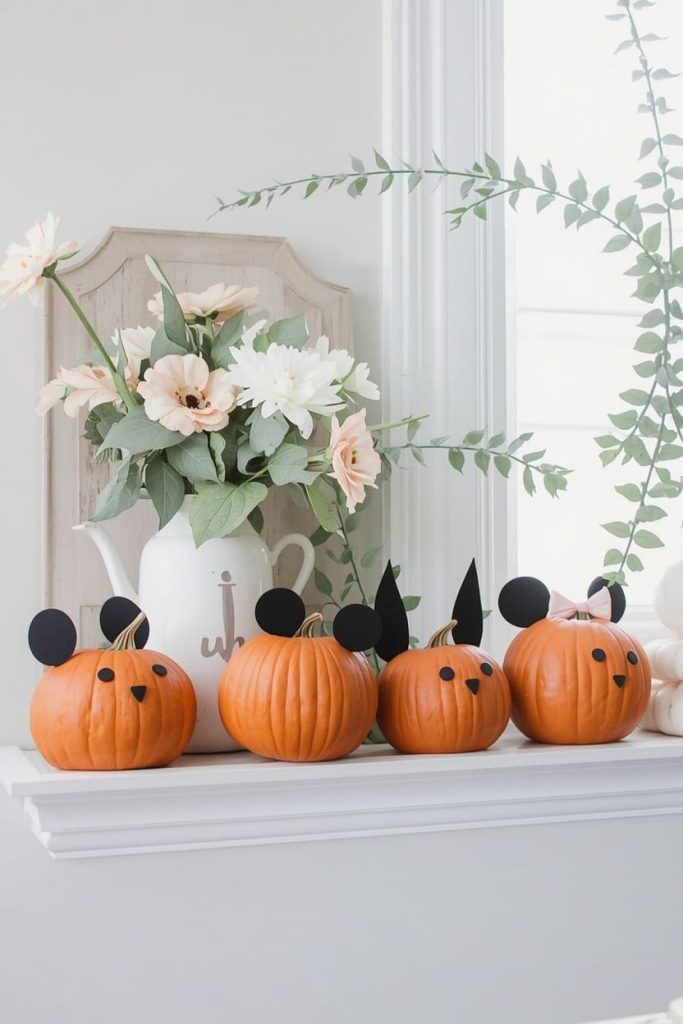
This is the easiest and most kid friendly idea on the list, perfect if carving knives are not an option yet.
What you need:
- 3 to 5 mini pumpkins, real or faux
- Black craft foam or felt for ear shapes
- Hot glue gun
- Colorful ribbon or bows (optional)
Steps:
- Cut simple circle shapes out of black craft foam to use as ears for each mini pumpkin.
- Let your kids help arrange and glue two ears onto the top of each pumpkin.
- Add a ribbon or bow to one or two pumpkins for extra character variety.
- Line the finished set up along a windowsill, mantel, or entry table.
Styling tip: Vary the size of the ears slightly across your pumpkin collection. It gives the set a playful, family style feel rather than looking too uniform.
Best Tools for Carving Detailed Designs
A basic kitchen knife will only get you so far once you start carving anything with curves or fine detail. A dedicated carving kit with a small serrated saw, a scoop, and an etching tool gives you far more control, especially for rounded shapes like ears or castle turrets.
A poker or transfer tool is just as important as the blades themselves. Pricking your outline before you cut means you are never carving blind, which makes a huge difference once your Disney Halloween pumpkin design gets more detailed than a simple triangle eyed jack o lantern.
Where to Find Stencils and Templates Safely
The safest and most respectful route is to search for fan made or independently sold stencil packs rather than anything claiming to be official licensed Disney artwork without permission.
Many talented crafters and small shops sell printable silhouette packs inspired by classic Disney shapes, castles, and character ears.
You can also freehand your own template using basic shapes, since most of the designs in this article, like connected circles or a castle skyline, are simple enough to sketch by hand with a pencil and a steady eye before you ever pick up a carving tool.
If you do buy a printed stencil pack, look for sellers who clearly describe their designs as fan inspired or original rather than anything implying it is official studio artwork.
That small detail protects both the creator and you as the buyer, and it usually means you are supporting an independent artist rather than a mass produced knockoff.
Tips for Making Your Carved Pumpkin Last
Carved pumpkins naturally dry out and shrink faster than uncarved ones, so a little prep goes a long way. Rubbing the cut edges with a thin layer of petroleum jelly helps seal in moisture and slow down shriveling.
Keeping your finished Disney Halloween pumpkin out of direct sunlight and bringing it inside overnight, if possible, can also add several extra days of life. A cool, shaded spot will always outlast a pumpkin sitting in full afternoon sun.
One more trick I swear by is misting the carved areas lightly with water every couple of days. It rehydrates the exposed flesh just enough to keep the edges from curling, and it only takes a few seconds to do as part of your normal porch routine.
FAQs
Can I use official Disney stencils for my pumpkin? It is best to avoid using or sharing copyrighted official artwork without permission, even for a home project. Sticking with simple silhouettes, fan made designs, or your own freehand sketches keeps things safe and still looks fantastic.
What is the easiest character-inspired design for beginners? The classic mouse ears silhouette is by far the easiest place to start, since it only requires three connected circles. It carves quickly, requires no fine detail work, and is instantly recognizable once it is lit up.
How do I keep a carved pumpkin from shriveling? Coating the cut edges with a thin layer of petroleum jelly slows down moisture loss significantly. Keeping the pumpkin out of direct sun and bringing it indoors overnight will also help it last longer.
Do I need power tools to carve detailed designs? No, a basic hand carving kit with a fine detail saw and etching tool is enough for every idea in this article. Power tools can speed things up, but they are not necessary for clean, detailed results.
Can kids help with these projects? Absolutely, especially with the no-carve character ears idea, which only involves gluing foam shapes onto mini pumpkins. For the carved designs, kids can help with tracing and cleaning out the pumpkin while an adult handles the actual cutting.
What kind of pumpkin works best for detailed carving? Look for a pumpkin with a flat, smooth front surface and slightly thinner walls, since thick walls make fine detail work much harder to carve cleanly. Medium to large pumpkins also give you more surface area to work with for designs like the castle skyline.

Jenny is a passionate writer specializing in home decor, design, and styling. With years of experience in transforming spaces, she shares expert tips on creating beautiful, functional homes. From interior design trends to DIY decor ideas, Jenny’s work helps homeowners craft spaces that reflect their unique style. Whether it’s a cozy living room, a modern kitchen, or a serene bedroom, her articles offer practical advice and inspiration to elevate any home.