I’m so excited to share some fun, creative ways to bring a warm, spooky glow to your home this October. Making your own Halloween candles is a fantastic way to add a personal touch to your decor.
Plus, it’s budget-friendly and lets you customize every detail to match your vibe—whether you’re going for creepy, cozy, or just plain fun. In this article, I’ll walk you through nine unique DIY Halloween candle ideas that range from super easy to a bit more challenging.
There’s something here for everyone, no matter your skill level. Ready to dive in? Let’s make some magic!
Table of Contents
- Materials and Safety Overview
- 9 DIY Halloween Candle Ideas
- Customization Tips
- Displaying and Gifting DIY Candles
- Troubleshooting Common DIY Candle Issues
- Conclusion
Materials and Safety Overview
Before we get started, let’s talk about what you’ll need and how to stay safe while crafting. Making candles is fun, but it involves hot wax and a few tools, so let’s set you up for success.
Common Materials
You’ll need some basic supplies for most of these projects. Wax is the star of the show—soy wax is great for beginners because it’s easy to work with and eco-friendly.
Paraffin wax is another option for a smoother finish, while beeswax adds a natural honey scent. You’ll also need wicks, which come in different sizes depending on your candle’s width.
Containers like mason jars or molds for shaped candles are essential. For color, use liquid or block dyes made for candles. Want scent? Essential oils or fragrance oils (like pumpkin spice or pine) add that extra Halloween vibe.
For some projects, you’ll use fun extras like glitter, decals, or dried flowers to make your candles pop.
Tools Needed
You don’t need a fancy setup. A double boiler or microwave-safe container works for melting wax. A thermometer helps you check the wax temperature—super important for safety and quality.
A pouring pitcher makes filling molds or containers easier. Glue dots or wick stickers keep wicks in place. Scissors, a spoon, and maybe a paintbrush for some designs round out your toolkit. If you’re carving candles, grab a small knife or sculpting tool.
Safety Tips
Safety first! Always melt wax in a double boiler or microwave with care—never leave it unattended. Hot wax can burn, so keep a thermometer handy to avoid overheating (aim for 185°F for pouring).
Place wicks in the center of your container or mold to ensure even burning and prevent fire risks. If you’re using fragrances or dyes, work in a well-ventilated area to avoid inhaling fumes. Keep kids and pets away from your workspace, and have a fire extinguisher nearby just in case.
Sourcing Tips
Craft stores like Michaels or Joann have wax, wicks, and dyes. Online retailers like Amazon or CandleScience offer bulk supplies at good prices.
Want to save money? Check thrift stores for jars, tins, or small cauldrons to use as containers.
You can even repurpose old candles by melting down leftover wax. Get creative with what you have!
9 DIY Halloween Candle Ideas
Now for the fun part! Here are nine Halloween candle ideas, each with clear steps, materials, and tips to make your creations shine. I’ve included a mix of beginner, intermediate, and advanced projects to suit everyone. Let’s get crafting!
1. Spooky Skull Candles
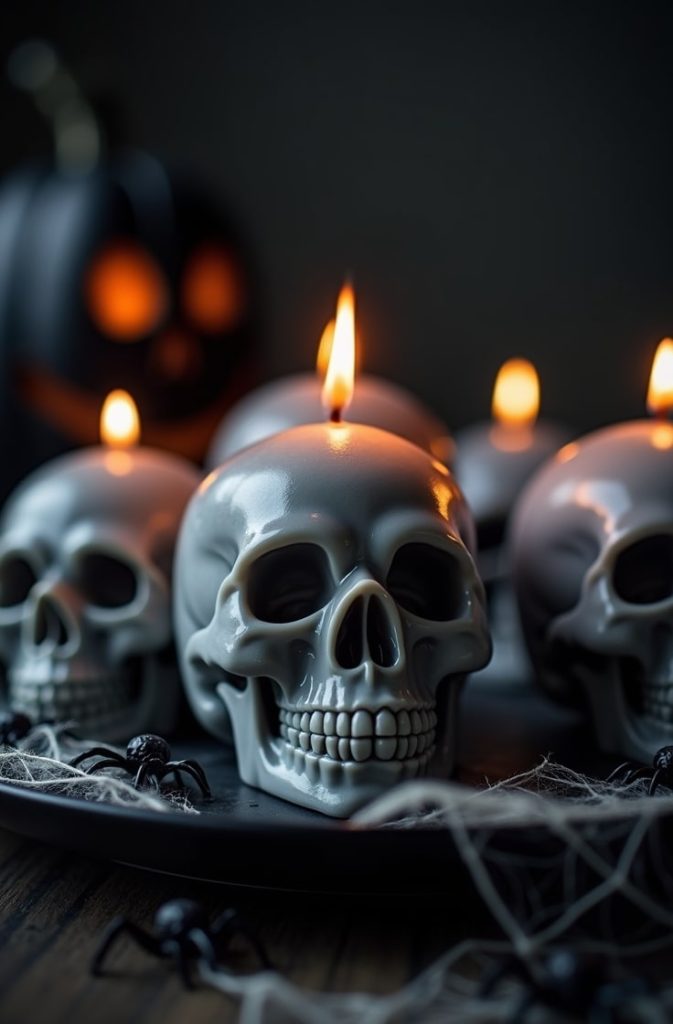
Nothing says Halloween like a skull glowing in the dark. These molded skull candles are creepy yet cool, perfect for a haunted vibe.
- Difficulty: Intermediate
- Time: 2–3 hours
- Materials: Skull-shaped molds, white soy wax, black liquid dye, cotton wicks, wick stickers, pouring pitcher, double boiler, thermometer.
- Steps:
- Set up your double boiler and melt 2 cups of soy wax to 185°F.
- Add a few drops of black dye to create a grayish tone for contrast. Stir gently.
- Secure a wick in the center of each skull mold using a wick sticker.
- Pour the wax into the molds, leaving a little space at the top.
- Let the candles cool for 2 hours, then pop them out of the molds.
- Trim the wick to ¼ inch.
- Styling Tip: Place your skull candles on a black tray with faux cobwebs and plastic spiders. It’s a spooky centerpiece that’ll wow your guests!
2. Pumpkin Spice Glow
These mason jar candles smell like fall and glow like a pumpkin patch. They’re so easy, even beginners can nail them.
- Difficulty: Beginner
- Time: 1–2 hours
- Materials: Soy wax, orange liquid dye, pumpkin spice fragrance oil, mason jars, cotton wicks, wick stickers, double boiler, thermometer, pouring pitcher.
- Steps:
- Melt 1 cup of soy wax in a double boiler to 185°F.
- Add 5–7 drops of orange dye and 1 tsp of pumpkin spice fragrance oil. Mix well.
- Stick a wick to the bottom of a mason jar with a wick sticker.
- Pour the wax into the jar, keeping the wick centered.
- Let it cool for 1 hour until solid.
- Trim the wick to ¼ inch.
- Styling Tip: Tie a burlap ribbon around the jar and place it with mini pumpkins on your table. It’s cozy and festive!
3. Bloody Drip Candles
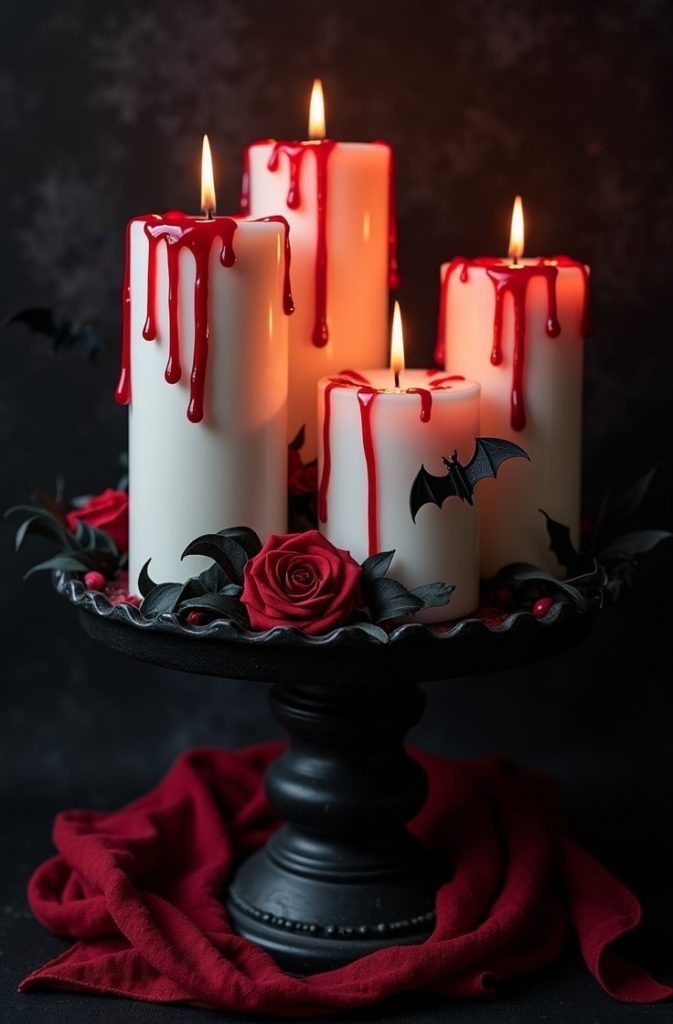
Want a vampire vibe? These white pillar candles with red “blood” drips look like they belong in a gothic castle.
- Difficulty: Beginner
- Time: 1 hour
- Materials: Pre-made white pillar candles, red wax, paintbrush, microwave-safe container.
- Steps:
- Melt ½ cup of red wax in a microwave-safe container (30-second intervals, stirring until smooth).
- Let the wax cool slightly to thicken—it should be pourable but not runny.
- Use a paintbrush or spoon to drizzle red wax over the top of the white candles, letting it drip down the sides.
- Let the drips harden for 30 minutes.
- Styling Tip: Group these on a black candelabra with fake bats or roses for a dramatic, horror-inspired look.
4. Ghostly Layered Candles
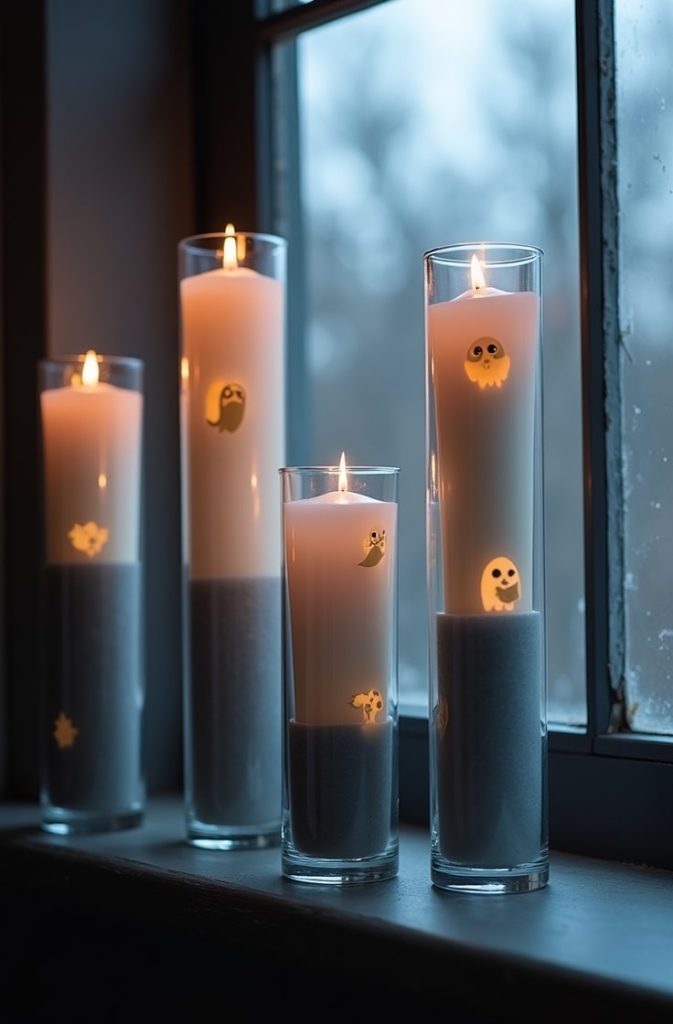
These candles have white and gray layers with ghost decals that glow eerily in glass containers. They’re hauntingly beautiful!
- Difficulty: Intermediate
- Time: 3–4 hours
- Materials: Soy wax, white and gray liquid dyes, ghost-shaped decals, tall glass containers, cotton wicks, wick stickers, double boiler, thermometer.
- Steps:
- Melt 1 cup of soy wax to 185°F.
- Pour a thin layer of white wax into a glass container. Let it set for 30 minutes.
- Melt another cup of wax, add gray dye, and pour a second layer. Stick a ghost decal on the inside of the glass before pouring.
- Repeat, alternating white and gray layers, adding decals as you go.
- Secure a wick in the center and pour the final layer.
- Let it cool for 2 hours. Trim the wick.
- Styling Tip: Place these on windowsills. The light will make the ghosts glow at night!
5. Witch’s Brew Cauldron Candles
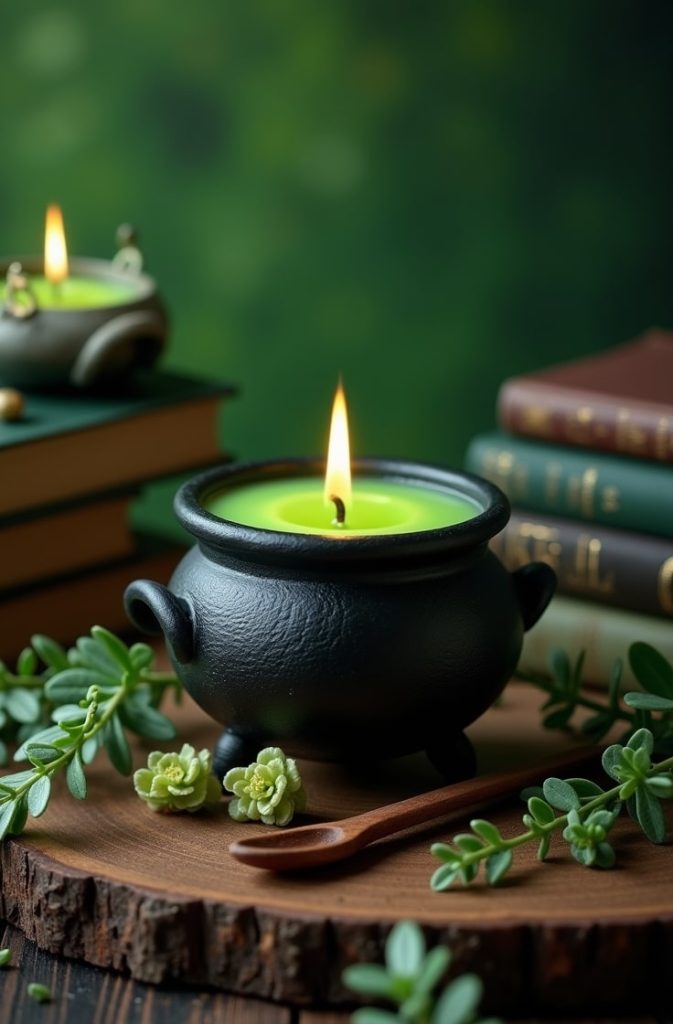
These mini cauldron candles look like bubbling potions with a green glow and herbal scent. Perfect for a witchy aesthetic.
- Difficulty: Intermediate
- Time: 2–3 hours
- Materials: Mini cauldron containers, soy wax, green liquid dye, eucalyptus or rosemary essential oil, cotton wicks, wick stickers, double boiler, thermometer.
- Steps:
- Melt 1 cup of soy wax to 185°F.
- Add 5 drops of green dye and 1 tsp of eucalyptus or rosemary oil. Stir well.
- Stick a wick to the bottom of the cauldron with a wick sticker.
- Pour the wax into the cauldron, keeping the wick centered.
- Let it cool for 2 hours.
- Trim the wick to ¼ inch.
- Styling Tip: Add a tiny wooden spoon to the cauldron for a “brewing” effect. Display with spell books for extra charm.
6. Jack-o’-Lantern Tealights
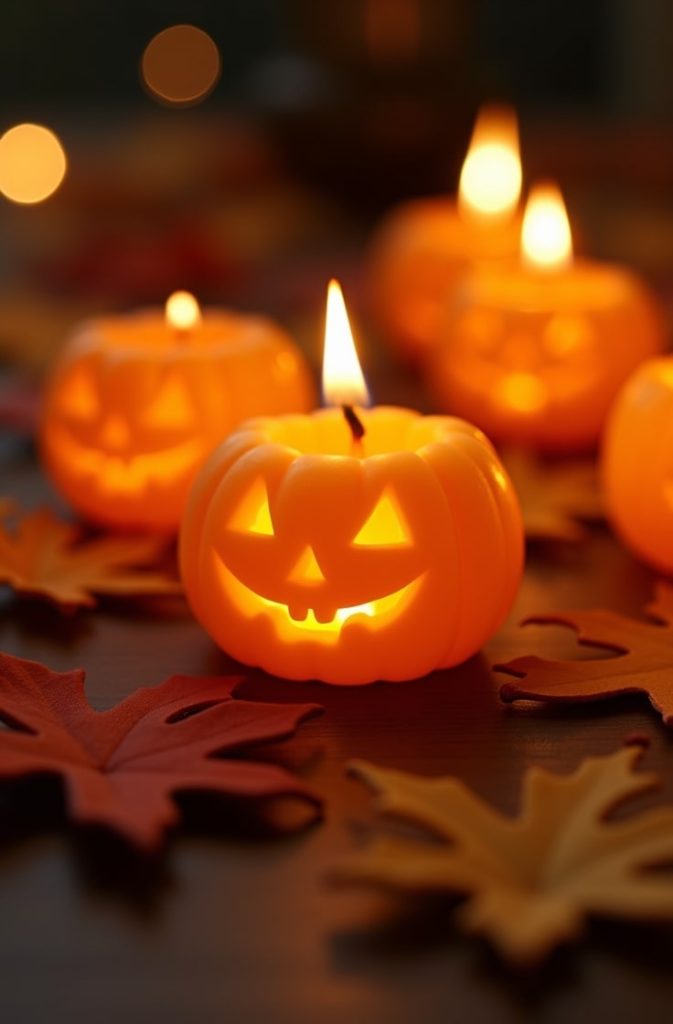
These carved tealights look like mini pumpkins with glowing faces. They’re a bit tricky but so worth it!
- Difficulty: Advanced
- Time: 3–4 hours
- Materials: Beeswax, tealight molds, carving tools (small knife or sculpting tool), orange liquid dye, cotton wicks, wick stickers, double boiler, thermometer.
- Steps:
- Melt 1 cup of beeswax to 185°F.
- Add 5–7 drops of orange dye and stir.
- Pour wax into tealight molds and let it cool for 20 minutes until firm but soft.
- Use a small knife to carve jack-o’-lantern faces into the wax.
- Insert a wick into the center of each tealight with a wick sticker.
- Let it fully harden for 2 hours.
- Styling Tip: Scatter these across a table with fake autumn leaves. They’ll light up your Halloween party!
7. Haunted Forest Pine Candles
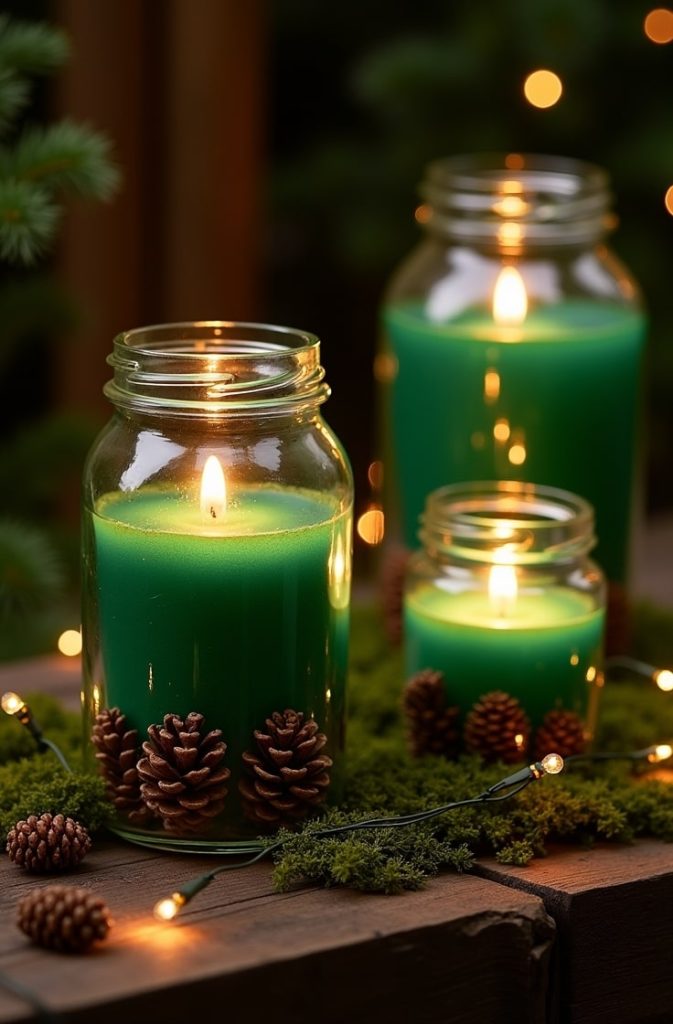
These green candles with pinecones smell like a spooky forest. They’re perfect for a natural, earthy vibe.
- Difficulty: Intermediate
- Time: 2–3 hours
- Materials: Soy wax, green liquid dye, pine essential oil, small pinecones, glass jars, cotton wicks, wick stickers, double boiler, thermometer.
- Steps:
- Melt 1 cup of soy wax to 185°F.
- Add 5 drops of green dye and 1 tsp of pine oil. Mix well.
- Place a few small pinecones in the bottom of a glass jar.
- Stick a wick in the center with a wick sticker.
- Pour the wax over the pinecones, keeping the wick upright.
- Let it cool for 2 hours. Trim the wick.
- Styling Tip: Pair with moss and fairy lights for a magical forest scene.
8. Glittery Bat Wing Candles
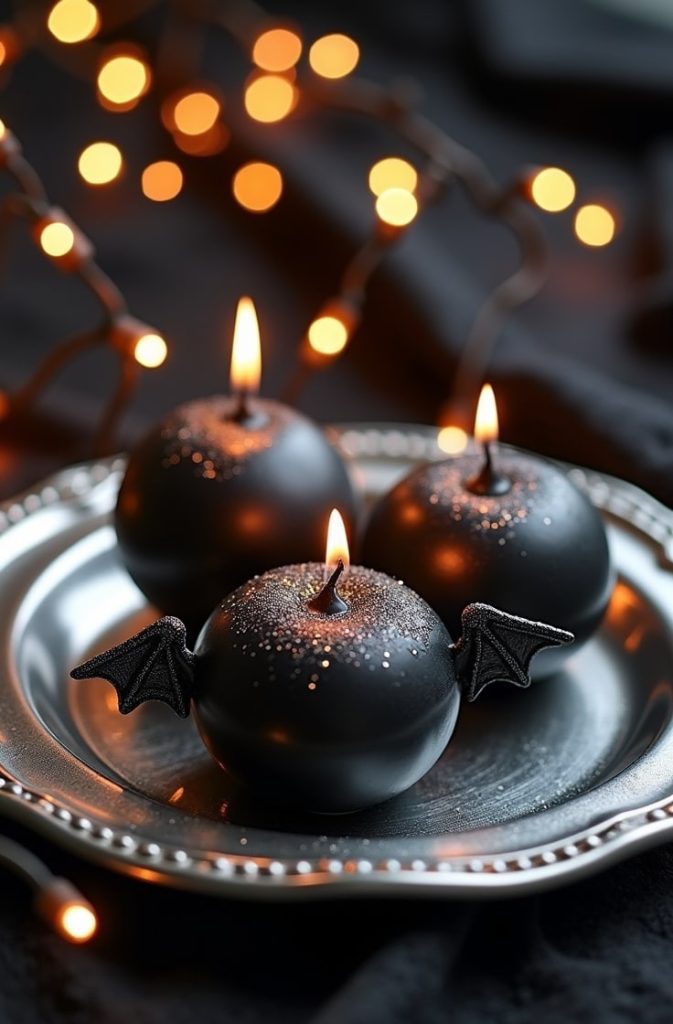
These black candles with glittery bat wing decals are whimsical and fun. They’re easy to make and look amazing.
- Difficulty: Beginner
- Time: 1–2 hours
- Materials: Black soy wax, bat wing stickers, edible glitter, round molds, cotton wicks, wick stickers, double boiler, thermometer.
- Steps:
- Melt 1 cup of black soy wax to 185°F.
- Pour the wax into round molds.
- Sprinkle a pinch of edible glitter over the wax while it’s still soft.
- Stick bat wing decals onto the sides of the wax.
- Insert a wick in the center with a wick sticker.
- Let it cool for 1 hour. Trim the wick.
- Styling Tip: Display on a silver tray with fairy lights for a magical, gothic look.
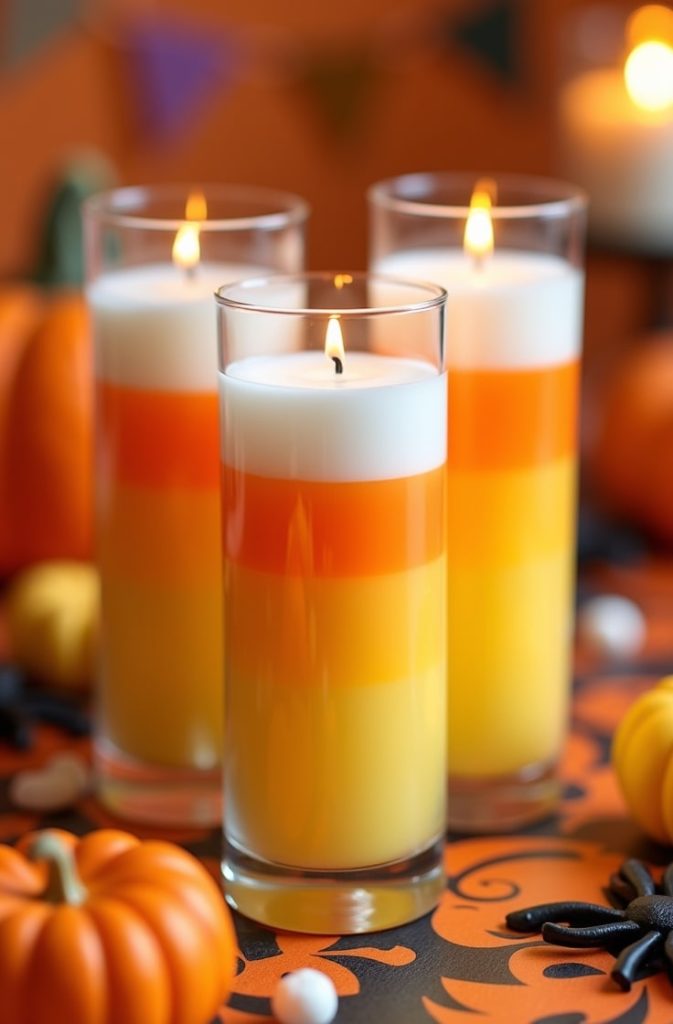
9. Candy Corn Striped Candles
These layered candles mimic candy corn colors—white, orange, and yellow. They’re fun and perfect for a kid-friendly Halloween.
- Difficulty: Intermediate
- Time: 3–4 hours
- Materials: Soy wax, white/orange/yellow liquid dyes, tall glass containers, cotton wicks, wick stickers, double boiler, thermometer.
- Steps:
- Melt 1 cup of soy wax to 185°F.
- Add white dye and pour a thin layer into a glass container. Let it set for 30 minutes.
- Melt another cup, add orange dye, and pour the next layer. Let it set.
- Melt a final cup, add yellow dye, and pour the top layer.
- Insert a wick in the center with a wick sticker before the final layer sets.
- Let it cool for 2 hours. Trim the wick.
- Styling Tip: Use these as a cheerful centerpiece for a Halloween party. Kids will love them!
Customization Tips
Want to make these candles your own? Here are some ideas to tweak them to fit your style.
Scent Variations
Switch up the scents to match your Halloween mood. Try cinnamon or clove for a warm, spicy vibe. A “foggy night” blend with cedarwood and lavender creates a mysterious feel. Check out fragrance oils at craft stores or online for unique Halloween scents.
Container Ideas
Get creative with containers! Repurpose old jars, coffee tins, or thrifted teacups. Small cauldrons or vintage candle holders add a spooky touch. Clean them well before pouring wax to ensure a smooth finish.
Color Palettes
Don’t stick to orange and black. Try purple for a witchy vibe or silver for a ghostly glow. Mix dyes to create custom shades that match your decor. A little experimenting goes a long way!
Embellishments
Add some flair with charms, ribbons, or engraved designs. Glue small Halloween charms (like bats or pumpkins) to the outside of jars. Use a hot glue gun to attach ribbons or twine. For advanced crafters, try carving simple designs into the wax before it fully hardens.
Displaying and Gifting DIY Candles
Your candles are ready—now let’s show them off or share them with friends!
Display Ideas
Create a spooky vignette by grouping candles with Halloween props like skeletons, lanterns, or faux cobwebs. Use them as a table centerpiece for your Halloween party. For outdoor vibes, line a pathway with your candles in jars for a glowing trail. Just keep them sheltered from wind or rain.
Gifting Tips
Candles make awesome gifts! Package them in Halloween-themed gift boxes with orange and black tissue paper. Include a small card with care instructions (like trimming the wick before lighting). Add a spooky note like, “Light this for a hauntingly good time!” to make it personal.
Storage Advice
Store your candles in a cool, dry place to keep their shape and scent. Avoid direct sunlight, which can fade colors or melt wax. Wrap them in tissue paper if you’re storing them for next Halloween.
Troubleshooting Common DIY Candle Issues
Ran into a problem? Don’t worry—I’ve got you covered with fixes for common candle-making hiccups.
Uneven Burns
If your candle burns unevenly, the wick might be off-center. Always secure the wick with a sticker and keep it upright while pouring. Trim the wick to ¼ inch before lighting to control the flame.
Cracked Wax
Cracks happen when wax cools too fast. Pour your wax at a lower temperature (around 130–150°F) to avoid shrinkage. Let it cool slowly at room temperature, away from drafts.
Weak Scent Throw
If your candle’s scent is faint, you might need more fragrance oil. Use 1–1.5 tsp per cup of wax for a stronger throw. Stronger scents like cinnamon or pine work better than subtle ones like lavender.
Conclusion
There you have it—nine DIY Halloween candle ideas to light up your spooky season!
From creepy skull candles to cheerful candy corn stripes, these projects offer something for every skill level and style. I love how these candles can transform a room, whether you’re hosting a Halloween bash or just cozying up with a scary movie.
Pick one (or try them all!) and let your creativity shine. Share your creations on social media with #DIYSpookyCandles—I can’t wait to see what you come up with!

Jenny is a passionate writer specializing in home decor, design, and styling. With years of experience in transforming spaces, she shares expert tips on creating beautiful, functional homes. From interior design trends to DIY decor ideas, Jenny’s work helps homeowners craft spaces that reflect their unique style. Whether it’s a cozy living room, a modern kitchen, or a serene bedroom, her articles offer practical advice and inspiration to elevate any home.