Halloween is my favorite time of year, and I bet you feel the same! There’s something magical about turning your home or business into a spooky spectacle.
Window displays are a fantastic way to share that Halloween spirit with everyone who passes by. Whether you’re decorating your apartment window, a storefront, or a community space, I’ve got you covered with 15 creative ideas.

These displays range from simple to elaborate, cheap to moderately priced, and easy to more involved. My goal is to give you clear, step-by-step ideas that spark your creativity and make your windows the talk of the neighborhood.
Let’s dive in and make this Halloween unforgettable!
Table of Contents
- Understanding Halloween Window Displays
- 15 Halloween Window Display Ideas
- 1. Spooky Silhouette Scene
- 2. Ghostly Floating Figures
- 3. Pumpkin Patch Window
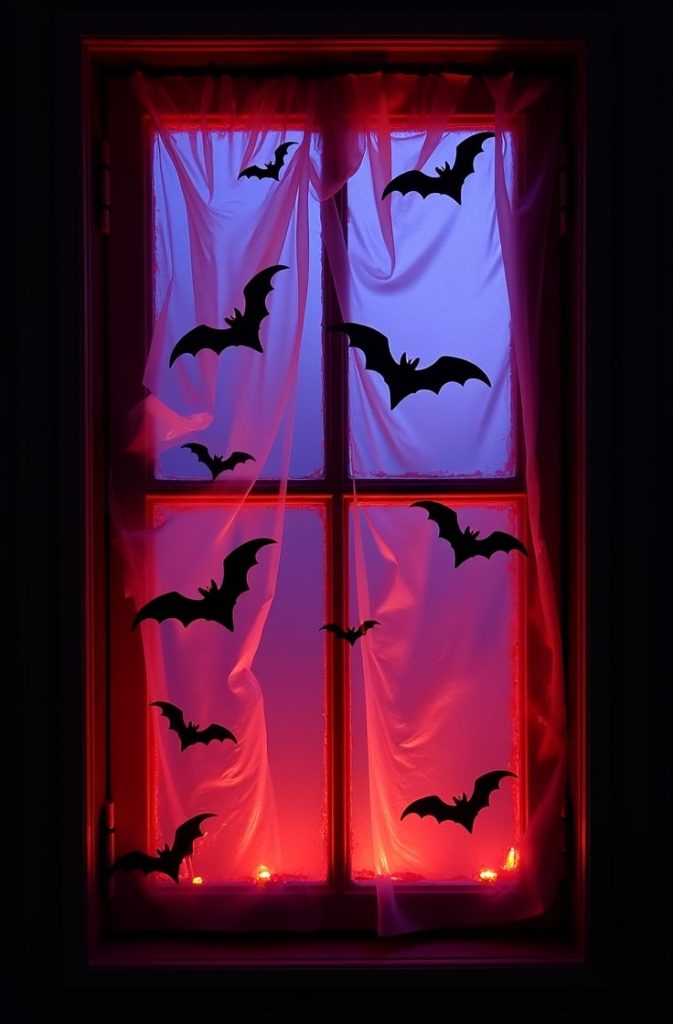
- 4. Spider Web Takeover
- 5. Haunted Mansion Glow
- 6. Witch’s Cauldron Brew
- 7. Zombie Hand Reach
- 8. Jack-o’-Lantern Stained Glass
- 9. Graveyard Scene
- 10. Creepy Crawly Critters
- 11. Witch’s Silhouette Flight
- 12. Eerie Eyeball Stare
- 13. Vampire’s Lair
- 14. Skeleton Dance Party
- 15. Monster Mash Window
- Conclusion
Understanding Halloween Window Displays
I love how a great Halloween window display sets the mood. It’s like inviting the whole neighborhood to join in the fun. A spooky or playful setup can make your home feel festive or draw customers to your business.
It’s also a chance to show off your personality. Kids love spotting creepy ghosts or glowing pumpkins, while adults appreciate clever designs. A well-done display builds excitement and makes Halloween feel special.
For businesses, it’s a way to stand out. A haunting window can pull in curious shoppers. For homes, it’s about creating memories.
I remember walking through my neighborhood as a kid, pointing out the best-decorated houses. Your window could be that memory for someone else!
Key Considerations
Before you start, think about who’s seeing your display. Are you aiming for kids with cute pumpkins or adults with eerie vibes? The size of your window matters too.
A small apartment window needs a compact design, while a big storefront can handle bolder setups. Budget is another factor. I’ll include cost estimates for each idea, so you can pick what fits your wallet.
Some displays use items you already have, while others need a small investment.
Safety is key. Use LED lights instead of candles to avoid fire risks. Make sure your display doesn’t block visibility for drivers or pedestrians.
Also, consider how much time you have. Some ideas are quick, while others take a weekend. I’ll note the difficulty level for each to help you plan.
15 Halloween Window Display Ideas
Here are 15 ideas to transform your windows into Halloween masterpieces. Each one includes a description, materials, cost, difficulty, and tips to make it shine. Let’s get started!
1. Spooky Silhouette Scene
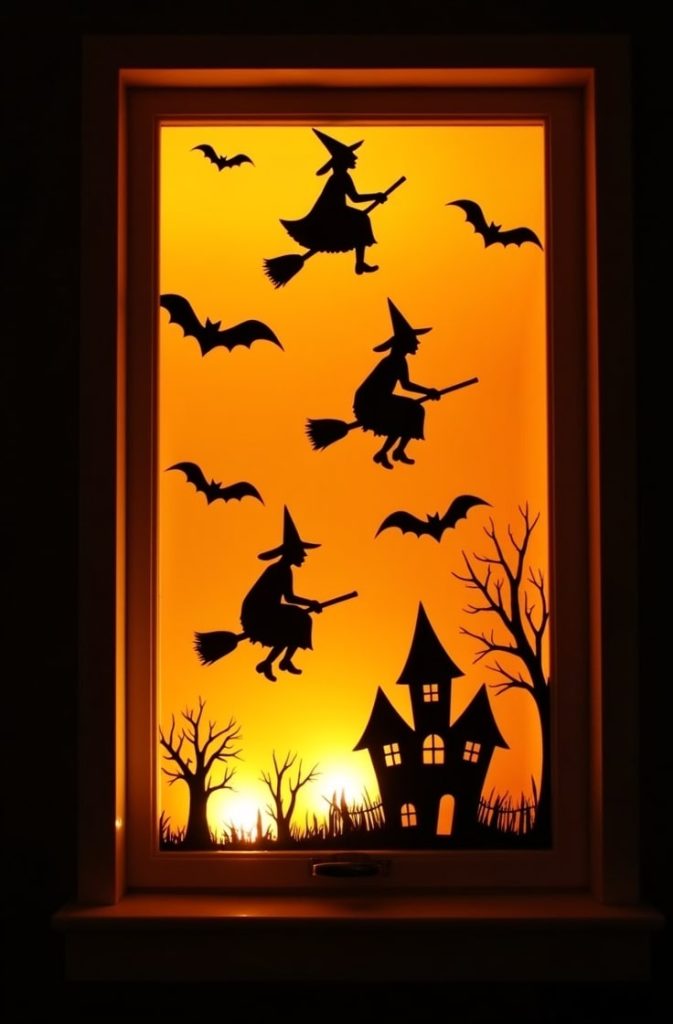
I love how simple yet striking silhouettes can be. This display uses black paper cutouts of witches, bats, or haunted houses against a glowing backdrop. It’s perfect for any window size and creates a dramatic effect at night.
- Materials: Black cardstock ($5), LED candles ($5–$10), tissue paper ($2–$5), tape ($1).
- Cost: $5–$15.
- Difficulty: Easy.
- Steps:
- Draw or print shapes like witches, bats, or trees on cardstock.
- Cut them out carefully with scissors or a craft knife.
- Tape tissue paper (orange or yellow) to the inside of your window.
- Stick the silhouettes on the glass over the tissue paper.
- Place LED candles behind the window to make it glow.
- Tips: Use a projector to trace intricate designs if you’re not confident drawing freehand. Orange tissue paper gives a warm, spooky glow. Test the placement during the day and night to ensure it looks great both ways.
This setup is quick and budget-friendly. It’s perfect if you want a big impact with little effort.
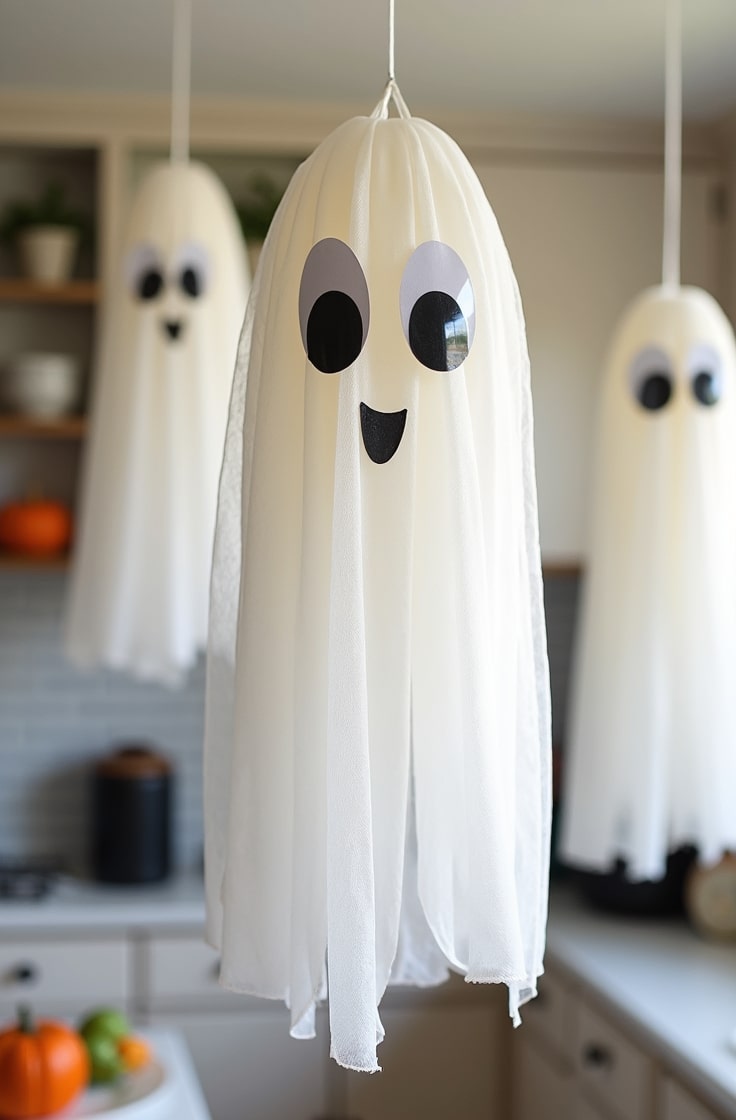
2. Ghostly Floating Figures
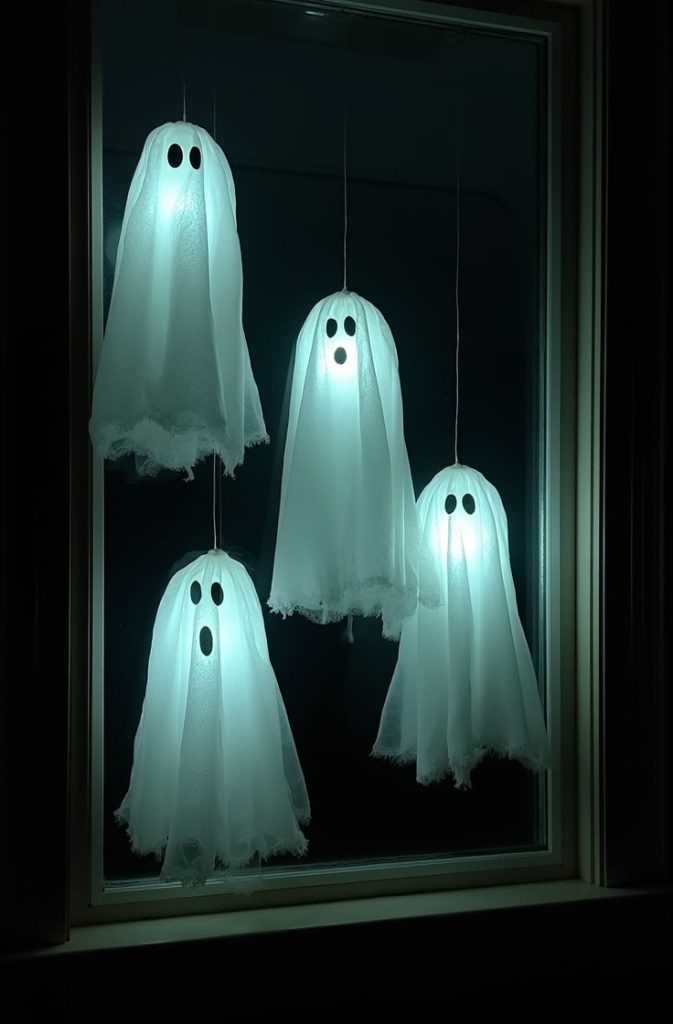
Nothing says Halloween like ghosts! This display uses cheesecloth to create translucent spirits that seem to float in your window. It’s creepy but family-friendly.
- Materials: Cheesecloth ($5–$10), balloons ($2), glow sticks ($3–$5), fishing line ($2).
- Cost: $10–$20.
- Difficulty: Moderate.
- Steps:
- Blow up small balloons to form ghost heads.
- Drape cheesecloth over each balloon, shaping it like a ghost.
- Tie fishing line around the base of the balloon to secure the cloth.
- Snap glow sticks and place them inside the balloons for an eerie glow.
- Hang the ghosts in your window with fishing line and tape.
- Tips: Insert glow sticks just before displaying to maximize their brightness. Use clear tape to secure the fishing line to the window frame. Add a fan nearby to make the ghosts sway gently.
This display looks amazing at night. It’s a bit more involved but worth the effort for the spooky effect.
3. Pumpkin Patch Window
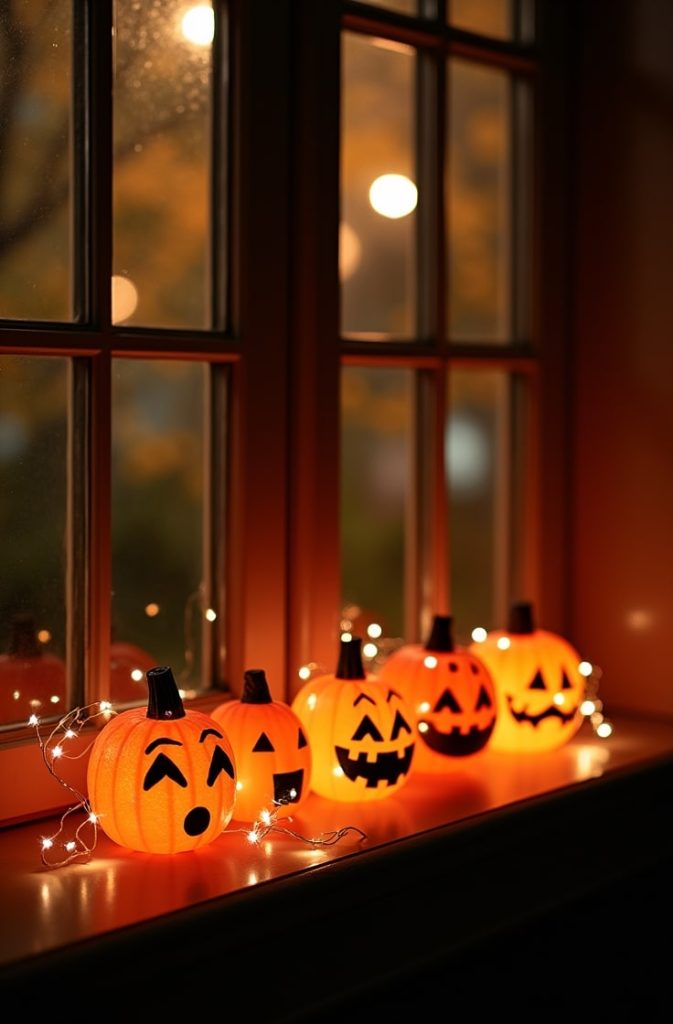
Pumpkins scream Halloween, don’t they? This display creates a cozy pumpkin patch scene with carved or painted pumpkins and twinkling lights. It’s warm and inviting.
- Materials: Mini pumpkins (real or foam, $5–$15), fairy lights ($5–$10), paint ($5).
- Cost: $15–$30.
- Difficulty: Easy.
- Steps:
- Gather mini pumpkins (real ones last longer outside, foam works indoors).
- Paint some pumpkins with fun designs like faces or patterns.
- Arrange them on your windowsill or hang them with clear thread.
- Weave battery-operated fairy lights around the pumpkins.
- Turn on the lights for a magical glow.
- Tips: Use battery-operated lights for safety and flexibility. Mix pumpkin sizes for a natural look. If using real pumpkins, check them weekly to avoid rot.
This display is great for families or businesses wanting a cheerful Halloween vibe.
4. Spider Web Takeover
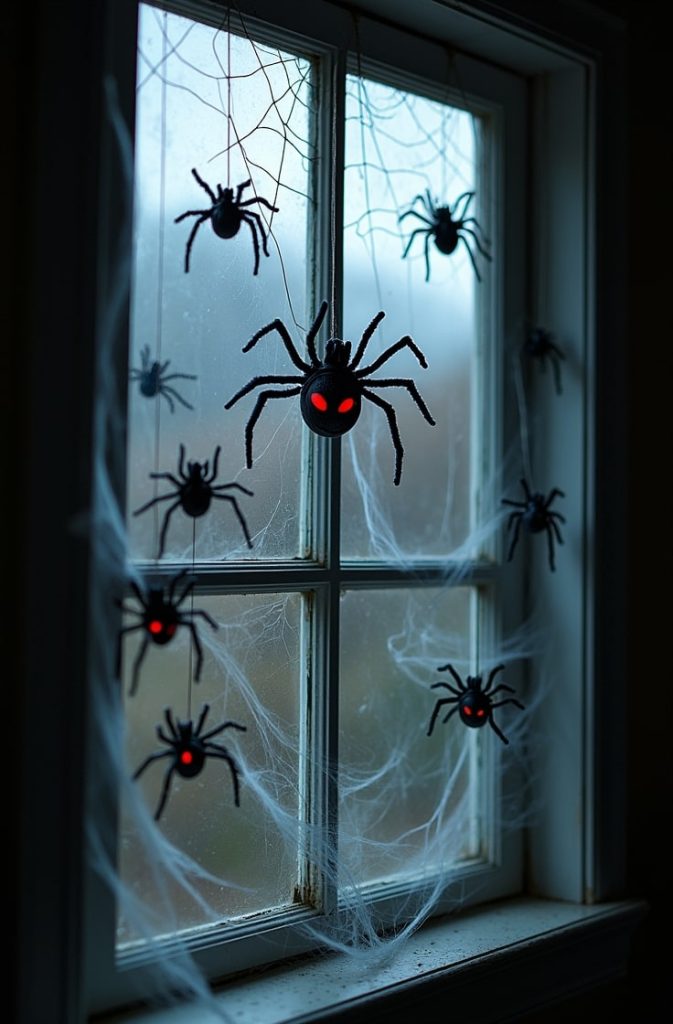
Spiders give me the chills, but they make awesome decorations! This display features giant spider webs with creepy crawlers all over your window. It’s simple but spooky.
- Materials: Cotton batting or yarn ($3–$5), plastic spiders ($2–$5), adhesive hooks ($2–$5).
- Cost: $5–$15.
- Difficulty: Easy.
- Steps:
- Stretch cotton batting or yarn across your window to form a web shape.
- Secure it with adhesive hooks or tape.
- Attach plastic spiders to the web with glue or thread.
- Add extra spiders crawling up the glass.
- Tips: Pull cotton batting thin for a realistic web effect. Glue red LED lights to spiders’ eyes for extra creepiness. Use removable hooks to avoid damaging your window.
This is a quick project that packs a punch. It’s perfect for scaring trick-or-treaters!
5. Haunted Mansion Glow
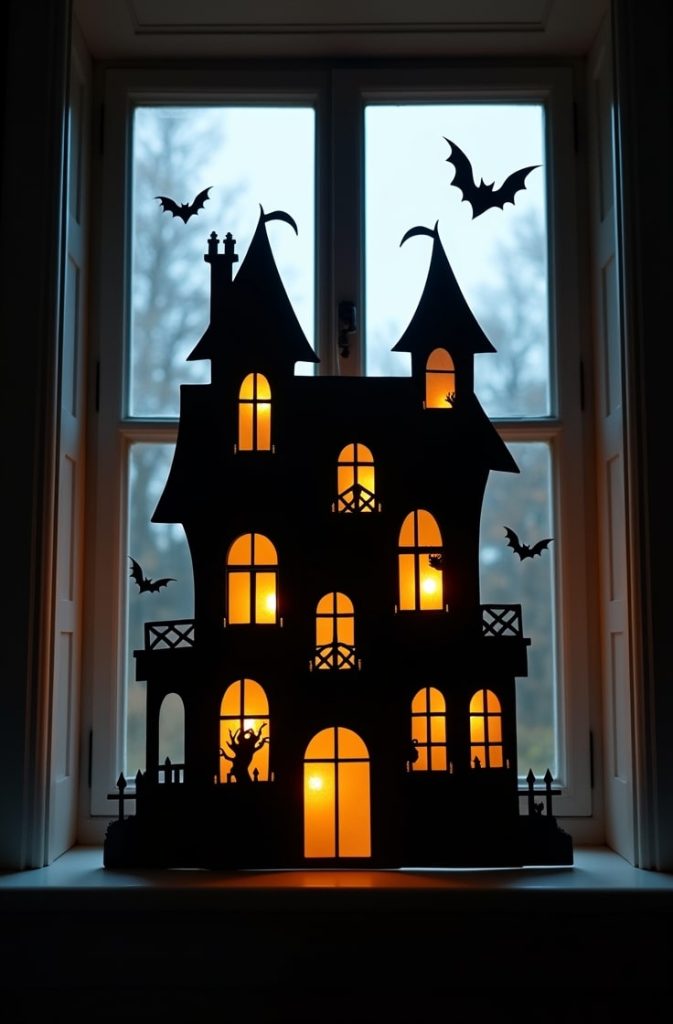
I’m obsessed with gothic vibes, and this haunted mansion display delivers. It creates a spooky house scene with flickering lights and ghostly faces in the windows.
- Materials: Cardboard ($5), black paint ($3–$5), LED tea lights ($5–$10), tissue paper ($2–$5).
- Cost: $10–$20.
- Difficulty: Moderate.
- Steps:
- Cut cardboard into a mansion shape with multiple windows.
- Paint it black and add details like shutters or vines.
- Cut out window shapes and tape tissue paper behind them.
- Draw ghostly faces on the tissue paper with a marker.
- Place LED tea lights behind the cardboard to light it up.
- Tips: Use stencils for clean window shapes. Layer tissue paper (white and yellow) for a ghostly effect. Test the lighting to ensure the faces are visible.
This display feels like a haunted house come to life. It’s great for larger windows.
6. Witch’s Cauldron Brew
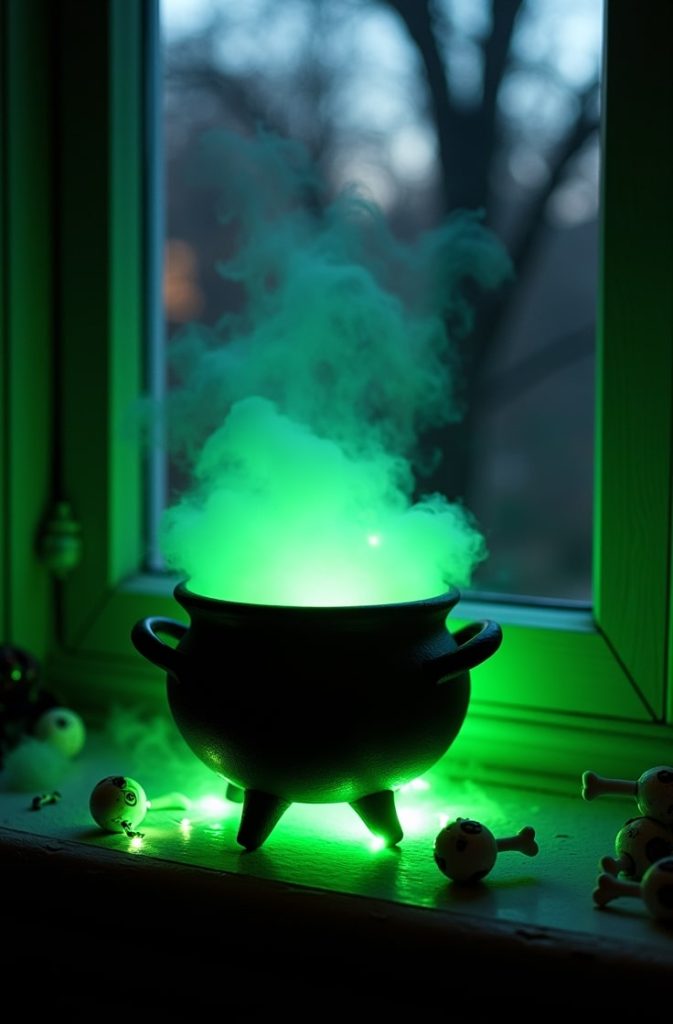
A bubbling cauldron is so much fun! This display features a glowing potion with floating “ingredients” like eyeballs or bones. It’s perfect for a witchy vibe.
- Materials: Plastic cauldron ($10–$20), green cellophane ($3–$5), LED lights ($5–$10), toy bones/eyes ($2–$5).
- Cost: $20–$40.
- Difficulty: Moderate.
- Steps:
- Place a plastic cauldron on your windowsill.
- Line it with green cellophane to mimic a potion.
- Add toy bones or eyeballs for a creepy effect.
- Place LED lights under the cellophane to make it glow.
- Tape cellophane “bubbles” around the cauldron.
- Tips: If you have a fog machine, add dry ice for a smoky effect (ventilate well). Use battery-powered LEDs for safety. Arrange the cauldron so it’s visible from outside.
This display is a showstopper for Halloween parties or busy streets.
7. Zombie Hand Reach
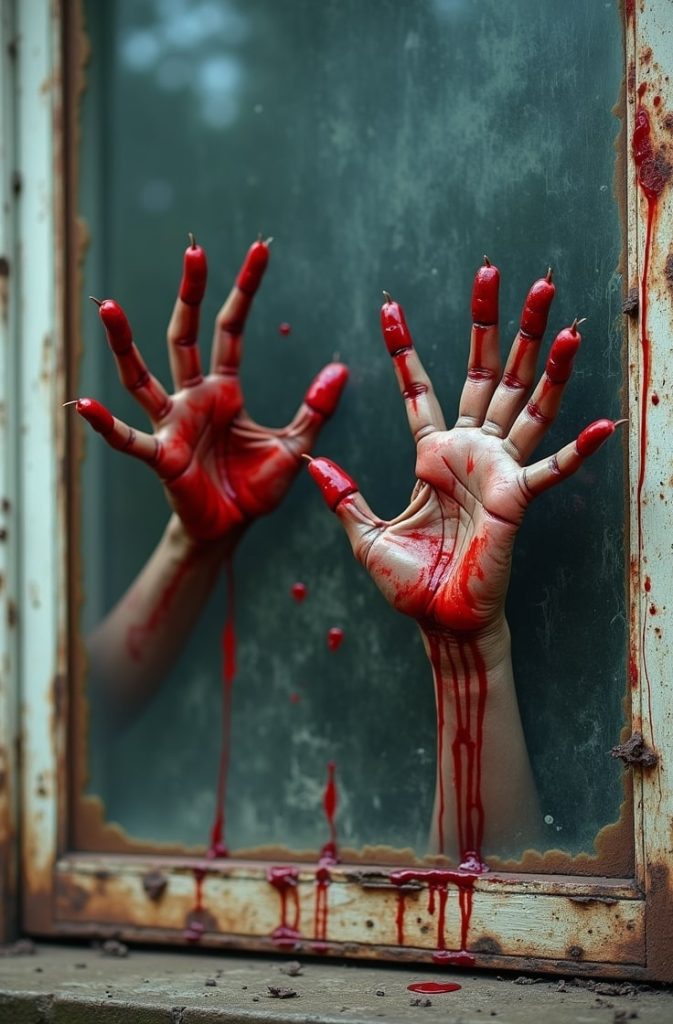
Zombies are terrifying, and this display nails that fear! It shows hands pressing against your window as if zombies are trying to break through.
- Materials: Foam hands ($5–$10), red paint ($3–$5), suction cups ($2–$10).
- Cost: $10–$25.
- Difficulty: Easy.
- Steps:
- Buy foam hands or make them from cardboard and paint.
- Paint the hands with red “blood” for a gory look.
- Attach suction cups to the back of each hand.
- Stick the hands to the inside of your window.
- Tips: Smear red paint on the glass for a bloody handprint effect. Use strong suction cups to keep hands in place. Angle the hands for a dynamic, reaching look.
This is a quick, creepy setup that’s sure to startle passersby.
8. Jack-o’-Lantern Stained Glass
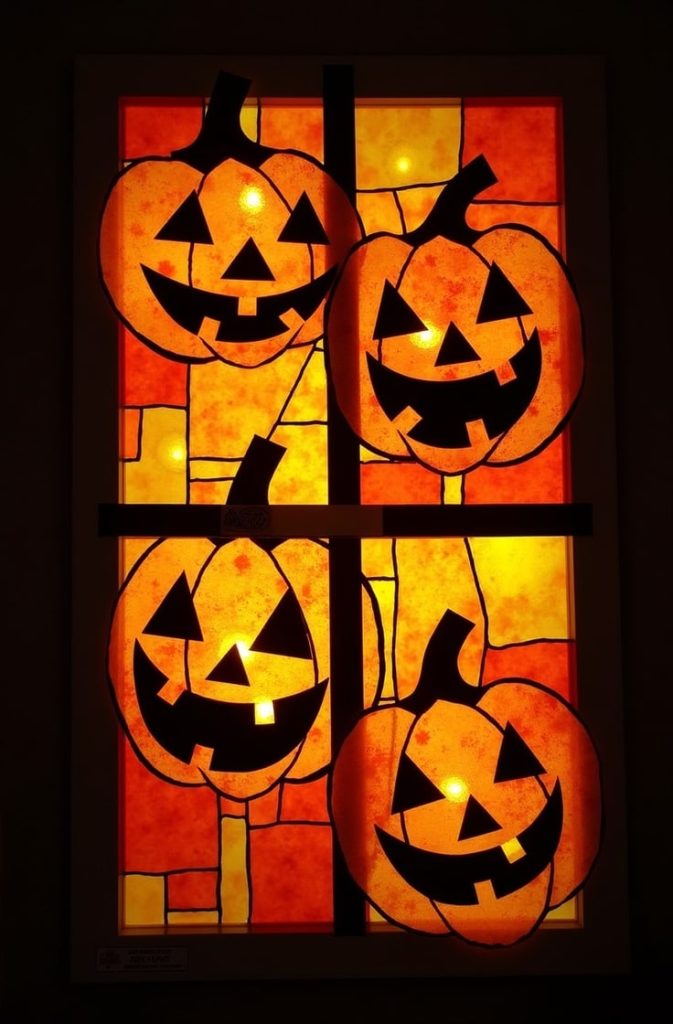
I love the glow of stained glass, and this faux version with jack-o’-lantern faces is so festive. It’s colorful and easy to make.
- Materials: Tissue paper ($2–$5), black electrical tape ($3–$5), LED lights ($5–$10).
- Cost: $5–$15.
- Difficulty: Easy.
- Steps:
- Cut tissue paper into squares (orange, yellow, white).
- Tape them to your window in a patchwork pattern.
- Use black electrical tape to create jack-o’-lantern faces.
- Place LED lights behind the window to make it glow.
- Tips: Layer tissue paper for brighter colors. Use straight tape lines for clean edges. Test the design at night to adjust lighting.
This display is perfect for kids and adds a warm, artistic touch.
9. Graveyard Scene
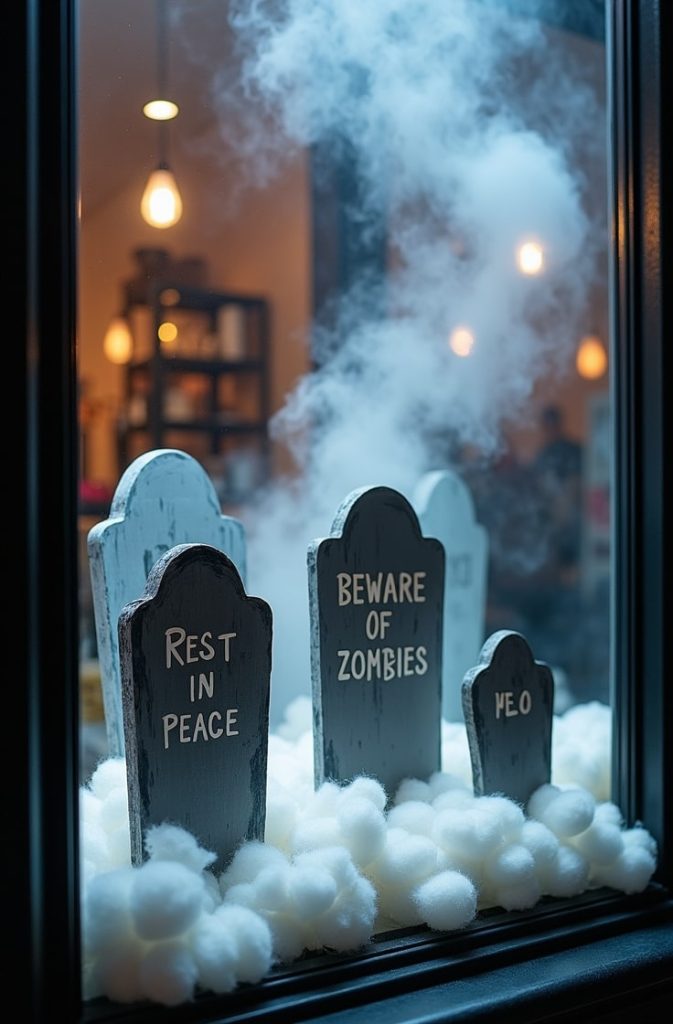
A creepy graveyard is a Halloween classic. This display features tombstones and fog for an eerie cemetery vibe.
- Materials: Cardboard ($5), gray paint ($3–$5), cotton batting ($2–$5), LED fog machine ($10–$35).
- Cost: $20–$50.
- Difficulty: Moderate.
- Steps:
- Cut cardboard into tombstone shapes.
- Paint them gray and add funny epitaphs with a marker.
- Arrange the tombstones on your windowsill.
- Spread cotton batting for a foggy ground effect.
- Use a battery-powered fog machine for extra spookiness.
- Tips: Write humorous epitaphs like “Here Lies My Wi-Fi.” Use battery-powered fog for small spaces. Secure tombstones with tape to prevent tipping.
This display is great for a spooky, interactive vibe.
10. Creepy Crawly Critters
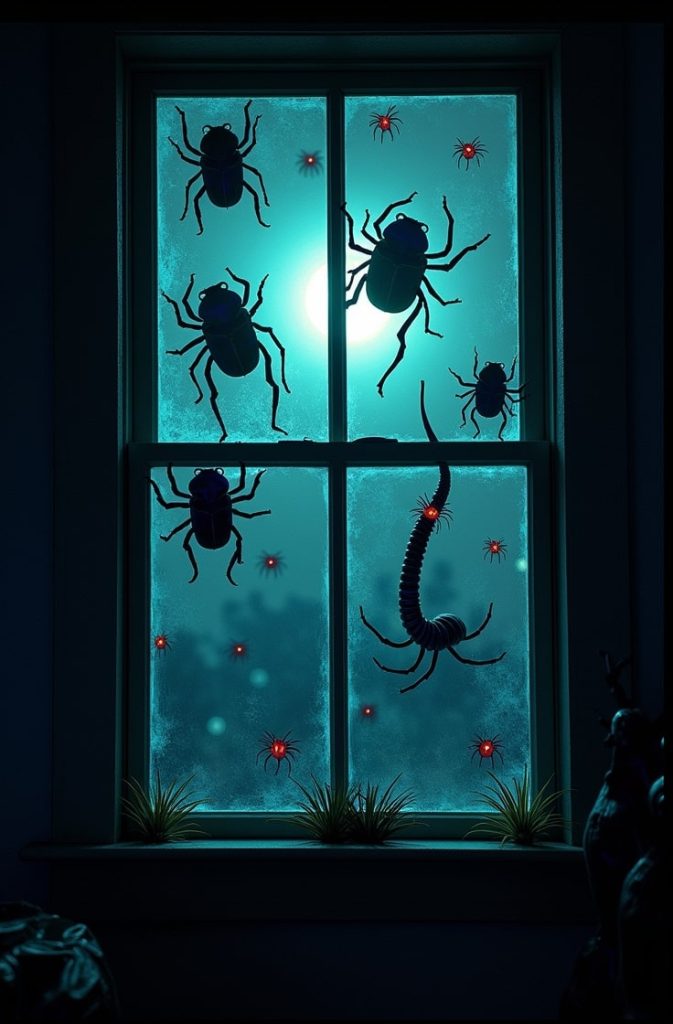
Bugs and critters give everyone the shivers! This display scatters oversized insects across your window for a skin-crawling effect.
- Materials: Plastic insects ($5–$10), glow-in-the-dark paint ($3–$5), double-sided tape ($2).
- Cost: $10–$17.
- Difficulty: Easy.
- Steps:
- Buy large plastic insects like beetles or centipedes.
- Paint them with glow-in-the-dark paint.
- Stick them to your window with double-sided tape.
- Add a few crawling up the window frame.
- Tips: Charge the glow paint with a flashlight before nightfall. Cluster insects for a swarm effect. Use removable tape to avoid residue.
This quick setup is perfect for a creepy, low-effort display.
11. Witch’s Silhouette Flight
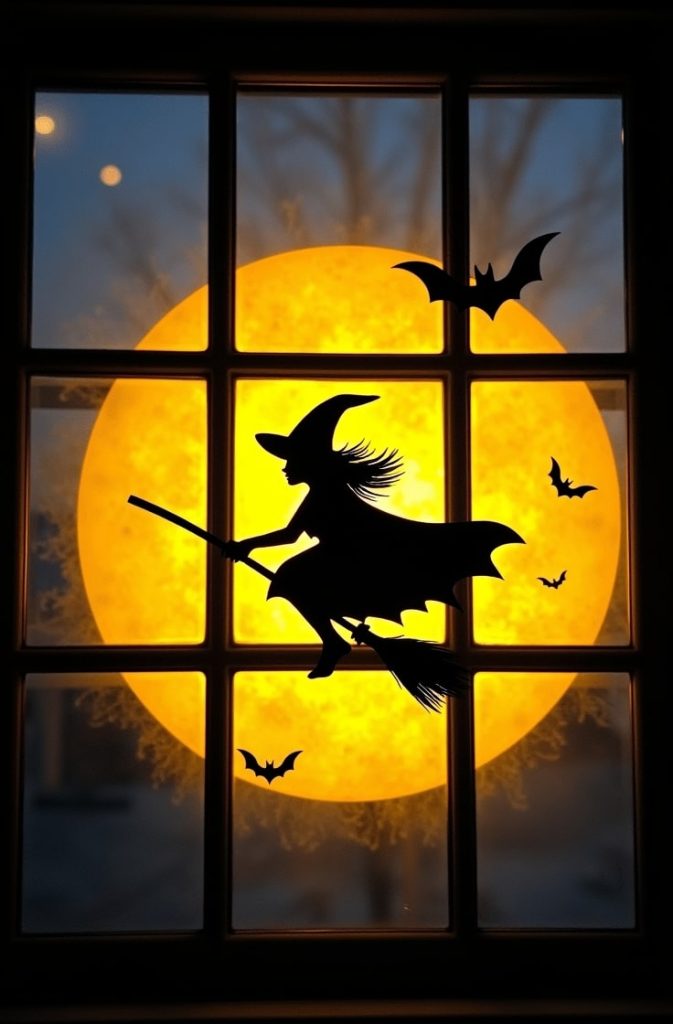
A witch flying across the moon is so iconic. This display uses a glowing moon backdrop with a witch silhouette soaring through.
- Materials: Yellow tissue paper ($2–$5), black cardstock ($5), LED lights ($5–$10), tape ($1).
- Cost: $13–$21.
- Difficulty: Easy.
- Steps:
- Cut a large circle from yellow tissue paper for the moon.
- Tape it to your window.
- Cut a witch on a broomstick from cardstock.
- Stick the witch over the moon.
- Place LED lights behind the tissue paper.
- Tips: Add bat silhouettes for extra flair. Use multiple tissue layers for a brighter moon. Test the lighting at dusk.
This is a classic Halloween look that’s simple to create.
12. Eerie Eyeball Stare
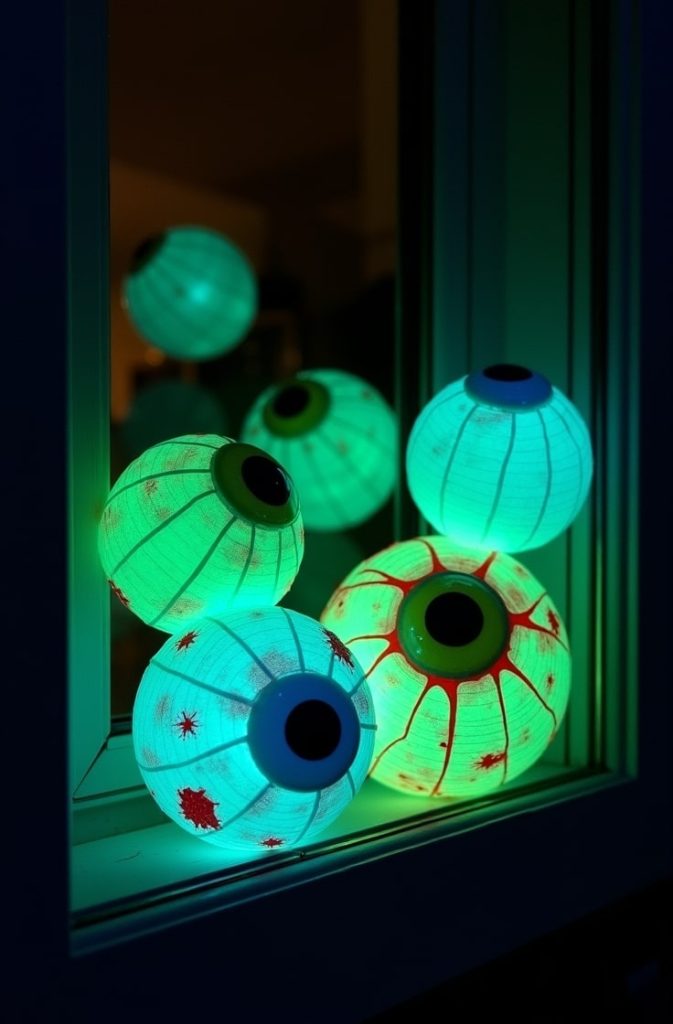
Eyes watching from your window? So creepy! This display uses glowing eyeballs to unsettle passersby.
- Materials: Ping-pong balls ($3–$5), glow sticks ($3–$5), markers ($2), fishing line ($2).
- Cost: $10–$14.
- Difficulty: Easy.
- Steps:
- Draw pupils on ping-pong balls with markers.
- Cut a small hole in each ball and insert a glow stick.
- Hang the balls in your window with fishing line.
- Arrange them to look like they’re staring out.
- Tips: Use red markers for bloodshot eyes. Hang at different heights for depth. Replace glow sticks nightly for brightness.
This display is quick and perfect for a spooky surprise.
13. Vampire’s Lair
Vampires bring a gothic chill, and this display creates a blood-red lair with fangs and bats.
- Materials: Red cellophane ($3–$5), cardboard ($5), white paint ($3–$5), LED lights ($5–$10).
- Cost: $16–$25.
- Difficulty: Moderate.
- Steps:
- Cover your window with red cellophane.
- Cut cardboard into fang and bat shapes.
- Paint the shapes white (fangs) and black (bats).
- Tape them to the window.
- Add LED lights for a bloody glow.
- Tips: Drip red paint on fangs for a bloody effect. Use small bats for a swarm look. Ensure the cellophane is smooth.
This display is perfect for a dramatic, gothic vibe.
14. Skeleton Dance Party

Skeletons having a dance party? So fun! This display shows glowing skeletons grooving in your window.
- Materials: Glow-in-the-dark skeleton decorations ($5–$10), blacklight ($5–$15), tape ($1).
- Cost: $11–$26.
- Difficulty: Easy.
- Steps:
- Buy or make glow-in-the-dark skeleton figures.
- Pose them in dance positions (think disco or twirl).
- Tape them to your window.
- Place a blacklight nearby to make them glow.
- Tips: Add a small speaker with spooky music for effect (if allowed). Pose skeletons creatively for humor. Check the blacklight’s range.
This playful display is great for kids and families.
15. Monster Mash Window
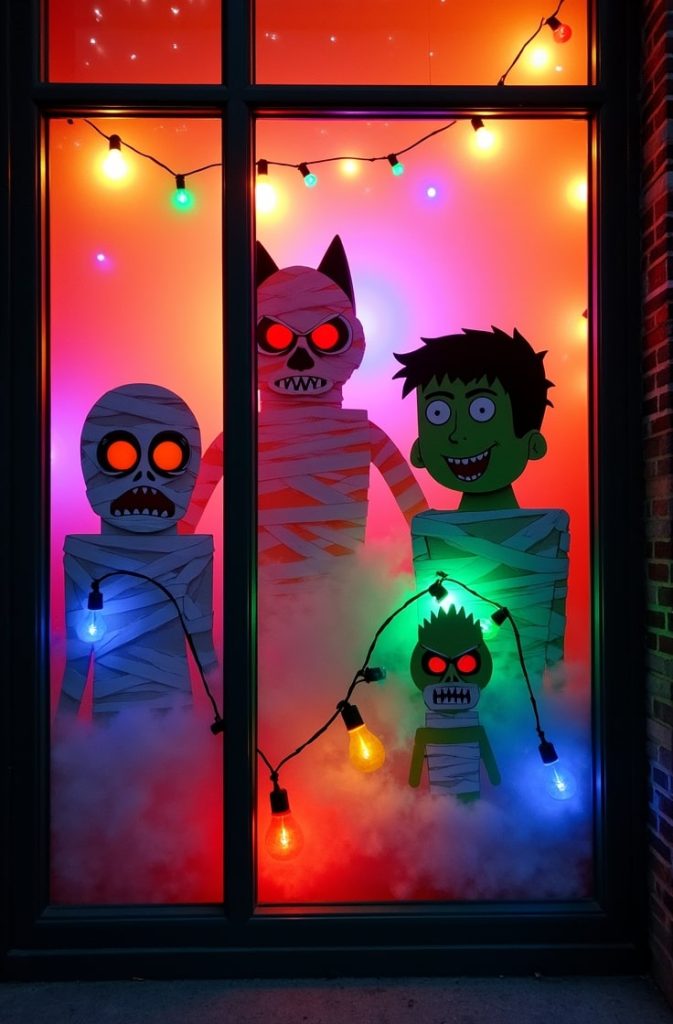
Let’s end with a monster party! This display mixes Frankenstein, mummies, and werewolves in a colorful, chaotic scene.
- Materials: Colored tissue paper ($5–$10), cardboard ($5), markers ($2), LED lights ($5–$10).
- Cost: $17–$27.
- Difficulty: Moderate.
- Steps:
- Cut cardboard into monster shapes (Frankenstein, mummy, werewolf).
- Color them with markers or paint.
- Tape tissue paper in patches behind the window.
- Stick monsters over the tissue paper.
- Add LED lights for a vibrant glow.
- Tips: Use green for Frankenstein, white for mummies, and brown for werewolves. Layer tissue for a stained-glass effect. Arrange monsters like they’re partying.
This display is a fun, colorful way to celebrate Halloween.
Conclusion
I hope these 15 Halloween window display ideas have sparked your creativity!
From spooky silhouettes to dancing skeletons, there’s something here for every skill level and budget. Pick one that fits your space and style, and have fun bringing it to life.
Halloween is all about sharing the spooky spirit, so let your windows shine. Grab your materials, get crafting, and make your display the talk of the town. Happy Halloween!

Jenny is a passionate writer specializing in home decor, design, and styling. With years of experience in transforming spaces, she shares expert tips on creating beautiful, functional homes. From interior design trends to DIY decor ideas, Jenny’s work helps homeowners craft spaces that reflect their unique style. Whether it’s a cozy living room, a modern kitchen, or a serene bedroom, her articles offer practical advice and inspiration to elevate any home.