Are you ready to deck your halls with some budget-friendly Christmas cheer? I’m so excited to share 15 fun, easy, and affordable DIY Christmas crafts you can make using supplies from Dollar Tree.

Whether you’re decorating your home, gifting handmade treasures, or spending quality time with family, these projects will spark joy without breaking the bank.
Dollar Tree is my go-to for affordable materials, and their wide variety of seasonal goodies makes crafting a breeze.
Let’s dive in and create some holiday magic together!
Table of Contents
- Getting Started with Dollar Tree Crafts
- 15 Dollar Tree Christmas Craft Ideas
- 1. Mini Christmas Tree Ornaments
- 2. Snowman Mason Jar Luminary
- 3. Dollar Tree Wreath
- 4. Glittery Gift Tags
- 5. Santa Hat Chair Covers
- 6. Reindeer Picture Frame
- 7. Christmas Village Luminaries
- 8. Pinecone Ornaments
- 9. Jingle Bell Door Hanger
- 10. Snow Globe Jars
- 11. Candy Cane Vase
- 12. Felt Christmas Stockings
- 13. Snowflake Window Clings
- 14. Pom-Pom Garland
- 15. Rustic Wooden Sign
- Customization and Variations
- Budget and Time-Saving Tips
- Inspiration and Display Ideas
- Troubleshooting Common Issues
- Conclusion
Getting Started with Dollar Tree Crafts
Why DIY Christmas Crafts?
I love crafting during the holidays because it’s a fun way to save money while making my home feel festive. You can create decorations that match your style, and it’s a great activity to do with kids or friends.
Plus, there’s something so special about giving or displaying something you made yourself. These crafts are perfect for anyone who wants to add a personal touch to their Christmas without spending a fortune.
What You’ll Need
Most of the supplies for these crafts come straight from Dollar Tree. Stock up on basics like a hot glue gun, glue sticks, acrylic paint, ribbons, scissors, and foam boards. You might already have some tools at home, like paintbrushes or a ruler.
I always grab a few extra items like pom-poms, pipe cleaners, and glitter because they’re so versatile. Check your local Dollar Tree for seasonal items like mini ornaments or holiday ribbon—they sell out fast!
Tips for Success
To make your crafting experience smooth, shop early. Dollar Tree’s Christmas stock hits shelves in late fall, and the best items go quickly. Plan your projects ahead to use supplies across multiple crafts—this saves time and money.
If you’re crafting with kids, keep an eye on hot glue guns and sharp scissors. Safety first! I like to set up a clean workspace with all my supplies organized before I start. It makes the process so much more enjoyable.
15 Dollar Tree Christmas Craft Ideas
Let’s get to the fun part—the crafts! I’ve put together 15 projects that are simple, affordable, and perfect for the holiday season. Each one includes a materials list, step-by-step instructions, estimated time, and skill level. Whether you’re a beginner or a seasoned crafter, there’s something here for you.
1. Mini Christmas Tree Ornaments
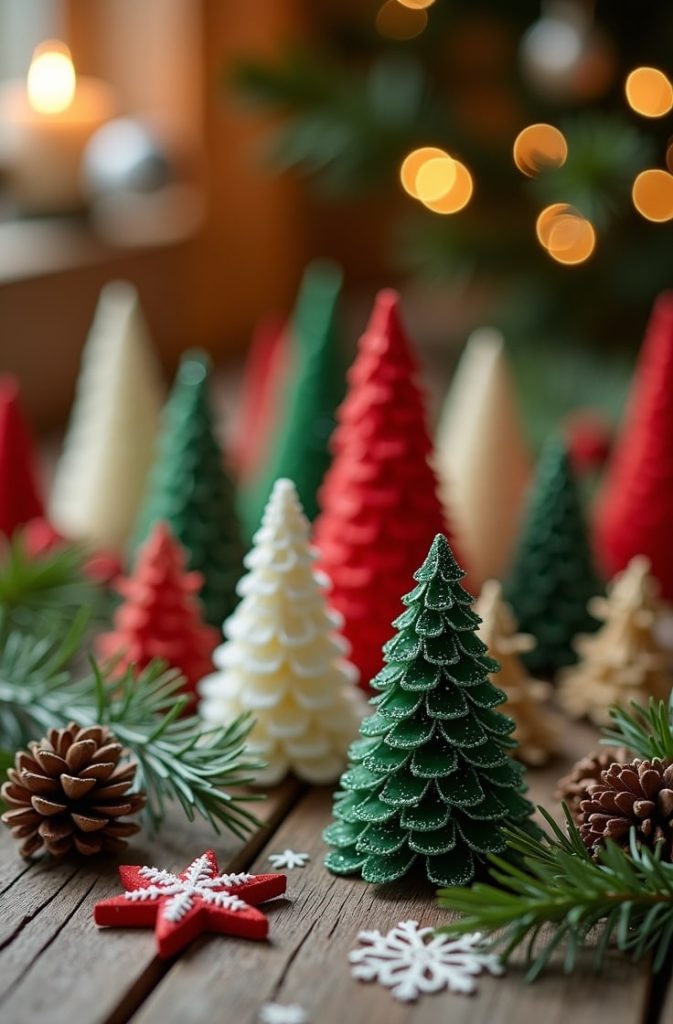
Description: These adorable mini trees are perfect for your Christmas tree or as table decor. They’re quick to make and look so festive!
Materials: Foam cones, tinsel, mini ornaments, glue sticks.
Instructions:
- Grab a foam cone from Dollar Tree.
- Wrap tinsel around the cone, securing it with hot glue as you go.
- Glue mini ornaments randomly on the tinsel.
- Add a star or bow on top for a finishing touch.
Time: 20 minutes | Skill Level: Beginner.
I love how these little trees brighten up any space. They’re so easy, even kids can help!
2. Snowman Mason Jar Luminary
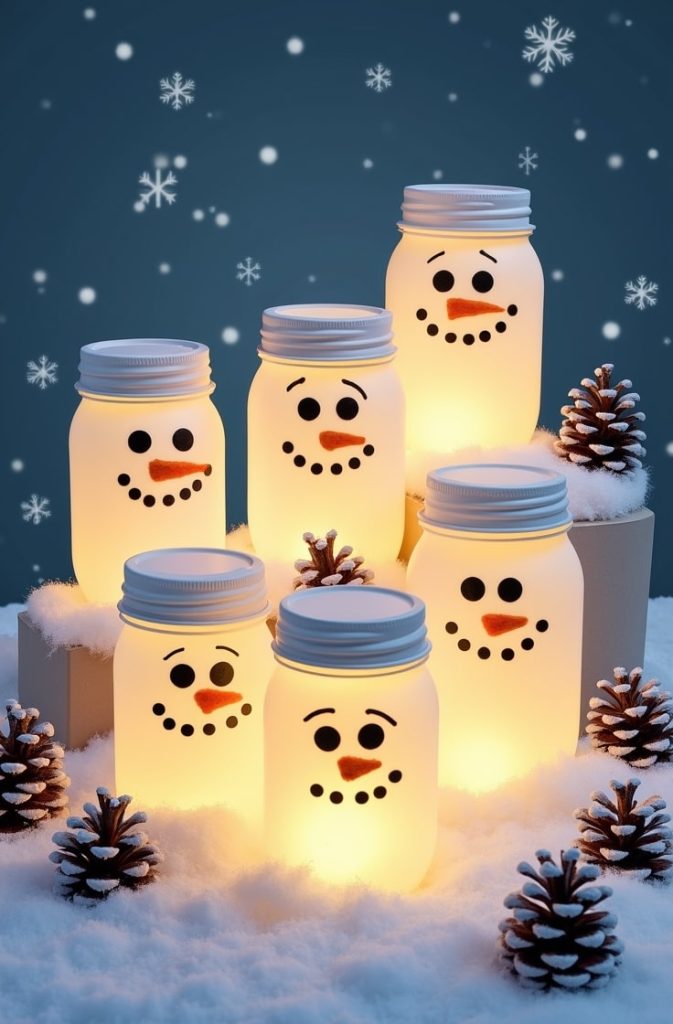
Description: Turn mason jars into glowing snowman faces. These luminaries create a cozy vibe on winter nights.
Materials: Mason jars, white acrylic paint, black felt, battery-powered tea lights.
Instructions:
- Paint the outside of a mason jar white. Let it dry completely.
- Cut out eyes, a mouth, and a carrot nose from black and orange felt.
- Glue the facial features onto the jar.
- Place a battery-powered tea light inside for a warm glow.
Time: 30 minutes | Skill Level: Beginner.
These snowmen are so cute on a mantel or as a centerpiece. The tea lights make them extra special.
3. Dollar Tree Wreath
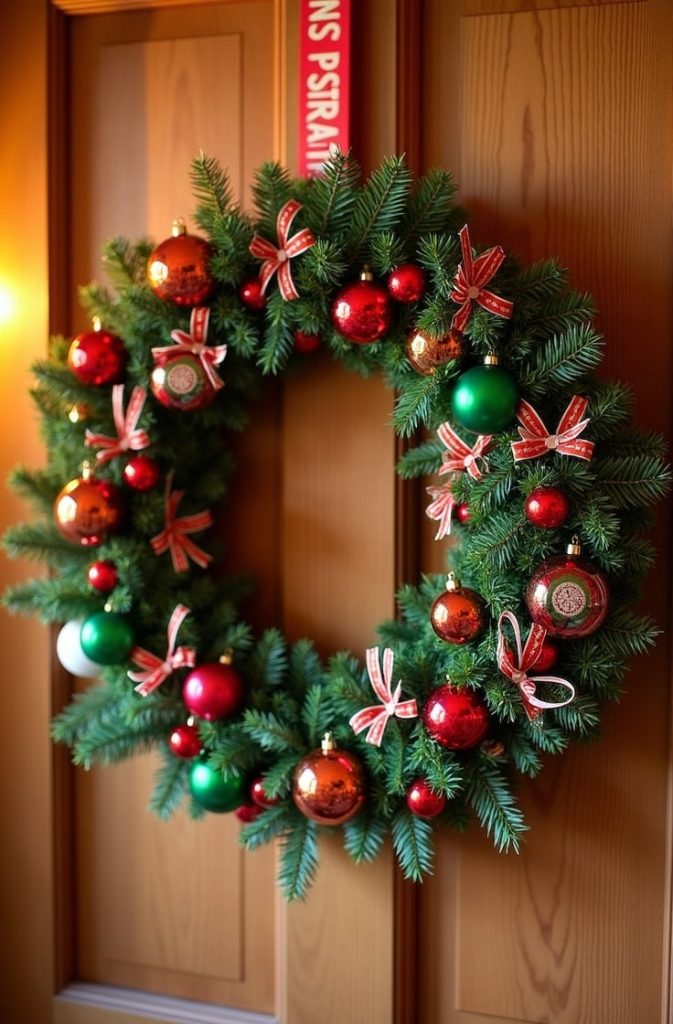
Description: Create a stunning wreath for your front door using affordable materials. It’s a showstopper!
Materials: Wire wreath frame, ribbons, plastic ornaments, artificial greenery.
Instructions:
- Attach greenery to the wire frame with hot glue.
- Wrap ribbon around the frame for color and texture.
- Glue plastic ornaments in clusters for a festive pop.
- Hang with a ribbon loop.
Time: 45 minutes | Skill Level: Intermediate.
This wreath looks so professional, but it’s so easy to make. Your neighbors will be jealous!
4. Glittery Gift Tags

Description: Add a sparkly touch to your presents with handmade gift tags. They’re quick and customizable.
Materials: Cardstock, glitter, ribbon, hole punch.
Instructions:
- Cut cardstock into small rectangles or fun shapes.
- Brush glue on one side and sprinkle glitter over it. Let it dry.
- Write names or messages on the back.
- Punch a hole and tie a ribbon through it.
Time: 15 minutes | Skill Level: Beginner.
These tags make every gift feel extra special. I love using red and green glitter for a classic holiday look.
5. Santa Hat Chair Covers
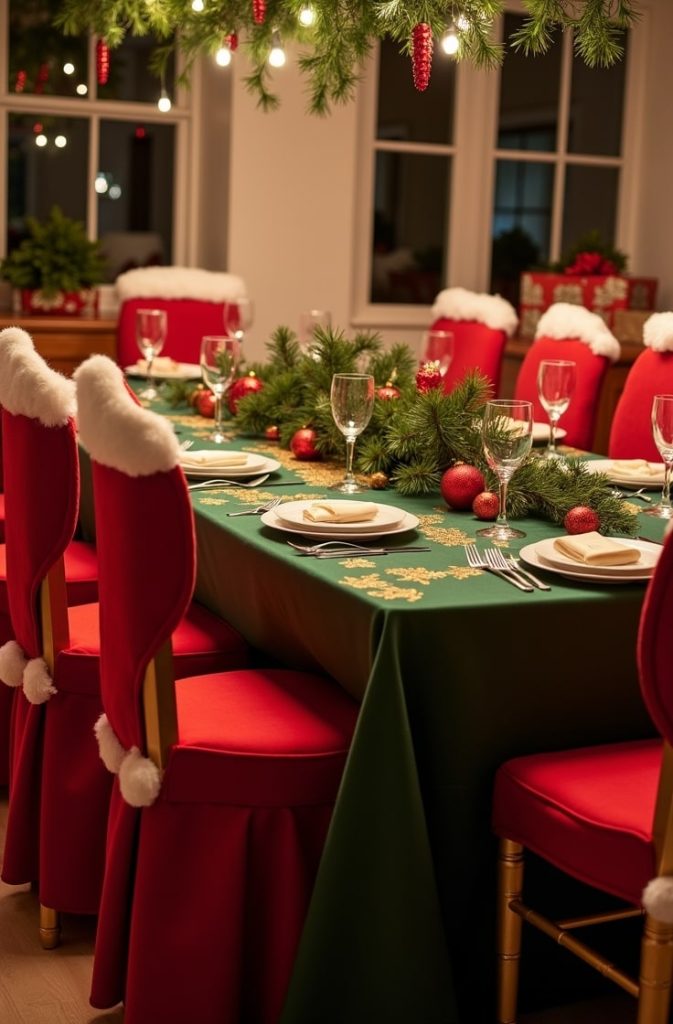
Description: Dress up your dining chairs with adorable Santa hat covers. They’re perfect for holiday dinners.
Materials: Red felt, white pom-poms, cotton batting.
Instructions:
- Cut red felt into Santa hat shapes (one per chair).
- Glue cotton batting along the bottom for the hat’s trim.
- Attach a white pom-pom to the tip.
- Slip the cover over the top of each chair.
Time: 40 minutes | Skill Level: Intermediate.
Your guests will love these festive chair covers. They’re a fun way to make your dining room merry!
6. Reindeer Picture Frame
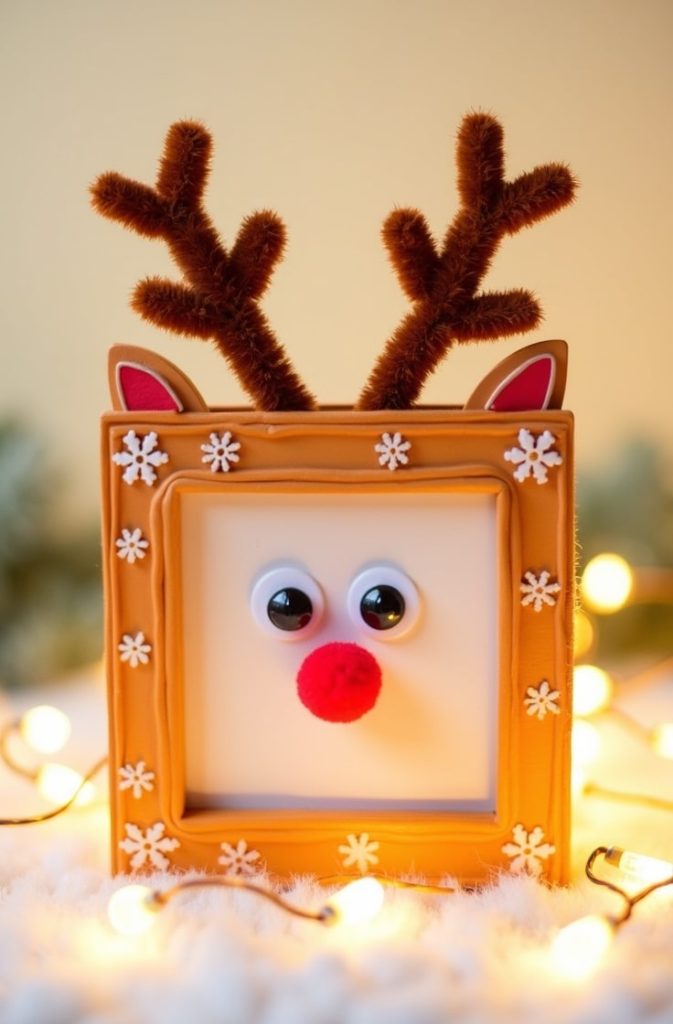
Description: Turn a plain frame into a cute reindeer for holiday photos or gifts.
Materials: Picture frame, brown pipe cleaners, googly eyes, red pom-poms.
Instructions:
- Twist brown pipe cleaners into antler shapes.
- Glue the antlers to the top of the frame.
- Add googly eyes and a red pom-pom nose below.
- Insert a holiday photo or leave it empty for gifting.
Time: 25 minutes | Skill Level: Beginner.
This frame is so charming! It’s a great gift for grandparents or friends.
7. Christmas Village Luminaries

Description: Create a glowing village scene that looks magical on a windowsill.
Materials: Black cardstock, white paint, battery-powered tea lights.
Instructions:
- Cut black cardstock into house shapes with windows.
- Paint details like doors or snow on the houses.
- Fold the cardstock to stand upright.
- Place a tea light behind each house for a cozy glow.
Time: 50 minutes | Skill Level: Intermediate.
These luminaries make your home feel like a winter hamlet. They’re so pretty at night!
8. Pinecone Ornaments

Description: Paint pinecones for rustic, charming tree ornaments.
Materials: Pinecones, acrylic paint, glitter, ribbon.
Instructions:
- Paint pinecones in festive colors like red, green, or white.
- Sprinkle glitter on wet paint for sparkle. Let it dry.
- Tie a ribbon loop to the top for hanging.
- Hang on your tree or around the house.
Time: 20 minutes | Skill Level: Beginner.
These pinecones add a natural, cozy feel to your decor. I love how simple they are!
9. Jingle Bell Door Hanger
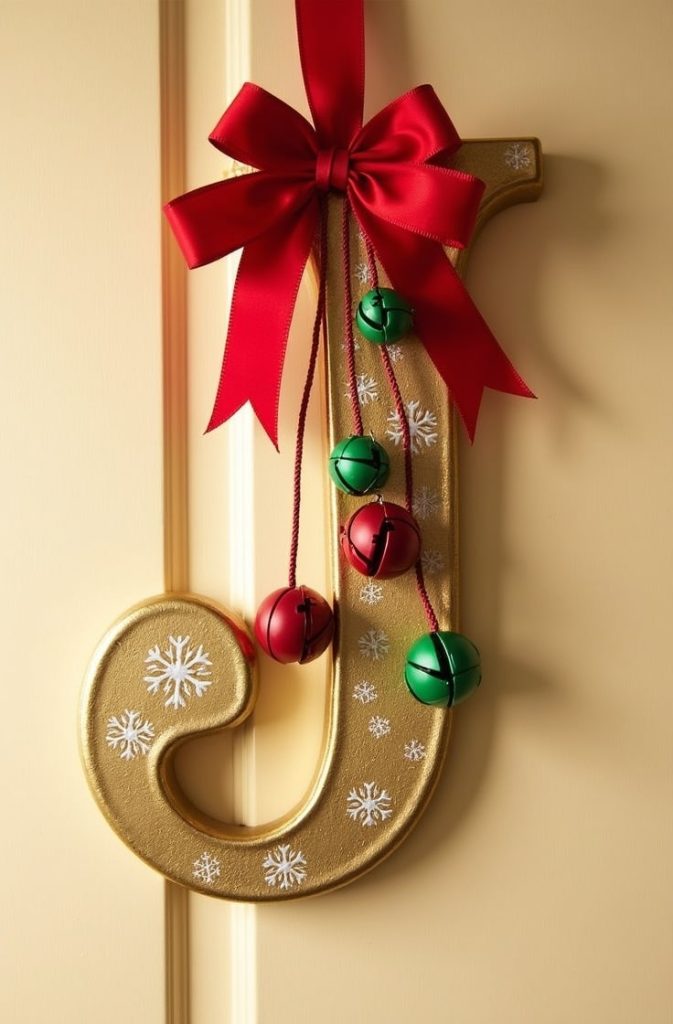
Description: Make a cheerful door hanger with jingle bells that ring with every open.
Materials: Jingle bells, ribbon, wooden letter.
Instructions:
- Paint a wooden letter (like “J” for joy) in a festive color.
- String jingle bells onto a ribbon.
- Glue the ribbon to the back of the letter.
- Hang on your door with a loop of ribbon.
Time: 30 minutes | Skill Level: Beginner.
The jingle bells make this craft so fun. It’s like a holiday greeting every time you enter!
10. Snow Globe Jars

Description: Create faux snow globes with jars and mini figurines for a whimsical touch.
Materials: Mason jars, mini trees, fake snow, glue.
Instructions:
- Glue a mini tree or figurine to the inside of the jar lid.
- Add a small amount of fake snow to the jar.
- Screw the lid on tightly.
- Flip the jar upside down to display.
Time: 35 minutes | Skill Level: Beginner.
These snow globes are so cute on a shelf. Shake them gently for a snowy effect!
11. Candy Cane Vase

Description: Wrap a vase with candy canes for a festive flower holder.
Materials: Glass vase, candy canes, ribbon, hot glue.
Instructions:
- Glue candy canes vertically around the outside of the vase.
- Tie a ribbon around the vase for extra charm.
- Fill with flowers or greenery.
- Display on your table or counter.
Time: 25 minutes | Skill Level: Beginner.
This vase is perfect for holiday centerpieces. It’s so easy but looks so elegant!
12. Felt Christmas Stockings

Description: Make mini stockings for gift cards or small treats.
Materials: Felt, thread, pom-poms, needle.
Instructions:
- Cut two stocking shapes from felt.
- Sew or glue the edges together, leaving the top open.
- Glue pom-poms or other decorations on the front.
- Fill with gift cards or candy.
Time: 40 minutes | Skill Level: Intermediate.
These stockings are perfect for small gifts. They’re so cute hanging on a tree!
13. Snowflake Window Clings
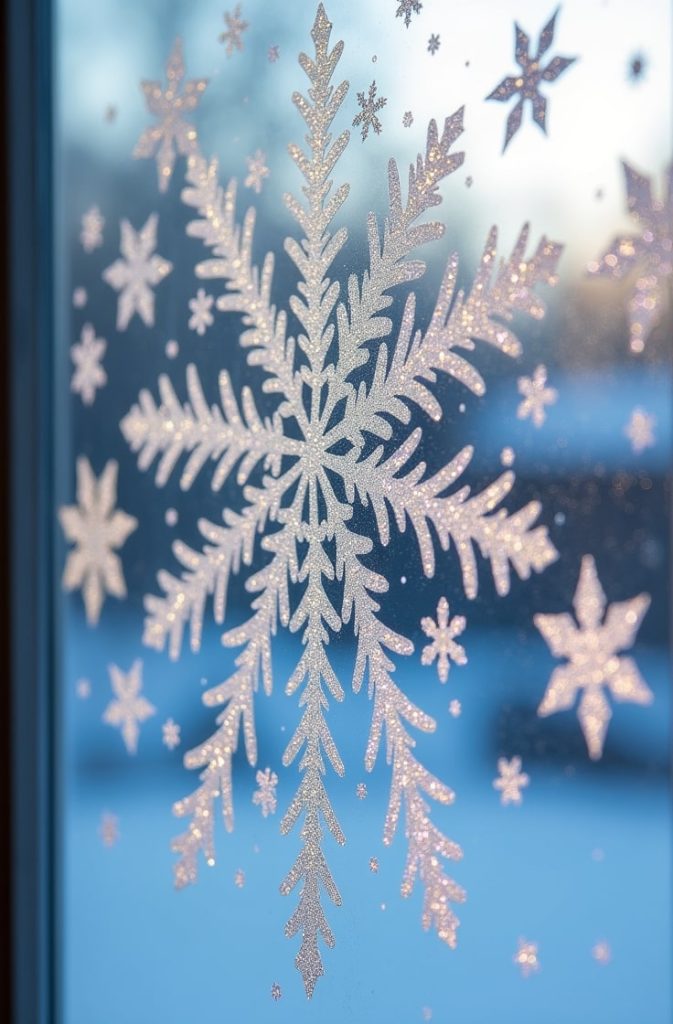
Description: Create reusable snowflake clings to decorate your windows.
Materials: Hot glue sticks, wax paper, glitter.
Instructions:
- Draw snowflake shapes with hot glue on wax paper.
- Sprinkle glitter over the glue while it’s wet.
- Let it dry completely, then peel off the wax paper.
- Stick to windows or glass surfaces.
Time: 30 minutes | Skill Level: Beginner.
These clings add a frosty touch to your home. They’re reusable, too!
14. Pom-Pom Garland
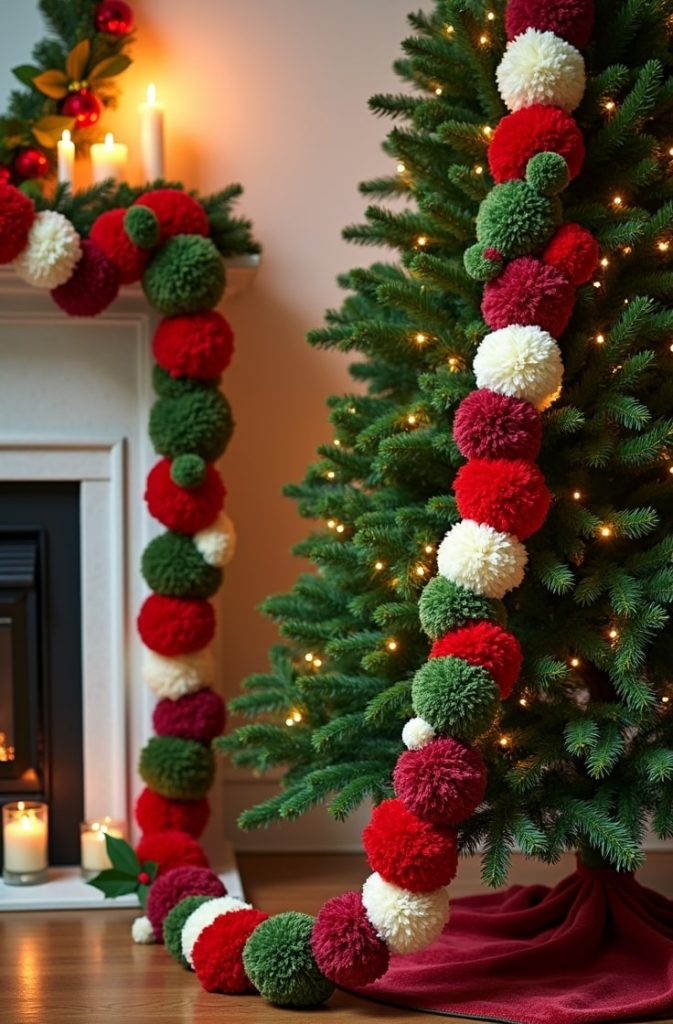
Description: Make a colorful garland for your tree or mantel.
Materials: Pom-poms, twine, hot glue.
Instructions:
- Cut a long piece of twine to your desired length.
- Glue pom-poms to the twine at even intervals.
- Let the glue dry completely.
- Drape the garland on your tree or mantel.
Time: 35 minutes | Skill Level: Beginner.
This garland is so cheerful and versatile. I love mixing red, white, and green pom-poms!
15. Rustic Wooden Sign

Description: Paint a wooden plank with a festive message like “Joy” or “Merry Christmas.”
Materials: Wooden plank, acrylic paint, stencils, twine.
Instructions:
- Paint the wooden plank in a solid color. Let it dry.
- Use stencils to paint a holiday message.
- Add small decorative touches like dots or stars.
- Tie twine to the back for hanging.
Time: 45 minutes | Skill Level: Intermediate.
This sign adds a rustic charm to your decor. It’s perfect for a front porch or living room.
Customization and Variations
Personalizing Crafts
Make these crafts your own! Add names to gift tags or stockings for a personal touch. Choose colors that match your decor—red and green are classic, but gold or silver can be stunning. If you’re hosting a craft night, let everyone pick their own embellishments. Kids love adding stickers or extra glitter to projects like the pinecone ornaments or snow globes.
Alternative Materials
If your Dollar Tree is out of something, don’t worry! Use yarn instead of ribbon for the wreath or garland. Swap felt for construction paper on the stockings if needed. You can even use buttons instead of pom-poms for decorations. Get creative with what you have at home to keep costs low.
Scaling Projects
Want a bigger wreath? Use a larger wire frame and more greenery. For smaller snow globes, try using baby food jars instead of mason jars. You can also make multiple mini trees or gift tags in one sitting for a cohesive look. Adjust the size to fit your space or needs.
Budget and Time-Saving Tips
Maximizing Dollar Tree Purchases
I always buy multi-packs of supplies like glue sticks, paint, or ribbon. They’re such a steal at Dollar Tree! Look for items you can use across projects, like pom-poms or cardstock. If you’re making several crafts, group them by shared materials to save money. For example, buy one pack of glitter for both the gift tags and pinecone ornaments.
Time Management
To save time, group similar crafts together. Paint all your projects (like the wooden sign and pinecones) in one session to avoid cleaning brushes multiple times. Set aside a weekend to complete your crafts before the holiday rush. I like to make a checklist of supplies and steps to stay organized.
Storage and Longevity
Store your crafts in plastic bins to keep them safe for next year. Wrap delicate items like snow globes in tissue paper. For clings or garlands, keep them in a dry place to avoid damage. Use sturdy materials like felt or wood to ensure your crafts last multiple seasons.
Inspiration and Display Ideas
Decorating with Crafts
These crafts can transform your home! Hang the wreath on your front door and the garland on your mantel. Place snowman luminaries and village scenes on your windowsill for a cozy glow. Use the candy cane vase as a dining table centerpiece with fresh or fake flowers. Mix and match for a festive, cohesive look.
Gifting Ideas
Many of these crafts make great gifts. Package gift tags with a ribbon for a thoughtful present. Give the reindeer frame with a family photo inside. The mini stockings are perfect for gift cards or small treats. Wrap them in tissue paper or a Dollar Tree gift bag for a polished look.
Photo Gallery
Picture this: your wreath on the door, luminaries glowing on the table, and garland draped across the tree. These crafts create a warm, inviting holiday vibe. Try arranging the mini trees in a cluster on a shelf for a forest effect. Experiment with different setups to see what you love most!
Troubleshooting Common Issues
Crafting Challenges
If your hot glue isn’t sticking, make sure surfaces are clean and dry. For smudgy paint, let each layer dry fully before adding more. If your snowflake clings won’t peel off easily, let them dry longer or use a thinner layer of glue. Practice makes perfect, so don’t stress if your first try isn’t flawless.
Material Shortages
Dollar Tree’s stock can vary, so have a backup plan. If you can’t find foam cones, use rolled-up cardstock for the mini trees. No mason jars? Try clear plastic cups for luminaries. Check nearby Dollar Tree locations or use household items to fill in gaps.
Kid-Friendly Adaptations
For younger kids, skip the hot glue and use school glue or tape. Simplify projects like the gift tags or pom-pom garland by letting them stick on decorations. Supervise closely with scissors or paint. These crafts are a great way to make memories with your little ones!
Conclusion
There you have it—15 Dollar Tree Christmas crafts to make your holiday season merry and bright! I love how these projects let you create beautiful decorations and gifts on a budget.
Crafting is such a fun way to get into the holiday spirit, and I hope you’re as excited as I am to try these ideas.
Head to your local Dollar Tree, grab some supplies, and start creating. You’ll be amazed at what you can make for just a few dollars!

Jenny is a passionate writer specializing in home decor, design, and styling. With years of experience in transforming spaces, she shares expert tips on creating beautiful, functional homes. From interior design trends to DIY decor ideas, Jenny’s work helps homeowners craft spaces that reflect their unique style. Whether it’s a cozy living room, a modern kitchen, or a serene bedroom, her articles offer practical advice and inspiration to elevate any home.