Every fall, as the leaves start to turn and the air gets crisp, I find myself reaching for my craft supplies. It’s become a seasonal ritual—one that brings warmth, creativity, and a little calm to the busy days ahead.

Over the years as a DIY stylist, I’ve tried just about every fall craft out there, but these 15 projects are the ones I keep coming back to. They’re simple, beautiful, and filled with that cozy, handmade charm we all crave this time of year.
Whether you’re decorating your space or carving out time for yourself, these ideas will inspire you to create. Grab a cup of tea—your next favorite fall craft might be waiting just ahead.
Table of Contents
- Why Fall Crafts for Adults?
- Materials and Tools Overview
- The 15 Fall Crafts For Adults
- Tips for Success
- Conclusion
- FAQs
Why Fall Crafts for Adults?
Fall feels like a fresh start. The changing leaves and cooler days make me want to slow down and create. Crafting is more than just a hobby—it’s a way to relax, express yourself, and bring the season into your home.
The rich oranges, deep reds, and golden yellows of autumn inspire endless ideas. Plus, holidays like Halloween and Thanksgiving give you plenty of reasons to get crafty.
Crafting helps you unwind. It’s a chance to focus on something fun and forget daily stress. You can make unique decor for your home or thoughtful gifts for friends. Best of all, these projects work for any budget.
Many use items you already have or can find in nature. Whether you’re new to crafting or a pro, there’s something here for you. I’ve included projects for all skill levels, so you can start simple or challenge yourself.
Materials and Tools Overview
Before we start, let’s talk about what you’ll need. Most of these crafts use easy-to-find materials. You can gather some from nature, like leaves, pinecones, or acorns. Others, like paint, twine, or burlap, are available at craft stores or dollar shops. I love using recycled items, too—think mason jars, wine corks, or old sweaters. They’re budget-friendly and eco-conscious.
Here’s a quick list of common materials:
- Natural items: Leaves, pinecones, acorns, small pumpkins.
- Craft supplies: Acrylic paint, twine, burlap, hot glue, scissors.
- Recycled items: Mason jars, wine corks, old fabrics or sweaters.
You’ll also need some basic tools:
- Paintbrushes for detailed work.
- A hot glue gun for quick bonding.
- Scissors or a craft knife for cutting.
- Mod Podge for sealing and gluing.
- A needle and thread for sewing projects.
Sourcing Tips
Check local dollar stores or thrift shops for affordable supplies. Craft stores like Michaels or Joann often have sales in the fall. For natural items, take a walk in your neighborhood—fallen leaves and pinecones are free! If you want to go green, repurpose old jars or fabric scraps. Sustainability feels good, and it saves money.
Setting Up Your Space
Find a clean, well-lit spot to work. A kitchen table or desk works great. Lay down newspaper or a drop cloth to keep things tidy. Keep your materials organized in bins or trays so you can focus on creating. I like to play soft music to set the mood—try it!
The 15 Fall Crafts For Adults
Let’s get to the fun part: the crafts! I’ve split them into four categories—home decor, seasonal gifts, holiday-themed projects, and upcycled creations. Each craft includes a description, skill level, estimated time, materials, and clear steps. I’ve also added tips to make each project your own. Let’s start crafting!
Category 1: Home Decor Crafts
1. Pumpkin Centerpiece

Description: This rustic centerpiece uses real or faux pumpkins to create a stunning table display. It’s perfect for Thanksgiving or fall dinners.
Skill Level: Beginner
Estimated Time: 1 hour
Materials: 3–5 small pumpkins (real or faux), acrylic paint (white or gold), candles, floral accents (e.g., fake leaves or berries), tray or basket.
Steps:
- Paint your pumpkins in white or gold for a chic look. Let them dry completely.
- Arrange the pumpkins on a tray or in a basket.
- Add candles (real or LED) for a warm glow.
- Tuck in floral accents like leaves or berries for texture.
- Place the centerpiece on your dining table or entryway.
Tips: Mix pumpkin sizes for variety. Try metallic paints for a modern twist. Use LED candles for safety.
Safety: Keep real candles away from flammable materials.
2. Fall Leaf Wreath

Description: Make a colorful wreath with preserved or artificial leaves. Hang it on your door to welcome guests.
Skill Level: Intermediate
Estimated Time: 2 hours
Materials: Foam wreath base, preserved or artificial leaves, hot glue gun, ribbon, optional embellishments (e.g., pinecones).
Steps:
- Gather leaves or buy artificial ones in fall colors.
- Hot glue leaves to the foam wreath base, overlapping them for a full look.
- Add pinecones or small ornaments for extra flair.
- Tie a ribbon at the top for hanging.
- Hang your wreath on your front door or indoors.
Tips: Spray preserved leaves with a sealant to keep them fresh. Choose a burlap ribbon for a rustic vibe.
Safety: Be careful with the hot glue gun to avoid burns.
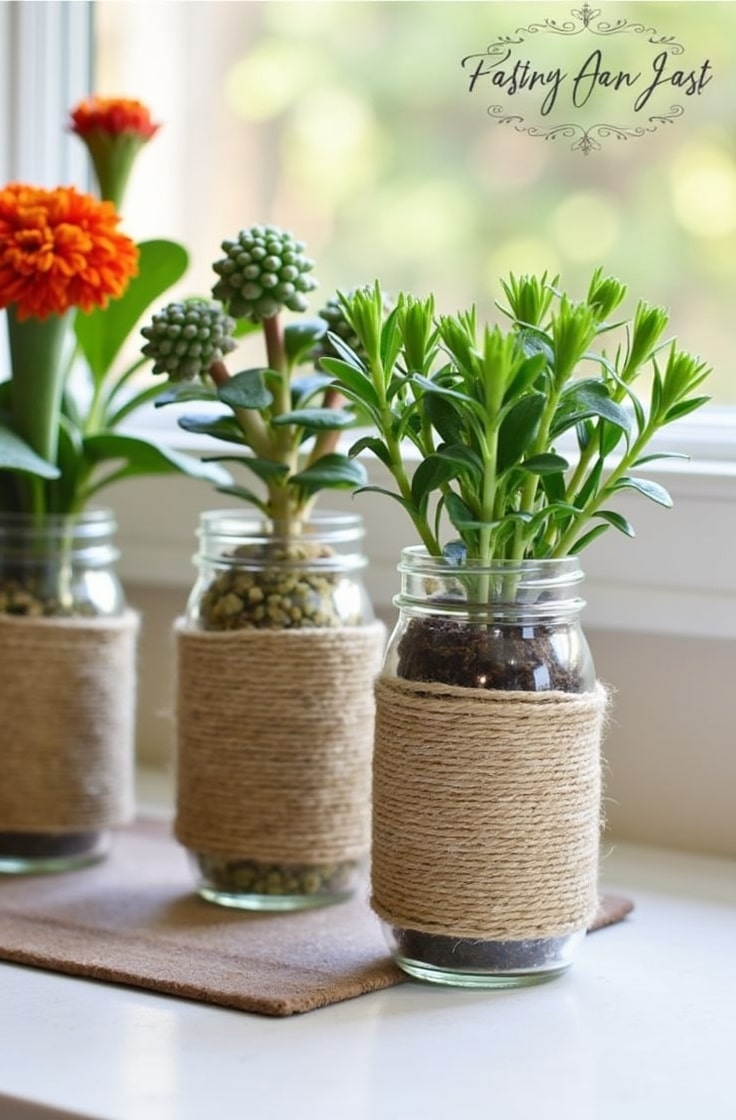
3. Mason Jar Candle Holders

Description: Turn mason jars into cozy candle holders with fall designs. They add warmth to any room.
Skill Level: Beginner
Estimated Time: 45 minutes
Materials: Mason jars, acrylic paint (fall colors), twine, tea lights, paintbrushes.
Steps:
- Paint the outside of a mason jar with fall colors like orange or brown. Let it dry.
- Add designs like leaves or pumpkins with a small brush.
- Wrap twine around the jar’s neck for a rustic touch.
- Place a tea light inside.
- Light it up or use an LED candle for safety.
Tips: Try painting stripes or polka dots for variety. Use frosted glass paint for a softer glow.
Safety: Never leave lit candles unattended.
4. Wood Slice Coasters

Description: Paint or wood-burn fall designs on wood slices for unique coasters. They’re both functional and decorative.
Skill Level: Intermediate
Estimated Time: 1.5 hours
Materials: Wood slices (4–5 inches wide), acrylic paint or wood-burning tool, sealant, paintbrushes.
Steps:
- Sand the wood slices to smooth them.
- Paint or wood-burn designs like leaves or acorns.
- Let the paint dry or cool the wood-burning tool.
- Apply a sealant to protect the design.
- Use your coasters for drinks or display them.
Tips: Practice wood-burning on scrap wood first. Use earthy colors for a natural look.
Safety: Handle wood-burning tools with care to avoid burns.
5. Burlap Table Runner

Description: Create a burlap table runner with stenciled fall motifs like pumpkins or leaves. It’s a great dining table accent.
Skill Level: Intermediate
Estimated Time: 2 hours
Materials: Burlap fabric, stencils, fabric paint, paintbrush, sewing kit or fabric glue, measuring tape.
Steps:
- Measure and cut burlap to fit your table (add 12 inches for overhang).
- Hem the edges with a sewing machine or fabric glue.
- Place stencils on the burlap and secure with tape.
- Paint the designs with fabric paint. Let dry.
- Place the runner on your table.
Tips: Fray the edges slightly for a rustic look. Use multiple stencils for variety.
Safety: Use fabric glue in a well-ventilated area.
Category 2: Seasonal Gifts
6. Autumn-Scented Candles

Description: Make soy candles with cozy fall scents like cinnamon or apple pie. They’re perfect for gifting.
Skill Level: Intermediate
Estimated Time: 2 hours
Materials: Soy wax, wicks, essential oils (cinnamon, apple, or pumpkin), jars, double boiler, thermometer.
Steps:
- Melt soy wax in a double boiler until it reaches 185°F.
- Add 10–15 drops of essential oils and stir.
- Secure a wick in the center of a jar with a dab of hot glue.
- Pour the melted wax into the jar, leaving ½ inch at the top.
- Let the candle cool for 24 hours before using.
Tips: Add a label with the scent name for a personal touch. Try mixing scents like vanilla and clove.
Safety: Handle hot wax carefully to avoid burns.
7. Personalized Fall Ornaments

Description: Craft mini ornaments with painted gourds or clay. They’re great for gift exchanges or tree decor.
Skill Level: Beginner
Estimated Time: 1 hour
Materials: Air-dry clay or small gourds, acrylic paint, string, paintbrushes.
Steps:
- Shape air-dry clay into small pumpkins or leaves, or use mini gourds.
- Paint the shapes with fall colors like orange or red.
- Let the paint dry completely.
- Tie a string through a small hole or around the shape for hanging.
- Gift or hang on a fall-themed display.
Tips: Add glitter for sparkle. Write names or dates for personalization.
Safety: Use non-toxic paint for safety.
8. Pumpkin Spice Soap

Description: Make homemade soap with a pumpkin spice scent. It’s a unique self-care gift.
Skill Level: Advanced
Estimated Time: 2.5 hours
Materials: Soap base, pumpkin spice essential oil, soap molds, double boiler, colorant (optional).
Steps:
- Melt the soap base in a double boiler.
- Add 10 drops of pumpkin spice oil and a few drops of orange colorant.
- Stir gently to mix the scent and color.
- Pour the mixture into soap molds.
- Let the soap cool for 4–6 hours before removing from molds.
Tips: Wrap soaps in cellophane for gifting. Add dried herbs for texture.
Safety: Work in a well-ventilated area when using essential oils.
9. Knitted Scarf with Fall Colors

Description: Knit a cozy scarf in autumn hues like mustard or burgundy. It’s a warm, stylish gift.
Skill Level: Advanced
Estimated Time: 10–12 hours
Materials: Yarn in fall colors, knitting needles (size 8), scissors.
Steps:
- Choose yarn in two or three fall colors.
- Cast on 30 stitches for a standard scarf width.
- Knit in a simple stitch pattern (e.g., garter or stockinette) for 60 inches.
- Switch colors every 10 inches for a striped effect.
- Cast off and weave in loose ends.
Tips: Add fringe to the ends for flair. Use soft yarn for comfort.
Safety: Keep needles away from kids or pets.
10. Acorn Magnets

Description: Paint acorns to create cute fridge magnets. They’re perfect as small gifts or party favors.
Skill Level: Beginner
Estimated Time: 30 minutes
Materials: Acorns, acrylic paint, small magnets, hot glue, paintbrushes.
Steps:
- Clean and dry acorns thoroughly.
- Paint the acorns in fun fall colors or patterns.
- Let the paint dry completely.
- Glue a small magnet to the back of each acorn.
- Stick them on your fridge or gift them.
Tips: Paint faces or patterns for a whimsical look. Seal with Mod Podge for durability.
Safety: Use a hot glue gun carefully.
Category 3: Holiday-Themed Crafts
11. Halloween Lanterns

Description: Transform glass jars into spooky lanterns with black silhouettes. They’re perfect for Halloween decor.
Skill Level: Beginner
Estimated Time: 1 hour
Materials: Glass jars, black paint, paintbrush, LED candles, stencils (optional).
Steps:
- Clean and dry glass jars.
- Paint spooky silhouettes (like bats or ghosts) on the outside.
- Let the paint dry completely.
- Place an LED candle inside for a glowing effect.
- Display on your porch or indoors.
Tips: Use stencils for precise shapes. Try orange or purple paint for variety.
Safety: Stick to LED candles for safety.
12. Thanksgiving Gratitude Board

Description: Create a board for guests to write what they’re thankful for. It’s a heartfelt holiday activity.
Skill Level: Intermediate
Estimated Time: 1.5 hours
Materials: Wood plank, chalkboard paint, paintbrush, chalk, sandpaper.
Steps:
- Sand the wood plank to smooth it.
- Apply two coats of chalkboard paint, letting each dry.
- Write “Grateful For” at the top with chalk or white paint.
- Set out chalk for guests to write messages.
- Display on a table or hang on a wall.
Tips: Add a fall-themed border with paint. Keep extra chalk handy.
Safety: Sand in a well-ventilated area to avoid dust.
13. Fall-Themed Dreamcatcher

Description: Weave a dreamcatcher with feathers and autumn colors. It’s a boho-style seasonal piece.
Skill Level: Intermediate
Estimated Time: 2 hours
Materials: Metal or wood hoop, twine, feathers, beads, ribbon in fall colors.
Steps:
- Wrap the hoop with twine or ribbon in a fall color.
- Weave a web in the center using twine, adding beads as you go.
- Tie feathers and ribbons to the bottom for decoration.
- Add a loop at the top for hanging.
- Hang in a window or bedroom.
Tips: Use owl or leaf-shaped beads for a fall vibe. Mix textures for interest.
Safety: Handle sharp beads carefully.
Category 4: Upcycled Crafts
14. Wine Cork Pumpkins

Description: Assemble wine corks into mini pumpkin shapes. They’re eco-friendly and cute.
Skill Level: Beginner
Estimated Time: 45 minutes
Materials: Wine corks (20–25 per pumpkin), orange paint, green ribbon, hot glue.
Steps:
- Paint the corks orange and let them dry.
- Arrange 20–25 corks in a pumpkin shape (circle or oval).
- Glue the corks together with hot glue.
- Tie a green ribbon at the top as a stem.
- Display on a shelf or table.
Tips: Add a cinnamon stick as a stem for extra charm. Use different sizes for variety.
Safety: Be cautious with hot glue.
15. Sweater Pumpkins

Description: Turn old sweaters into plush pumpkin decorations. They’re cozy and sustainable.
Skill Level: Intermediate
Estimated Time: 1 hour
Materials: Old sweater (orange or neutral), stuffing, twine, needle, thread.
Steps:
- Cut a large circle from the sweater.
- Sew a loose stitch around the edge and pull to gather it.
- Fill with stuffing to form a pumpkin shape.
- Tie the top closed with twine.
- Wrap twine around the pumpkin to create segments.
Tips: Use a stick or rolled fabric as a stem. Mix sweater textures for variety.
Safety: Use a thimble when sewing to protect your fingers.
Tips for Success
Crafting is all about having fun, so don’t stress about perfection. If you’re new, start with beginner projects like the acorn magnets or mason jar candle holders. Practice techniques on scrap materials first to build confidence. For example, test your paint colors on paper before painting pumpkins.
If you’re an experienced crafter, try mixing techniques. Combine knitting and painting for a unique scarf, or add beads to your wreath for extra sparkle. Invest in quality materials for projects you want to last, like durable yarn or sturdy wood slices.
Customization Ideas
Make each craft your own. For Halloween, add spooky elements like black glitter or bat shapes. For Thanksgiving, focus on warm tones and gratitude themes. Add personal touches like monograms or family names to gifts. For example, paint initials on the wood slice coasters.
Storage and Care
Store your crafts in a dry, cool place to keep them fresh for next fall. Wrap delicate items like wreaths in tissue paper. For reusable pieces like coasters or table runners, clean gently with a damp cloth. Avoid harsh chemicals to preserve your work.
Conclusion
These 15 fall crafts bring the beauty of autumn into your home. From cozy candle holders to heartfelt gratitude boards, there’s something for everyone. Crafting is a way to celebrate the season, save money, and make meaningful gifts. Start with one or two projects that catch your eye. Don’t worry about mistakes—just enjoy the process.
Want more ideas? Check out craft blogs or YouTube tutorials for step-by-step videos. Visit local craft stores or online shops like Etsy for supplies. Share your finished crafts with friends or on social media. I’d love to hear what you create! Grab your materials, find a cozy spot, and let’s make this fall unforgettable.
FAQs
Where can I find craft supplies on a budget?
Look at dollar stores, thrift shops, or online marketplaces like Amazon. Take nature walks for free leaves or pinecones.
How do I fix mistakes in my project?
For paint errors, cover with a new layer or sand lightly. For sewing mistakes, carefully undo stitches and try again. Practice on scraps first.
Can these crafts be done with kids?
Yes, beginner projects like acorn magnets or Halloween lanterns are kid-friendly with supervision. Avoid hot glue or sharp tools for young kids.
What if I don’t have advanced tools like a sewing machine?
Use fabric glue instead of sewing for projects like the burlap runner. Hand-sew small projects if needed. Most crafts don’t require fancy tools.

Jenny is a passionate writer specializing in home decor, design, and styling. With years of experience in transforming spaces, she shares expert tips on creating beautiful, functional homes. From interior design trends to DIY decor ideas, Jenny’s work helps homeowners craft spaces that reflect their unique style. Whether it’s a cozy living room, a modern kitchen, or a serene bedroom, her articles offer practical advice and inspiration to elevate any home.