I love watching kids light up when they create something special for their moms. Mother’s Day is the perfect time for kids to dive into crafts that show love and gratitude.
In this guide, I’m sharing 15 Mother’s Day crafts for kids that are fun, affordable, and meaningful. These projects range from simple to moderately challenging, making them ideal for preschoolers to early teens.

Whether you’re a parent, teacher, or caregiver, you’ll find inspiration here for heartfelt, kid-made gifts. My goal is to make crafting easy and enjoyable while meeting your needs for clear instructions, budget-friendly ideas, and projects that moms will cherish.
Let’s get started!
Table of Contents
- Why Kids’ Crafts for Mother’s Day?
- Materials and Preparation
- The 15 Mother’s Day Crafts for Kids
- Craft 1: Handprint Flower Card
- Craft 2: Photo Frame Keepsake
- Craft 3: Heart-Shaped Bookmark
- Craft 4: Painted Flower Pot
- Craft 5: Tissue Paper Flowers
- Craft 6: Love Coupon Book
- Craft 7: Beaded Keychain
- Craft 8: Decorated Mason Jar Vase
- Craft 9: Fingerprint Heart Canvas
- Craft 10: Yarn-Wrapped Letters
- Craft 11: Button Art Card
- Craft 12: Pom-Pom Picture Frame
- Craft 13: Paper Heart Wreath
- Craft 14: Fingerprint Charm Necklace
- Craft 15: Decorated Trinket Box
- Tips for a Successful Crafting Experience
- Adapting Crafts for Different Needs
- Conclusion
Why Kids’ Crafts for Mother’s Day?
I believe there’s something magical about a handmade gift. When kids create for Mother’s Day, they’re not just making a craft—they’re pouring their hearts into something unique. These projects create memories that moms treasure forever.
Plus, crafting helps kids grow. It boosts their creativity, sharpens fine motor skills, and builds confidence. I’ve seen shy kids beam with pride when they hand their mom a painted flower pot or a handprint card.
These crafts are inclusive, too. You can adapt them for different ages and abilities, ensuring every child can join in. As a parent, I know you want activities that are purposeful and engaging. These crafts deliver that.
They’re not just fun—they’re a way to teach kids about love and appreciation. Let’s explore how to make these projects a success.
Materials and Preparation
Before we dive into the crafts, let’s talk supplies. I’ve designed these projects to use common, affordable materials.
You’ll need basics like construction paper, glue, washable paint, scissors, markers, and craft items like pom-poms or beads.
Many of these you might already have at home. If not, I recommend checking dollar stores, thrift shops, or even recycling household items.
For example, an old mason jar can become a beautiful vase.
Here’s a quick list of common supplies:
- Construction paper or cardstock
- Washable paints and brushes
- Glue sticks and liquid glue
- Safety scissors
- Markers, crayons, or colored pencils
- Pipe cleaners, ribbons, and yarn
- Beads, buttons, or stickers
To keep costs low, I often repurpose items. Cereal boxes make great cardboard for frames, and leftover tissue paper works for flowers. If you’re shopping, try stores like Walmart, Michaels, or Amazon for budget-friendly craft kits.
Safety is key when crafting with kids. I always supervise closely when scissors or hot glue are involved. Choose non-toxic materials, especially for younger kids who might put things in their mouths.
Set up a clean workspace with a tablecloth or newspaper to catch messes. With these tips, you’ll be ready to craft stress-free.
The 15 Mother’s Day Crafts for Kids
Now, let’s get to the fun part—the crafts! I’ve carefully chosen 15 projects that vary in difficulty and appeal to different ages.
Each craft includes a clear title, age range, difficulty level, materials, step-by-step instructions, customization ideas, and a pro tip.
Craft 1: Handprint Flower Card

Age Range: 3–6
Difficulty: Easy
Materials Needed: Construction paper, washable paint, glue, markers, scissors.
I love how simple yet heartfelt this handprint flower card is. It’s perfect for preschoolers, and moms adore the personal touch of their child’s handprint.
Step-by-Step Instructions:
- Fold a piece of construction paper in half to make a card.
- Pour washable paint into a shallow dish. Let your child dip their hand in and press it onto the front of the card to form a flower shape.
- Cut green construction paper into thin strips for stems. Glue them below the handprint.
- Use markers to write a sweet message inside, like “I love you, Mom!” or “Happy Mother’s Day!”
- Let the paint dry completely before closing the card.
Customization Ideas: Use mom’s favorite colors for the handprint. Add glitter or stickers for extra sparkle. You could also make multiple handprints to create a bouquet effect.
Pro Tip: Keep a damp cloth nearby to clean painted hands quickly. This keeps the mess minimal and the fun maximum.
Craft 2: Photo Frame Keepsake

Age Range: 6–10
Difficulty: Moderate
Materials Needed: Popsicle sticks, glue, washable paint, small photo, decorations (beads, stickers), paintbrushes.
This photo frame is a treasure moms will display proudly. I find it’s a great way for kids to combine creativity with a personal memory.
Step-by-Step Instructions:
- Lay out four popsicle sticks in a square, overlapping at the corners. Glue them together.
- Paint the frame with washable paint in any design—stripes, polka dots, or solid colors work great. Let it dry.
- Glue a small photo to the back so it shows through the frame.
- Decorate with beads, stickers, or small gems around the edges.
- Let everything dry fully before gifting.
Customization Ideas: Add a magnet to the back for a fridge-friendly gift. Paint mom’s name or a heart on the frame for a personal touch.
Pro Tip: Use hot glue for stronger bonds, but only with adult supervision. It makes the frame sturdier.
Craft 3: Heart-Shaped Bookmark

Age Range: 5–8
Difficulty: Easy
Materials Needed: Cardstock, ribbon, stickers, hole punch, scissors, markers.
As a book-loving mom, I’d cherish this heart-shaped bookmark. It’s quick to make and perfect for kids who want a practical yet sweet gift.
Step-by-Step Instructions:
- Cut a heart shape from cardstock, about 3 inches tall.
- Punch a hole near the top of the heart.
- Thread a short piece of ribbon through the hole and tie a knot.
- Decorate the heart with stickers, drawings, or a small message.
- Let any marker or glue dry before using.
Customization Ideas: Write mom’s name or a short quote like “You’re my hero” on the bookmark. Use patterned cardstock for a fancier look.
Pro Tip: If you have a laminator, laminate the bookmark for extra durability. It’ll last through many books!
Craft 4: Painted Flower Pot

Age Range: 7–12
Difficulty: Moderate
Materials Needed: Small terracotta pot, acrylic paint, paintbrushes, sealant (optional), small plant or seeds.
I’ve seen kids get so excited painting flower pots. This craft doubles as a gift and a gardening project, which moms will love.
Step-by-Step Instructions:
- Clean and dry the terracotta pot to remove dust.
- Paint designs like hearts, flowers, or mom’s initials with acrylic paint. Let each layer dry.
- Add a small plant or sprinkle in flower seeds with some soil.
- Place the pot in a sunny spot and include a note with care instructions.
- If using sealant, apply it after painting and let it dry fully.
Customization Ideas: Attach a tag with the plant’s name and care tips. Paint the pot in mom’s favorite colors or add a glossy finish.
Pro Tip: Apply a base coat of white paint first. It makes other colors pop and look brighter.
Craft 5: Tissue Paper Flowers

Age Range: 4–8
Difficulty: Easy
Materials Needed: Tissue paper, pipe cleaners, scissors.
These tissue paper flowers are a burst of color and so easy to make. I love how they brighten any room and make moms smile.
Step-by-Step Instructions:
- Stack 5–6 sheets of tissue paper (different colors work great). Cut them into 6×6-inch squares.
- Fold the stack accordion-style, about 1 inch per fold.
- Wrap a pipe cleaner around the center and twist to secure.
- Gently fluff the layers to form a flower shape.
- Trim the edges for rounded or pointed petals if desired.
Customization Ideas: Mix colors for a vibrant bouquet. Tie multiple flowers together with ribbon for a bigger gift.
Pro Tip: Cut the tissue paper edges into curves or points for different petal shapes. It adds variety to the flowers.
Craft 6: Love Coupon Book

Age Range: 6–12
Difficulty: Easy
Materials Needed: Paper, markers, ribbon, stickers, scissors, hole punch.
I think coupon books are such a thoughtful gift. Kids love coming up with promises, and moms appreciate the gestures.
Step-by-Step Instructions:
- Cut paper into small rectangles, about 3×5 inches, for coupons.
- Write promises on each coupon, like “One big hug” or “Help with dishes.”
- Decorate with stickers, drawings, or colorful borders.
- Punch a hole in the corner of each coupon and tie them with ribbon.
- Present the book with a smile!
Customization Ideas: Include specific chores or activities mom loves, like “A movie night with you.” Use themed stickers for extra fun.
Pro Tip: Use a hole punch to make neat holes for the ribbon. It keeps the coupons tidy and professional-looking.
Craft 7: Beaded Keychain

Age Range: 8–12
Difficulty: Moderate
Materials Needed: Beads, cord, keyring, charms, scissors.
This beaded keychain is a stylish gift that kids can feel proud of. I love how it’s both functional and personal.
Step-by-Step Instructions:
- Cut a 12-inch piece of sturdy cord.
- String beads and charms in a pattern or randomly.
- Tie a secure knot at the end to keep beads in place.
- Attach the cord to a keyring with another tight knot.
- Trim any excess cord.
Customization Ideas: Use letter beads to spell mom’s initials or “LOVE.” Add a small heart charm for extra sweetness.
Pro Tip: Double-knot the cord to ensure the beads don’t slip off. It makes the keychain more durable.
Craft 8: Decorated Mason Jar Vase

Age Range: 7–11
Difficulty: Moderate
Materials Needed: Mason jar, acrylic paint, ribbon, flowers (real or faux), paintbrushes.
I adore mason jar crafts for their versatility. This vase is a beautiful way to present flowers and show mom some love.
Step-by-Step Instructions:
- Clean and dry a mason jar.
- Paint designs like hearts, stripes, or a solid color. Let it dry completely.
- Tie a ribbon around the jar’s rim for a decorative touch.
- Fill with fresh or faux flowers.
- Add a small note or tag saying “Happy Mother’s Day!”
Customization Ideas: Paint a special message like “Best Mom Ever” on the jar. Use glass paint for a smoother finish.
Pro Tip: Use glass-specific acrylic paint for better adhesion. It ensures the design stays vibrant.
Craft 9: Fingerprint Heart Canvas

Age Range: 3–7
Difficulty: Easy
Materials Needed: Small canvas (5×5 inches), washable paint, markers, damp cloth.
This fingerprint heart canvas is so sweet and simple. I’ve seen moms tear up when they receive one—it’s that special.
Step-by-Step Instructions:
- Pour washable paint into a shallow dish.
- Dip your child’s finger in paint and press it onto the canvas to form half a heart. Repeat on the other side to complete the heart shape.
- Let the paint dry fully.
- Use markers to outline the heart or add a message like “You’re the Best!”
- Clean fingers with a damp cloth.
Customization Ideas: Use multiple colors for a rainbow heart. Add glitter or small stickers around the heart for flair.
Pro Tip: Practice the heart shape on scrap paper first. It helps kids get the placement right on the canvas.
Craft 10: Yarn-Wrapped Letters

Age Range: 8–12
Difficulty: Moderate
Materials Needed: Cardboard, yarn, glue, scissors.
Yarn-wrapped letters are a trendy, heartfelt gift. I love how kids can make mom’s initial into a piece of art.
Step-by-Step Instructions:
- Draw mom’s initial on cardboard and cut it out (about 6 inches tall).
- Dab glue on the cardboard to help yarn stick.
- Wrap yarn tightly around the letter, covering all areas.
- Secure the yarn’s end with a drop of glue.
- Let it dry before gifting.
Customization Ideas: Use variegated yarn for a colorful effect. Add a small flower or gem to the letter.
Pro Tip: Start wrapping at one end and work your way across. It keeps the yarn neat and even.
Craft 11: Button Art Card

Age Range: 5–9
Difficulty: Easy
Materials Needed: Cardstock, buttons, glue, markers, scissors.
This button art card is charming and easy to make. I find it’s a great way for kids to experiment with textures.
Step-by-Step Instructions:
- Fold cardstock in half to create a card.
- Arrange buttons on the front to form a heart, flower, or mom’s initial.
- Glue each button in place and let it dry.
- Write a loving message inside with markers.
- Check that all buttons are secure before gifting.
Customization Ideas: Use buttons in mom’s favorite color. Draw a border around the button design for extra detail.
Pro Tip: Lay out the button design before gluing. It helps kids visualize the final look.
Craft 12: Pom-Pom Picture Frame

Age Range: 6–10
Difficulty: Moderate
Materials Needed: Cardboard, pom-poms, glue, small photo, scissors.
Pom-poms add such a fun vibe to this picture frame. I love how colorful and tactile it is for kids to create.
Step-by-Step Instructions:
- Cut cardboard into a frame shape with a 4×4-inch opening.
- Glue pom-poms around the frame’s edges in a pattern or randomly.
- Let the glue dry completely.
- Attach a small photo to the back so it shows through.
- Add a stand or magnet if desired.
Customization Ideas: Sprinkle glitter over the pom-poms for sparkle. Use pom-poms in mom’s favorite colors.
Pro Tip: Use a glue gun for faster drying, but only with adult help. It makes the pom-poms stick better.
Craft 13: Paper Heart Wreath

Age Range: 5–9
Difficulty: Easy
Materials Needed: Construction paper, glue, ribbon, scissors.
This paper heart wreath is a cheerful decoration. I’ve seen kids have a blast cutting and gluing hearts together.
Step-by-Step Instructions:
- Cut 10–12 heart shapes from colored construction paper (about 2 inches wide).
- Arrange the hearts in a circle, overlapping slightly, and glue them together.
- Let the glue dry fully.
- Tie a ribbon loop at the top for hanging.
- Add a small note or decoration in the center if desired.
Customization Ideas: Glue a small photo in the wreath’s center. Use patterned paper for a unique look.
Pro Tip: Use double-sided tape instead of glue for quick assembly. It’s less messy and dries faster.
Craft 14: Fingerprint Charm Necklace
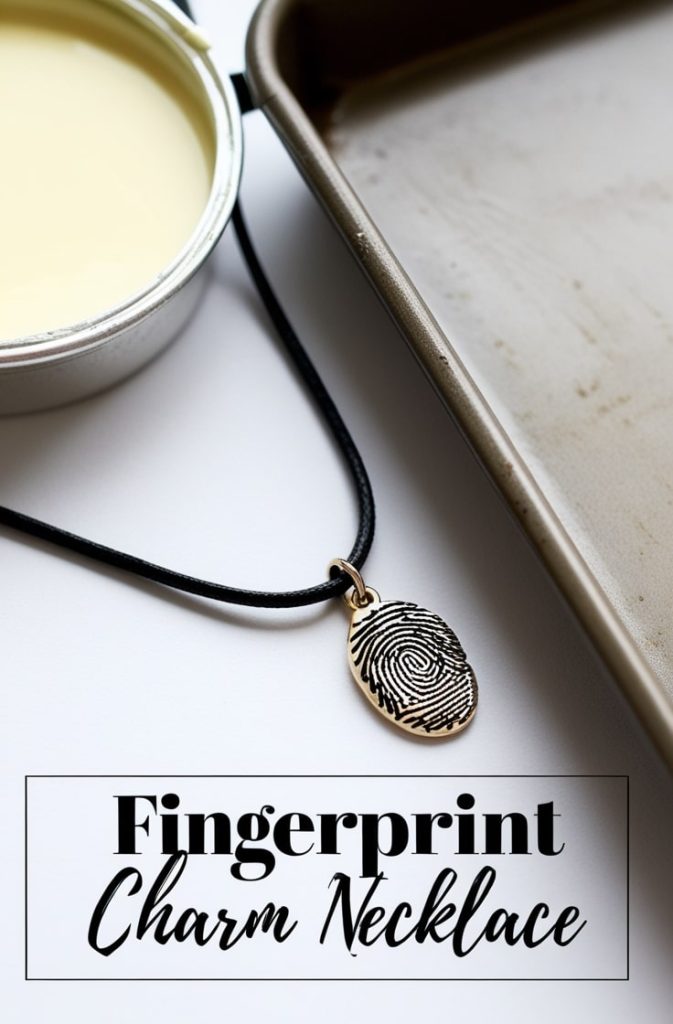
Age Range: 8–12
Difficulty: Advanced
Materials Needed: Shrink plastic, washable paint, cord, hole punch, scissors, oven.
This fingerprint charm necklace is a bit more involved, but the result is stunning. I love how it captures a child’s fingerprint forever.
Step-by-Step Instructions:
- Cut a small circle (2 inches) from shrink plastic.
- Dip your child’s finger in washable paint and press it onto the circle.
- Punch a hole near the edge of the circle.
- Bake the plastic per the package instructions (usually 325°F for 1–2 minutes) to shrink it.
- Thread a cord through the hole to make a necklace.
Customization Ideas: Add a tiny heart charm to the cord. Use multiple fingerprints for a layered effect.
Pro Tip: Follow the shrink plastic instructions exactly. Overbaking can warp the charm.
Craft 15: Decorated Trinket Box

Age Range: 7–12
Difficulty: Moderate
Materials Needed: Small wooden box, acrylic paint, gems or stickers, glue, paintbrushes.
This trinket box is a keepsake mom will use for years. I love how kids can make it sparkle with their creativity.
Step-by-Step Instructions:
- Paint the wooden box with acrylic paint in any design. Let it dry.
- Glue gems, stickers, or beads on the lid for decoration.
- Let all glue dry completely.
- Place a small note or trinket inside, like a heart-shaped paper.
- Present it with a big hug!
Customization Ideas: Paint mom’s name or a heart on the lid. Add a glossy sealant for a polished look.
Pro Tip: Use a sealant spray after painting to protect the design. It gives the box a professional finish.
Tips for a Successful Crafting Experience
Crafting with kids is so rewarding, but it takes a little planning. I recommend starting these projects 1–2 weeks before Mother’s Day. This gives you time to gather supplies and enjoy the process without rushing.
Set up a clean workspace with a tablecloth or newspaper to catch spills. I like to play soft music to keep the mood fun and relaxed.
To keep kids engaged, let them choose colors or designs. Offer small choices, like “Red or blue paint?” to avoid overwhelm. If you’re crafting with multiple kids, assign tasks based on age—younger ones can paint, while older ones cut shapes.
For presentations, I love wrapping crafts in tissue paper or placing them in a small gift bag. Add a handwritten note from the child saying “I made this for you!”
It makes the moment extra special. These tips ensure a smooth, joyful crafting session that everyone enjoys.
Adapting Crafts for Different Needs
I want every child to feel included in these Mother’s Day crafts. For younger kids (ages 3–5), simplify steps. Pre-cut shapes or use stickers instead of paint to reduce mess.
For older kids (ages 9–12), add complexity. They might enjoy sewing a small heart or creating intricate bead patterns.
For kids with special needs, consider sensory-friendly options. Use tactile materials like pom-poms or avoid messy paints if sensory issues are a concern.
I’ve found that clear instructions and a calm environment help all kids succeed.
If you’re crafting in a group, like a classroom or party, pre-portion supplies into small bags. This saves time and reduces chaos.
Assign roles, like one child gluing while another decorates. These adaptations make the crafts accessible and fun for everyone.
Conclusion
I hope these 15 Mother’s Day crafts inspire you and your kids to create something special.
From handprint cards to beaded keychains, each project is a chance to show love and make memories.
I’ve loved sharing these ideas, and I’m excited for you to try them. Don’t worry about perfection—the heart behind the craft is what matters most.
Get started today, and enjoy the process. Let your kids’ creativity shine, and watch mom’s face light up when she sees her gift. Have fun, and happy Mother’s Day!
If you make any of these crafts, I’d love to hear about it—share your creations or try a few more for extra fun.

Jenny is a passionate writer specializing in home decor, design, and styling. With years of experience in transforming spaces, she shares expert tips on creating beautiful, functional homes. From interior design trends to DIY decor ideas, Jenny’s work helps homeowners craft spaces that reflect their unique style. Whether it’s a cozy living room, a modern kitchen, or a serene bedroom, her articles offer practical advice and inspiration to elevate any home.


