Do you know why your Richmond Water Heater Pilot Light won’t stay lit?
Your Richmond Water Heater Pilot Light won’t light due to:
- Defective thermocouple
- Faulty gas control valve
- Improper gas supply
- And a lot
Fortunately, this guide will walk you through step-by-step instructions to resolve the pilot issue.
Without further ado, let’s dive in.
Richmond Water Heater Pilot Light Won’t Stay Lit: Causes and Solutions
Richmond Water Heater Pilot Light won’t stay lit due to a defective thermocouple, a faulty gas control valve, and problem with the gas supply
Test The Thermocouple and Replace It (If Required)
A defective thermocouple is one of the main culprits that prevent the pilot light on your Richmond Water Heater from staying lit.
The thermocouple’s job is to detect the flame and keep the gas valve open. If it is at fault, it may incorrectly signal that the pilot light is out, causing the gas supply to shut off.
Now, the question is- how can I tell if the thermocouple is bad?
Simple.
By testing the thermocouple electrically
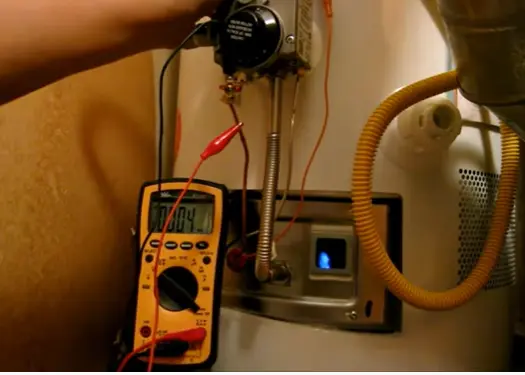
To test the thermocouple on a water heater, try this procedure:
- Turn Off the Gas Supply: Before beginning any work, ensure the gas supply is turned off for safety.
- Remove the Access Panel: Locate and remove the access panel to access the thermocouple.
- Inspect for Damage: Check for any visible signs of wear or damage on the thermocouple.
- Test with a Multimeter:
- Set your multimeter to measure millivolts.
- Disconnect the thermocouple from the gas control valve.
- Light the pilot light and place one multimeter probe on the thermocouple’s tip and the other on its base.
- A reading of about 25-30 millivolts indicates a functioning thermocouple; anything significantly lower suggests it needs replacement.

Inspect The Gas Control Valve
If replacing the thermocouple doesn’t resolve the pilot light issue, the next step is to check the gas control valve.
The gas control valve controls the gas supply to the water heater. If the gas control valve is defective, your water heater won’t receive a correct gas supply flow. Without a sufficient gas supply, you can’t light the burner.
Here are the step-by-step instructions to inspect the gas control valve:
- Ensure that gas is flowing properly to other appliances in your home, confirming there are no supply issues
- Look for any loose or damaged connections at the gas control valve.
- When attempting to light the pilot, listen for a clicking sound, indicating that the igniter is working.
Don’t hesitate to replace the gas control valve if it’s at fault.
Check The Gas Supply
Water Heaters require a continuous gas supply for proper combustion. If there is an issue with the gas supply, you can’t ignite the burner- let alone the pilot light to stay lit.
Ensure that the gas is on at the water heater and the main meter. If the gas supply isn’t flowing properly, the pilot won’t light.
Confirm that there is no issue with the gas by checking nearby appliances. If the appliances are not functioning, there may be a larger issue with the gas supply.
Clogged Pilot Tube
The pilot tube might be clogged, preventing gas from reaching the pilot flame. To address this:
- Turn off the gas.
- Disconnect the pilot tube from the gas valve.
- Clean the orifice with a fine wire or compressed air to remove blockage.
- Reattach the tube and try lighting the pilot again.
Ventilation and Pressure Switch
Proper ventilation is crucial for the water heater’s combustion process. Inspect the vent piping for blockages or obstructions.
Disconnect the vent pipe at its connection point and visually check for debris. If you’re unsure about the venting system, a professional inspection may be necessary.
Similarly, examine the pressure switch hose for kinks or blockages. If it’s clogged or bent, clean or straighten it to ensure the water heater operates smoothly.
Igniter Not Working
If your Richmond water heater’s pilot light refuses to ignite despite the igniter sparking, it may indicate a problem with the igniter itself.
To test the functionality of the igniter, go along with these steps:
- For safety, ensure that the gas supply to the water heater is turned off before performing any checks.
- Remove any access panels to reach the igniter. You can find the igniter near the pilot assembly.
- Look for any visible signs of damage or wear on the igniter. Cracks, corrosion, or burn marks can indicate a defective component.
- Manually activate the igniter (if applicable) and observe whether it produces a spark. You should see a consistent spark when pressing the igniter button.
- Ensure that all electrical connections to the igniter are secure and free from corrosion or damage. Loose or corroded connections can prevent proper operation.
Replace the igniter if it’s at fault.
To replace the igniter, follow these steps:
- Purchase a Compatible Igniter: Make sure to buy an igniter that matches your specific Richmond water heater model. Check your owner’s manual or consult with a local supplier if needed.
- Turn Off Power and Gas Supply: Always ensure both power and gas supplies are turned off before working on your water heater.
- Remove Old Igniter:
- Disconnect any wiring connected to the old igniter.
- Unscrew or unclip the igniter from its mounting bracket.
- Install New Igniter:
- Position the new igniter in place and secure it with screws or clips as required.
- Reconnect any wiring, ensuring that connections are tight and secure.
- Test the New Igniter:
- Turn on the gas supply and restore power to the unit.
- Activate the ignition system and observe whether the pilot light successfully ignites.
Low Gas Pressure or Starved Gas Supply
If the gas supply to your heater is too low, the pilot flame may not stay lit. This can be due to a defective gas control valve or an issue with the incoming gas line.
In such cases, it’s best to get a technician with a manometer to check the gas pressure and diagnose the issue.
How Do You Light The Pilot On A Richmond Water Heater?
To light the pilot on a Richmond Water Heater, try these steps:
- Read the safety information first labeled on the tank.
- Set the gas control/thermostat knob counterclockwise to the Off position.
- Leave the water heater for five minutes to clear out unburned gasses.
- Move the thermostat knob to Pilot. Press down the thermostat knob and start striking the igniter button simultaneously.
- Once the pilot light comes on, release the thermostat knob.
- Move the thermostat knob to your desired temperature setting.
Conclusion
Every homeowner encounters the pilot light issues on their water heater. Luckily, I mentioned all the possible reasons behind this problem. So, what you need to do next is to follow the troubleshooting steps and figure out the source that keeps the pilot light from staying lit. Then, take the proper steps to solve the problem. Good Luck!
Read Also:

Eric Alvarez is the head of content on LilDutchUncle.Com. He is an HVAC guy based in El Paso, Texas, United States. He obtained his Bachelor of Science degree from the University Of Texas at El Paso. Years of experience in the HVAC field have taught him many lessons, not the least of which is that the value of quality and knowledge far exceeds any promised initial savings. He has a good standing reputation for superior skills in heating, air conditioning, hot water tanks, and indoor air quality systems.


