This is a complete guide on Takagi Tankless Water Heater Error Code 101. What I am going to break down in this article:
- What is code 101 on Takagi Tankless Water Heater?
- How do I fix Takagi error code 101?
So, let’s get started right here.
Table of Contents
What Is Code 101 On Takagi Tankless Water Heater?
Error code 101 on Takagi Tankless Water Heater means abnormal combustion. This problem can happen due to:
- Blockage in the airway
- Improper manifold pressure
- Dirty burner
- Weather related problems
- Set the dip switches improperly
Now, it’s time to break down those reasons that cause your Takagi Tankless Water Heater to throw the error code 101.
Here we go.
1. Blockage In The Airway
Your water heater won’t make a proper combustion if the airway gets restricted.
For example, bird nests or spider nests can block the venting length, which can prevent the air from going into the combustion chamber.
Similarly, a dirty heat exchanger and fan coated with lint or dust will block the airway and cause the unit to pop up the error code 1o1.
How To Fix:
Start with inspecting the venting for blockage. You can use a vacuum cleaner with an extension attachment to suck away blockage from the vent piping.
Next, verify there is no crusty solid or scale buildup in the heat exchanger. If yes, don’t hesitate to contact the Technical Service Department for help.
Thirdly, check the blower fan for obstructions. Follow the below steps if there is any debris buildup to clean the fan:
- Ensure there is no power to the unit.
- Remove the front access cover panel.
- Place a towel under the heat exchanger to cover the square port to the fan.
- Use an air compressor to blow away the lint and debris from the fan.
2. Improper Manifold Pressure
For complete and clear combustion, the manifold pressure should be within specifications. If the manifold pressure goes out of range, you can’t ignite the unit. The proper manifold pressure may vary depending on the model of your Takagi Water Heater.
For instance, if you have an indoor water heater model like T-KJr2-In, the ideal manifold pressure should be 2.0” WC for natural gas units or 2.5” WC for propane units.
You can’t accurately say whether the manifold pressure is within specification or not unless you measure it. The following procedure will help in checking the manifold pressure:
- Make sure your unit is not in operation.
- Remove the screw from the manifold port.
- Attach a manometer to the manifold port and ensure you tighten it up well to prevent gas leak.
- Run the water through the water heater to activate its operation.
- Hold down the MAX button on the computer board to measure the manifold gas pressure during maximum combustion.
- Similarly, hold down the MIN button if you want to check the manifold gas pressure during minimum combustion.
- Now, match up the reading with the desired pressures listed in the specification table on the manual.
- If the manifold gas pressure reading doesn’t match, you must adjust.
How To Fix:
Go along with these steps to learn how to adjust manifold gas pressure on Takagi Tankless Water Heater:
- Set up the manometer and attach it to the manifold port.
- Press and hold down the MIN button. While you hold down the MIN button, keep pressing either the Increase or Decrease button to increase or decrease the manifold pressure. Keep adjusting until you set it up according to the desired value.
- Similarly, hold down the MAX button while you should also press either the Increase or Decrease button to adjust the manifold pressure.
- Once you adjust the pressure within specification, deactivate the unit.
- Finally, pull out the manometer port and replace the port screw.
3. Dirty Burner
Abnormal combustion can also occur if the burner gets dirty. Several reasons like dirt, debris, and fuel residue can easily mess up the burner. If you want to ignite the burner clearly, you must clean it.
How To Fix:
Complete these step-by-step cleaning procedure to clean the burner:
1. Power off your Takagi Water Heater and remove the front cover panel.
2. Remove the burner assembly from the unit. In this case, you should follow these steps:
- Unscrew those five screws that hold down the burner to the combustion chamber.
- Detach the rod assembly and ensure you disconnect the orange flame sensor, yellow AFR, and black igniter wiring from it.
- Remove the burner from the unit.
- Inspect the gaskets and protect them.
3. Now, it’s time to clean the burner. Regarding this, perform the following cleaning tasks:
- Keep the burner gasket from direct water pressure.
- Spray cleaning solution evenly from the top, down through the slots, and openings in front of the burner. Ensure you saturate the cleaning solution thoroughly so that the burner is getting soaking wet.
- Leave the burner for 5 minutes.
- Place the burner in the sink and set it in its normal upright position. Then, wash the slots of the burner with a high flow of water. While rinsing the burner, make sure the burner gaskets make no contact with water.
- Let the burner dry and replace it in its place.
4. Weather Related Problems
High winds and frozen vent termination flaps are some weather related issues that prevent the unit from making complete combustion.
I highly recommend you to install the unit in a location where high winds fail to affect the normal operation. Keep in mind; the location where you set the unit up should be free of lint, dirt, and ebris.
5. Set the DIP Switches Improperly
If you fail to set up the DIP switches based on the type of installation, it will affect the combustion process.
You should set up the DIP switches according to this table.
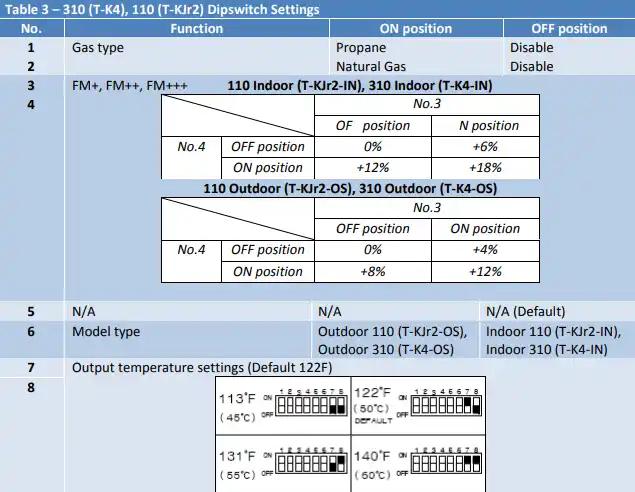
It will be better to call a professional if you don’t know how to set the DIP switches based on the installation type.
How Do I Fix Takagi Error Code 101?
To reset the error code 101 on your Takagi Tankless Water Heater, follow the resetting procedure described below:
First off, Ensure you resolve all the reasons that cause the unit to pop up the error code 101. Then, head over to the following steps to override the error message.
- Make sure no water is flowing through the unit.
- Press the power button to turn off the power to the remote.
- Shut off the power to the unit and turn it on again.
- Remove the front access cover and find the INC and DEC buttons on the computer board.
- Push both the INC and DEC buttons on the PCB simultaneously for several seconds until the red LED comes on.
- Turn the unit off using the On/Off switch. Finally, turn the unit on again, which will reset the error code 101 successfully.
End-Note
I mentioned every reason that causes the unit to throw the error code 101 on your Takagi water heater.
What you need to do to reset the error code is- solve all the problems responsible for popping up the code 101.
Then, reset the unit. In this case, locate the INC and DEC buttons on the computer board. Next, keep pressing both those buttons until the red LED lights up solid. Finally, turn off the unit and turn it on again, which will reset the error code.
Read Also:

Eric Alvarez is the head of content on LilDutchUncle.Com. He is an HVAC guy based in El Paso, Texas, United States. He obtained his Bachelor of Science degree from the University Of Texas at El Paso. Years of experience in the HVAC field have taught him many lessons, not the least of which is that the value of quality and knowledge far exceeds any promised initial savings. He has a good standing reputation for superior skills in heating, air conditioning, hot water tanks, and indoor air quality systems.