Your 4th of July celebration deserves decorations that look like you spent a weekend planning them — even if you thought of it this morning.
Whether you’re transforming your front porch into a patriotic showstopper, keeping the kids busy before the fireworks, or pulling together a last-minute tablescape that makes your guests say “did you make that?” — you’re in exactly the right place.
Every craft on this list costs under $15, takes 30 minutes or less, and doubles as genuine home decor you’ll be proud to display. No experience needed, no specialty tools required. Just grab your supplies and let’s make your home the most festive one on the block:
Table of Contents
🛒 Grab These Before You Start
- Gorilla Dual Temp Mini Hot Glue Gun Kit — This beginner-friendly glue gun heats up in under two minutes and works across all five crafts on this list, making it the single most versatile tool you can own for holiday crafting.
- UPIKIT Red White and Blue Burlap Wired Ribbon (3-Pack, 2.5 inch) — Three coordinating patriotic ribbon styles in one pack give you everything needed for wreaths, bows, and table runners with a polished, cohesive look that’s reusable every patriotic holiday.
- Ball Wide Mouth Mason Jars (12-Pack, 16 oz) — These classic wide-mouth jars serve as centerpieces, luminaries, vases, and party favor containers and look far more expensive than their per-jar price suggests.
- Rust-Oleum Patriotic Red White Blue Spray Paint Set — A quick-dry spray paint trio that transforms dollar store wood, glass, and metal items into high-end-looking patriotic decor in under five minutes per coat.
- Unfinished Wood Star Cutouts Bulk Pack (50-count) — These lightweight wood stars take paint, glitter, and ribbon beautifully and can be used across garlands, centerpieces, and door decor for a cohesive, collected look throughout your whole home.
5 Easy 4th of July Crafts That Look Stunning
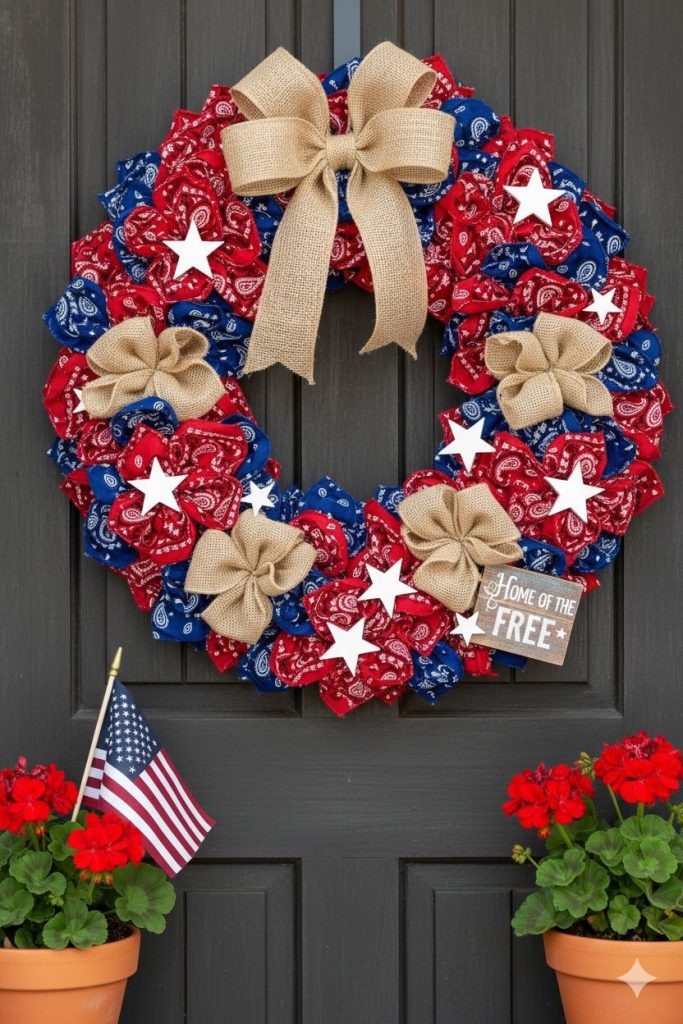
Bandana & Burlap Front Door Wreath
Perfect for: Front door decor / Porch statement piece
Time needed: 25 minutes
Cost estimate: Under $12 with dollar store bandanas
Skill level: No experience needed
Kid-friendly? Yes — great for ages 5 and up
Mess level: 🟢 No Mess
Supplies:
- Wire wreath frame (dollar store or craft store)
- 6–8 red and blue bandanas (dollar store)
- 2–3 yards of wired white or natural burlap ribbon
- Star-shaped embellishments or wooden star cutouts
- Hot glue gun and glue sticks
- Optional: small flag pick or “Home of the Free” sign
Step-by-Step Instructions:
- Lay your wire wreath frame flat on a table and fold your first bandana into a loose triangle — then fold it again into a long strip about 3 inches wide, draping and looping it around one section of the frame and pulling it snug. As you add the first few bandanas, the wreath starts to fill out with this beautiful layered, textured look that immediately says “intentional” rather than “craft project.”
- Continue working around the frame in a red-blue-red-blue alternating pattern, tucking each bandana fold tight against the last so there are no gaps — the denser you pack them, the more lush and full the finished wreath looks, almost like a fabric flower arrangement. Step back after every few bandanas to check the fullness and adjust any loose sections.
- Cut three generous lengths of burlap ribbon — about 12 inches each — and scrunch each piece into a loose gathered loop, securing the center with a small piece of wire or a dot of hot glue. Tuck these burlap puffs evenly around the wreath in the spaces between color sections, and suddenly the whole piece has dimension and texture that looks straight out of a Magnolia Market display.
- Hot glue your wooden star cutouts directly onto the burlap puffs and scattered across the bandana sections — use three to five stars in varying sizes if you have them, because the variation in scale is what makes it look professionally styled rather than uniform. Press each star firmly for ten seconds while the glue sets.
- Finish with an optional small sign, flag pick, or a generous bow made from your remaining burlap ribbon tied at the top — hang it on your front door and step back to admire something that genuinely looks like it cost $50 and took an entire afternoon. Your neighbors will absolutely ask where you bought it.
Stylist’s Secret: Hot glue a few sprigs of faux eucalyptus or white faux florals between the bandana folds — the green breaks up the red and blue in the most sophisticated way and instantly elevates the wreath from “festive” to “curated.”
Display It Like This: Hang centered on your front door using a wreath hanger, and flank the doorway with two matching potted red geraniums or small American flags in planters for a full porch vignette that photographs beautifully.
Make It a Family Moment: Let kids choose the bandana placement pattern and press the star cutouts into the hot glue spots you’ve pre-applied — they’ll feel enormous ownership over the finished piece every time someone compliments it.
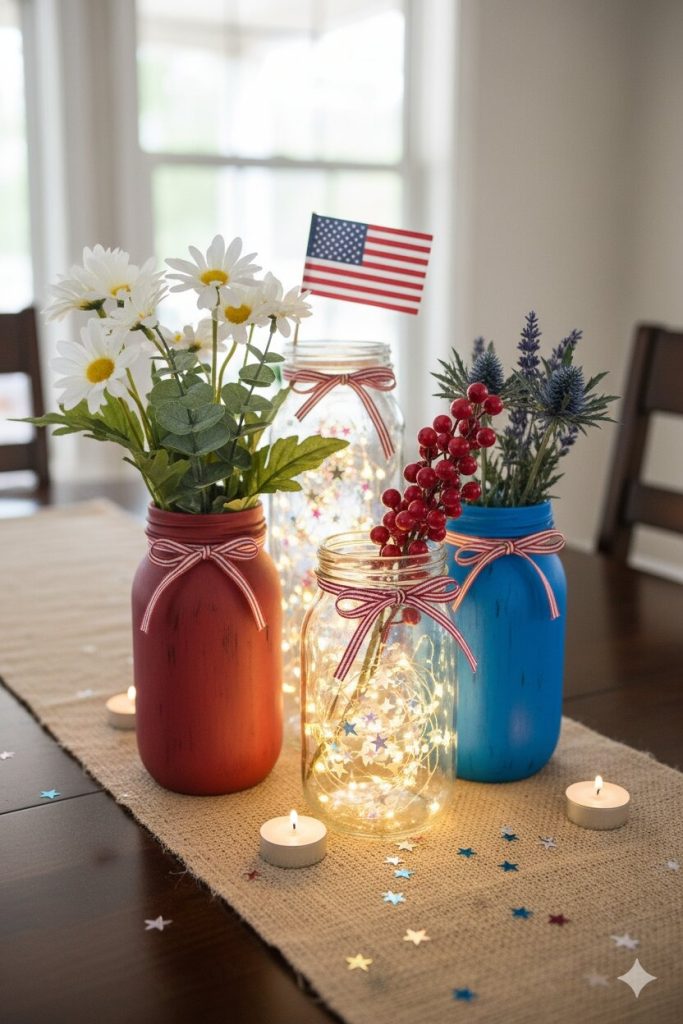
Mason Jar Firecracker Centerpiece Cluster
Perfect for: Tablescape centerpiece / Buffet table decor / Mantel display
Time needed: 20 minutes
Cost estimate: Under $10 for a cluster of five jars
Skill level: Beginner
Kid-friendly? Yes — great for ages 4 and up
Mess level: 🟡 Minimal Mess
Supplies:
- 3–5 wide-mouth mason jars in varying heights (or dollar store glass jars)
- Red, white, and blue acrylic craft paint or spray paint
- Mod Podge and foam brush (optional, for a frosted effect)
- Battery-operated string lights or tea lights
- Fresh or faux white flowers, red berries, and blue thistle or dried florals
- Twine or red/white/blue ribbon for jar necks
- Star stickers or star confetti
Step-by-Step Instructions:
- Paint each jar a different base treatment — leave one clear, paint one solid red, brush one with a thin white wash for a frosted look, and wrap one with twine tied at the neck — varying the finish across your jar cluster is the single most important thing you can do to make this look like a styled vignette rather than a matching set.
- While paint dries (about 10 minutes), drop a handful of star confetti inside each clear or lightly painted jar, followed by a coil of battery-operated mini string lights — when you turn the lights on later, the stars catch the glow and create this gorgeous twinkling effect that makes the whole table look like a magazine shoot.
- Arrange fresh or faux stems into each jar — white daisies or carnations in the unpainted jar, red berry stems in the white-washed jar, blue dried thistle or artificial lavender in the painted jar. The key is keeping the florals loose and unfussy rather than tightly arranged — a casual, gathered look is far more current and effortlessly chic than a stiff formal arrangement.
- Tie a length of wired burlap ribbon or twine around the neck of each jar, finishing with a small knot or bow — this one step ties the whole cluster together visually and adds that handmade, intentional touch that makes guests reach for their phones to take a photo of your table.
- Cluster your jars together in an odd number — three or five always looks more styled than two or four — varying the heights if possible by setting some on small books or a wooden slice hidden underneath. Step back and look: what you have is a centerpiece that looks like it came from a high-end party styling company and costs your guests about $60 to recreate.
Stylist’s Secret: Tuck a small American flag pick into one of the floral jars at a slight angle — it anchors the patriotic theme without screaming it, and that restraint is what makes the whole arrangement feel grown-up and stylish rather than costume-party festive.
Display It Like This: Cluster your jars down the center of your dining or buffet table on a length of burlap table runner, and scatter loose star confetti and a few tea lights between the jars to fill the space and create a cohesive, layered tablescape.
Make It a Family Moment: Let kids drop the star confetti and string lights into the clear jars — it’s the most satisfying step of the whole craft, and little ones can feel like they built the magic themselves.
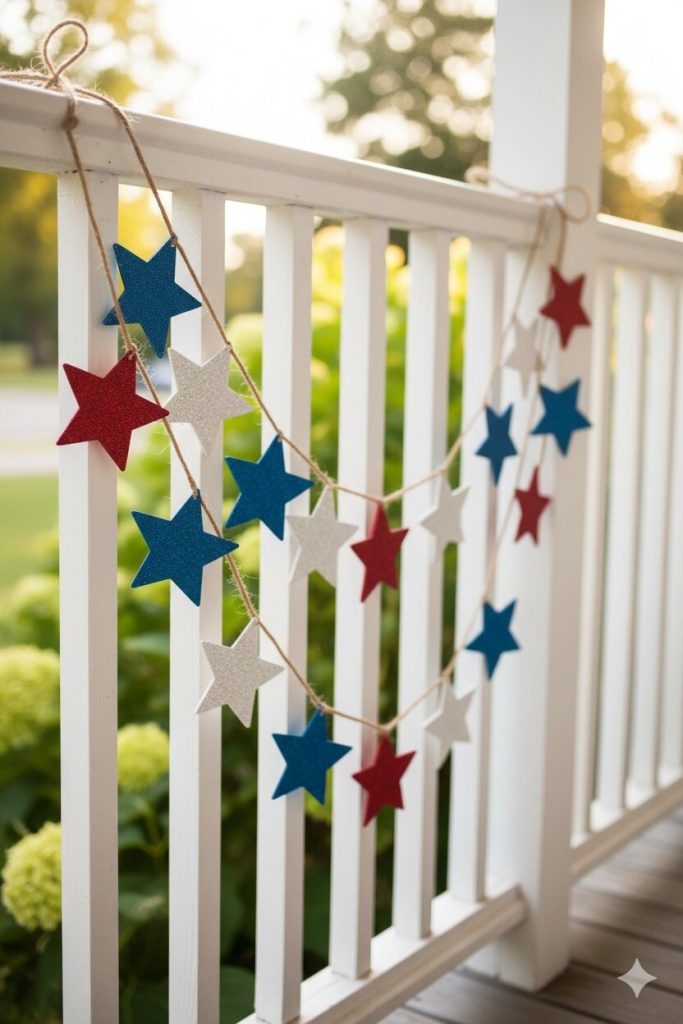
Patriotic Star Garland
Perfect for: Porch railing / Mantel / Party backdrop / Staircase banister
Time needed: 20 minutes
Cost estimate: Under $8 with dollar store supplies
Skill level: No experience needed
Kid-friendly? Yes — great for ages 6 and up
Mess level: 🟡 Minimal Mess
Supplies:
- Unfinished wood star cutouts (bulk pack) or cardstock star shapes
- Red, white, and blue acrylic paint and small foam brush
- Twine or jute rope (6–8 feet)
- Hot glue gun and glue sticks
- Optional: fine glitter in red, white, and silver
- Optional: small clothespins for an alternating flag-and-star variation
Step-by-Step Instructions:
- Paint your stars in a repeating red-white-blue pattern, working in batches of three so each color is drying while you paint the next — a quick single coat is all you need, and the slightly uneven coverage of a foam brush actually adds a rustic, artisanal look that flat machine-printing could never replicate. Set them flat to dry for five to eight minutes.
- While stars dry, cut your twine to your desired garland length and lay it flat on your work surface — add a small dot of hot glue to the back of the first star and press it firmly onto the twine about three inches from one end, holding for ten seconds. As you work your way down the twine adding stars in your color sequence, the garland starts to take shape and already looks like something you’d see styled on a Southern Living front porch.
- For an elevated finish, brush a thin layer of Mod Podge over each painted star and immediately sprinkle coordinating fine glitter — red glitter over red stars, silver over white, blue over blue. Shake off the excess over a paper plate and what you’re left with is a garland that catches every bit of afternoon sunlight and genuinely sparkles, which is exactly the effect you want for an outdoor patriotic display.
- Space your stars evenly — roughly every four to five inches — and step back to check the rhythm of the color pattern before the glue fully sets. Adjust any stars that look crowded or off-pattern while the glue is still slightly pliable.
- Tie a loop at each end of the twine for easy hanging, and hold your finished garland up against the wall or railing where you plan to display it — the moment it’s up, your space is transformed, and the whole project cost you less than a single store-bought garland that wouldn’t have been half as charming.
Stylist’s Secret: Hang your garland in a gentle swag rather than pulled tight and flat — draping it in a slight U-shape between two anchor points gives it movement and makes it photograph dramatically better than a straight horizontal line.
Display It Like This: Drape across your porch railing, fireplace mantel, or staircase banister, and for maximum impact, layer two garlands of slightly different lengths hung at different heights on the same wall for a lush, abundant look.
Make It a Family Moment: Assign each child a color — one paints all the red stars, one paints all the white, one paints all the blue — so every person who walks through your door that day had a hand in making the decor.
Patriotic Painted Rock Party Activity

Perfect for: Backyard party guest activity / Party favor / Garden decor
Time needed: 15 minutes per person (ongoing party activity)
Cost estimate: Under $6 for a full party station setup
Skill level: No experience needed — zero artistic skill required
Kid-friendly? Yes — great for all ages
Mess level: 🔴 Worth the Mess
Supplies:
- Smooth river rocks or craft stones (dollar store bag or collected from outside)
- Red, white, and blue acrylic paint in small squeeze bottles
- Fine-tip paint markers in white and black (for detail work)
- Paper plates as paint palettes
- Plastic tablecloth to protect the surface
- Small cups of water and paper towels
- Optional: clear sealant spray to set finished rocks
Step-by-Step Instructions:
- Set up your rock painting station before guests arrive — lay out a plastic tablecloth, set one paper plate palette per seat loaded with red, white, and blue paint, and place two to three smooth rocks at each spot. The setup alone looks like a curated party activity rather than a craft table, especially if you add a small chalkboard sign that says “Paint Your Rock!” with a few examples displayed.
- Give each guest a base coat on their rock — a solid red, white, or blue single color painted across the whole surface is the starting point, and while it dries (about five minutes), guests can mingle, grab a drink, or start planning their design. This drying window is actually a built-in icebreaker because everyone starts comparing and chatting about what they’re going to paint.
- Once the base coat is dry, guests add their design using fine-tip paint markers — stripes, stars, “USA,” fireworks bursts, or even just their family name and the year. The paint markers do all the precision work so no one needs to be artistic; even the shakiest hand produces something that looks genuinely charming on a smooth painted base.
- Encourage guests to sign and date the bottom of their rock — when you display a cluster of these in your garden or on your front steps after the party, you’ll have this beautiful collection of memories from everyone who celebrated with you. It’s the most meaningful party favor you’ve ever offered, and it cost you pennies per guest.
- If you have a few minutes before guests leave, spritz finished rocks with a coat of clear sealant spray to weatherproof them for outdoor display — guests take their rocks home, you keep a few for your garden, and the whole table becomes a conversation piece that defines the tone of your entire party.
Stylist’s Secret: Display three to five pre-made example rocks in a shallow wooden tray or basket at the center of the activity table — guests immediately understand what to do AND the visual reference raises the quality of everyone’s finished product without a single instruction being given.
Display It Like This: Arrange your own collection of finished rocks in a galvanized metal tray or woven basket on your front steps or garden path — a cluster of 8–10 painted patriotic rocks together looks like intentional seasonal garden decor that cost real money.
Make It a Family Moment: This craft IS the family moment — set up the station before the party and let it run itself while you host, because guests of every age from 4 to 74 will gravitate toward it naturally and end up crafting side by side.
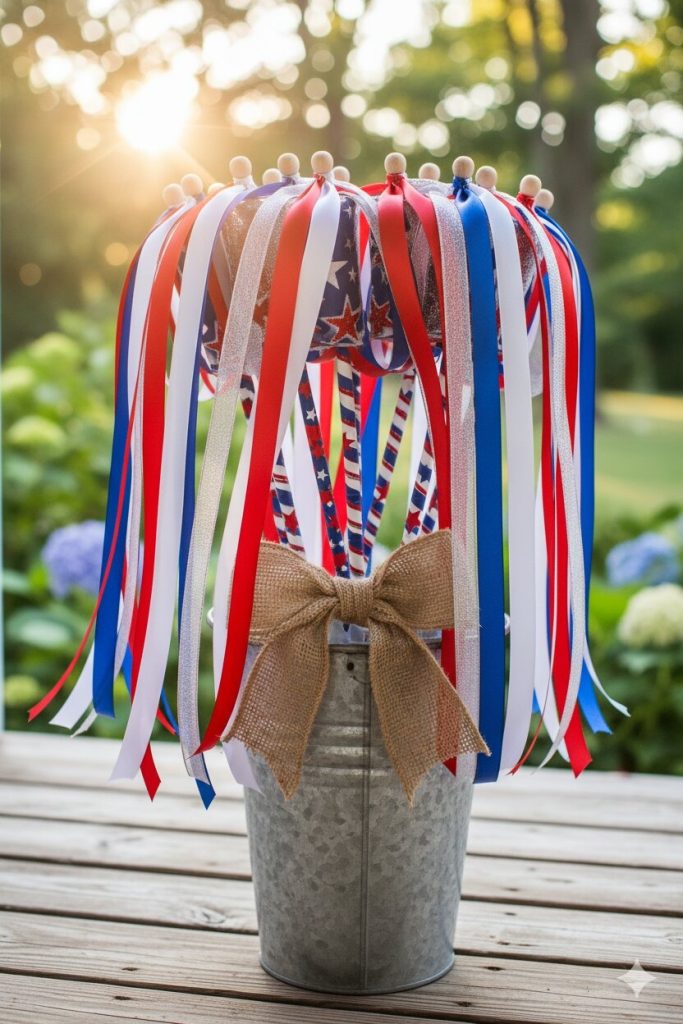
Patriotic Ribbon Wand Bouquet
Perfect for: Wearable/handheld party accessory / Party favor / Kids’ parade prop
Time needed: 15 minutes for a bouquet of 10
Cost estimate: Under $8 for 10 wands
Skill level: No experience needed
Kid-friendly? Yes — great for ages 3 and up
Mess level: 🟢 No Mess
Supplies:
- Wooden dowels (12 inch, from dollar store or craft store)
- Red, white, and blue satin or grosgrain ribbon (3 colors, about 2 yards each)
- Hot glue gun and glue sticks
- Washi tape or decorative tape in patriotic colors
- Optional: star-shaped foam stickers for handle decoration
- Optional: small bells or metallic fringe for the ribbon tips
Step-by-Step Instructions:
- Cut six ribbon strips per wand — two red, two white, two blue — each about 18 inches long, because longer ribbons catch more air when waved and create that gorgeous flowing streamer effect that makes these look far more expensive than their dollar store origins. Lay all your strips together and line up one end evenly.
- Fold the lined-up ribbon ends over the top of your wooden dowel and secure tightly with a generous wrap of hot glue — press firmly for 15 seconds while it sets. As soon as you let go and give the ribbons a test wave, the satisfying flutter of all six colors streaming together tells you immediately that this is going to be a hit.
- Wrap the handle of each dowel in decorative washi tape, spiraling from just below the ribbon attachment point down to the bottom tip — this covers the raw wood, adds a finished look, and gives little hands better grip when waving enthusiastically. Use a coordinating red, white, or blue washi tape for a cohesive result, or alternate colors for extra festivity.
- Press star-shaped foam stickers along the washi-taped handle section and at the very top where the ribbons attach — this one small detail transforms a craft-fair-looking wand into something that could genuinely be sold at a boutique party supply shop for $12 each.
- Make your full bouquet of 10 wands and gather them together with a wide burlap bow tied around the handles — displayed as a bouquet in a mason jar or galvanized bucket near your front door or party entrance, they function as both a decoration AND an instant self-serve party favor that guests — kids and adults alike — will reach for without being asked.
Stylist’s Secret: Add a single metallic gold or silver ribbon to each wand alongside the red, white, and blue — the metallic thread catches sunlight and camera flashes and makes the whole wand look elevated, intentional, and genuinely sparkly without glitter getting on everything.
Display It Like This: Stand your ribbon wand bouquet in a tall galvanized metal bucket or a wide-mouth mason jar on your front steps or porch — guests walk past it on the way in, the ribbons flutter in the breeze, and you have a decoration that doubles as a welcoming, interactive party moment.
Make It a Family Moment: Set up a wand-making station for 10 minutes before the party and let kids assemble their own — they press the stickers, choose their ribbon order, and end up with a wand they made themselves that they’ll wave all night long.
Final Thoughts
You just turned dollar store supplies and 30 minutes into decorations your guests are going to photograph and ask about all night — and that is not a small thing. Handmade always wins over store-bought when it comes to atmosphere, because there is a warmth and personality in something you made with your own hands that no party supply chain can package and sell. Whether you made all five or just picked the one that called to you most, your home is more festive, more personal, and more you than it would have been with anything you could have ordered online. Now go enjoy your 4th of July — you earned every compliment that’s coming your way.

Jenny is a passionate writer specializing in home decor, design, and styling. With years of experience in transforming spaces, she shares expert tips on creating beautiful, functional homes. From interior design trends to DIY decor ideas, Jenny’s work helps homeowners craft spaces that reflect their unique style. Whether it’s a cozy living room, a modern kitchen, or a serene bedroom, her articles offer practical advice and inspiration to elevate any home.