Your baby won’t remember their first 4th of July. But you will — the way they smelled, how impossibly tiny their feet were, the sounds of summer all around you while they slept through the fireworks completely unbothered.
These 7 crafts exist for exactly that reason: to freeze this moment in time before it slips away. Every single one is completely adult-led — your baby’s only job is to be their perfect, tiny self.
Every material on this list is baby-safe, gentle on newborn skin, and zero-risk. And several of these, tucked into a keepsake box and rediscovered a decade from now, will absolutely make you cry. Here’s everything you’ll need:
Table of Contents
🛒 What You’ll Need
- Pearhead Clean-Touch Inkless Baby Hand & Footprint Ink Pad — This dermatologist-tested inkless pad transfers a perfect, permanent print onto included cardstock without a single drop of ink ever touching your baby’s skin, making it the safest print option available for newborns.
- Lakeshore Non-Toxic Washable Baby-Safe Finger Paint Set (Red, White & Blue) — Specifically formulated for infant skin, this ultra-washable paint rinses off in seconds and is free from all harsh chemicals, making it the gold standard for any paint-contact craft with babies under 12 months.
- Unfinished Wood Canvas Boards 5×7 inch (12-Pack) — These smooth, lightweight wood boards accept both inkless prints and paint beautifully, are ready to hang with an included notch, and make finished keepsakes look like genuine heirloom art pieces rather than craft projects.
- Tiny Ideas Baby Hand & Footprint Ornament Kit — This all-in-one molding compound kit captures a three-dimensional impression of your infant’s hand or foot in permanent, paintable material that becomes a display piece families genuinely pass down for generations.
- Melannco 4×6 Shadow Box Frame Set (White, 3-Pack) — These deep-set shadow box frames hold finished prints, pressed keepsakes, and small mementos together in one beautifully displayed piece that looks intentional and gallery-worthy on any nursery wall.
7 Precious 4th of July Crafts for Infants
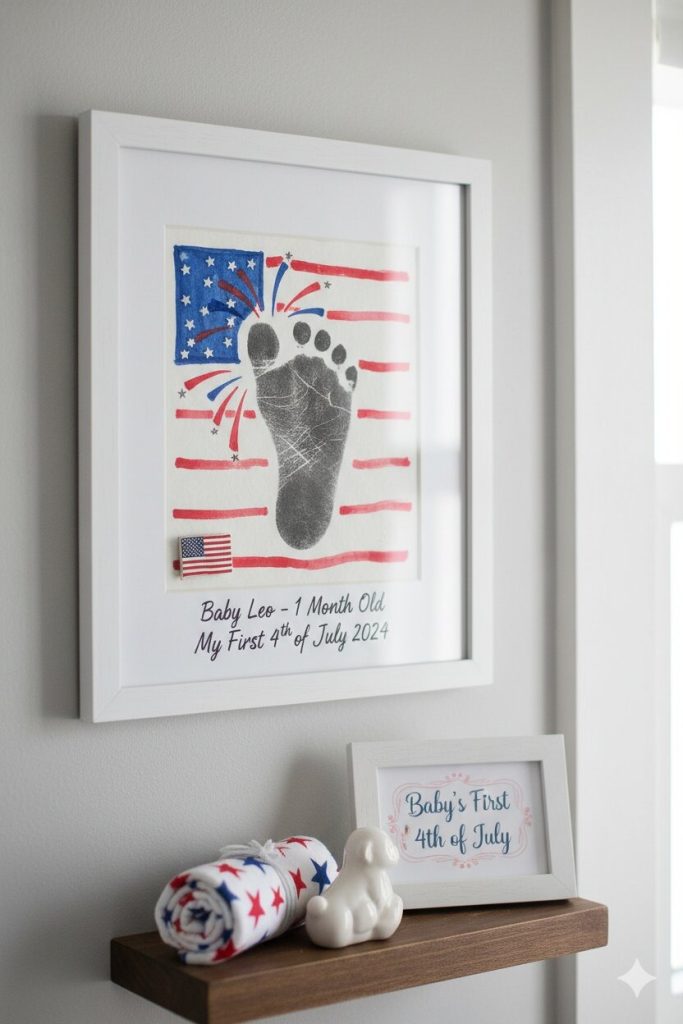
Inkless Footprint Flag Keepsake
Baby’s age: Newborn and up
Time needed: 10 minutes
Who does the work: 100% adult-led — baby just needs to show up!
Keepsake level: ❤️ Heirloom Quality
Mess risk: 🟢 Zero Mess
Safety note: Uses an inkless clean-touch pad exclusively — the transfer agent is completely non-toxic and nothing marks or stains your baby’s skin in any way.
Supplies:
- Pearhead Clean-Touch Inkless Ink Pad
- Included white cardstock (or thick watercolor paper)
- Red and blue fine-tip markers (adult use only)
- Ruler and pencil
- Fine-tip permanent marker for writing
- Optional: small star stickers
How To Make It (Step by Step):
- Before you bring your baby over, lightly sketch a simple American flag outline on your cardstock using a ruler and pencil — draw 13 horizontal stripes across the lower portion and a small rectangle in the top left corner for the union. This quiet preparation moment is your chance to take a breath and be present for what you’re about to make.
- Press your baby’s clean, dry foot gently onto the inkless pad surface for three to four seconds, then lift it carefully and press it firmly onto the center of your flag outline, holding it still for five seconds before lifting straight up — don’t worry if it’s not perfectly placed, because the slight imperfection is what makes it unmistakably handmade and real. Look at how tiny that footprint is against the paper — that is your child, right now, at this exact size they will never be again.
- Once the print appears (it develops within 60 seconds on the clean-touch system), use your red and blue fine-tip markers to carefully fill in the flag’s stripes around the footprint — the toes become the firework burst at the top of the flag, and the heel anchors the bottom, and once you see it come together you will understand immediately why this craft exists.
- Add blue to the union rectangle, press small star stickers into it, and use your permanent marker to write your baby’s name, their age in months, and “My First 4th of July” along the bottom edge in your best handwriting — or your most honest handwriting, because that imperfection will matter enormously to you someday.
- Set flat to dry fully before handling, then hold it at arm’s length and look at what you made in ten minutes on an ordinary afternoon — it is not ordinary at all.
The Moment to Savor: The second the footprint develops on the paper and you see every tiny toe ridge and the exact curve of your baby’s heel preserved permanently — that is the moment most moms report having to set down the craft and just hold their baby for a minute.
Display or Gift It: Frame in a white 5×7 shadow box with a small American flag pin and a printed card reading “Baby’s First 4th of July” and hang on the nursery wall where you’ll see it every single day.
Save It Forever Tip: Frame under UV-protective glass to prevent the inkless print from fading over decades — it will look just as crisp at their high school graduation as it does today.
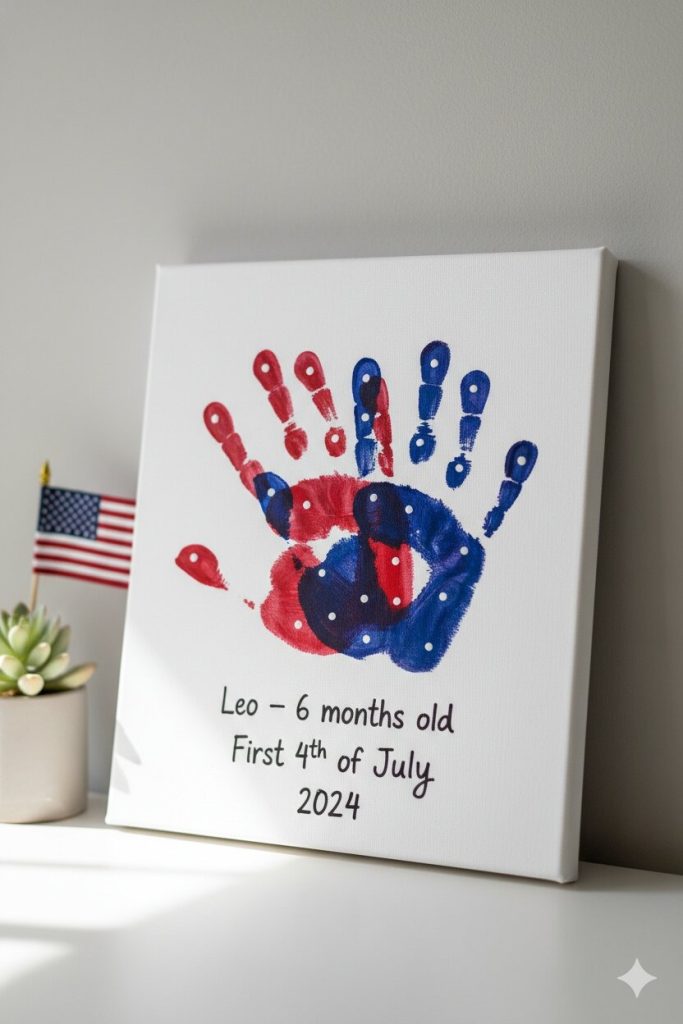
Patriotic Handprint Canvas Art
Baby’s age: 3 months and up
Time needed: 15 minutes
Who does the work: Adult-led with baby’s hand as the star
Keepsake level: 💜 Frame-Worthy Forever Piece
Mess risk: 🟡 Minimal Mess
Safety note: Uses Lakeshore baby-safe washable paint that is specifically formulated for infant skin contact and rinses completely clean with warm water in under 30 seconds.
Supplies:
- Small white canvas board (8×10 inch)
- Baby-safe washable paint in red and blue
- Small foam brush
- Damp warm washcloth
- Fine-tip permanent marker (adult use)
- Optional: white paint pen for star details
How To Make It (Step by Step):
- Lay your baby on a soft surface nearby and prepare everything before you apply a single drop of paint — have your damp washcloth open, your canvas positioned, and your phone ready to photograph, because the window between “paint on hand” and “paint on everything else” is shorter than you think, and you want to be fully present for it rather than scrambling.
- Using the foam brush, apply a thin, even layer of red paint across your baby’s entire palm and spread it gently to each fingertip — most babies will either stare at their hand with profound concentration or immediately attempt to eat it, and both reactions are equally precious and worth capturing on camera before you press the print.
- Guide your baby’s painted hand firmly onto the canvas and hold it flat and still for a count of five — press gently on each finger to ensure full contact, then lift the hand straight up in one clean motion. The handprint that appears is perfect. Do not judge it by whether it’s centered or complete — judge it by the fact that it is theirs, right now, at this size.
- Wipe your baby’s hand immediately and thoroughly with the warm damp cloth, then step back and let the canvas dry while you hold your clean, paint-free baby and look at what just happened on that canvas. Repeat with blue paint if you want a second handprint placed overlapping the first at a slight angle — the layered red-and-blue effect looks like a professional art piece.
- Once fully dry, use your permanent marker to write the date, your baby’s age, and a short phrase along the bottom — “6 months old, First 4th of July” or simply their name and the year — and then look at this canvas, which cost you fifteen minutes and will hang on a wall in your home for the rest of your life.
The Moment to Savor: The expression on your baby’s face when the cool paint brush touches their palm for the first time — that look of pure wide-eyed surprise followed by an attempt to investigate their own painted hand is a moment of genuine personality you will want to have photographed.
Display or Gift It: Hang directly on the nursery wall above the crib, or duplicate the canvas and give one to each set of grandparents as an Independence Day gift they will display in their homes for decades.
Save It Forever Tip: Seal the finished canvas with a thin coat of Mod Podge once dry — it protects the paint from dust, humidity, and the curious hands of future toddlers who will want to touch the handprint that used to be theirs.
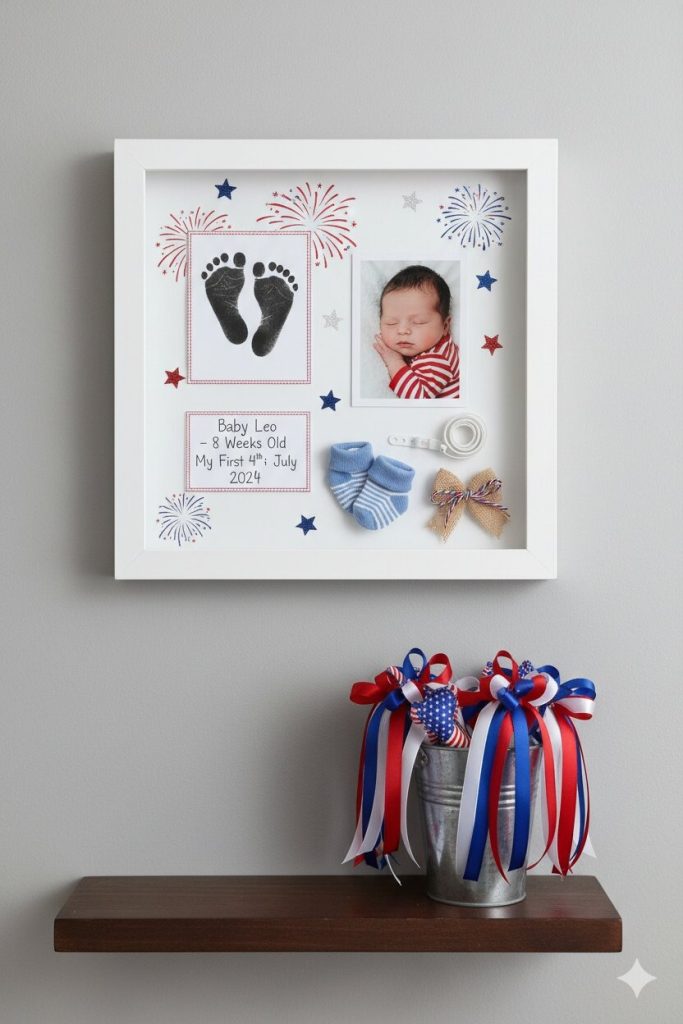
“Little Firecracker” Shadow Box Memory Set
Baby’s age: Newborn and up
Time needed: 20 minutes
Who does the work: 100% adult-led — baby’s print and a few mementos do all the work
Keepsake level: ❤️ Heirloom Quality
Mess risk: 🟢 Zero Mess
Safety note: Uses inkless clean-touch pad only — zero paint or dye makes contact with your newborn’s skin at any point during this craft.
Supplies:
- Deep shadow box frame (white or natural wood, 8×10 inch)
- Inkless print pad and cardstock
- Small patriotic ribbon or red-white-blue twine
- One tiny outfit item or hospital bracelet (optional)
- Printed photo of baby from the day (wallet size)
- Cardstock label printed or handwritten: “My First 4th of July”
- Star stickers or small decorative elements
How To Make It (Step by Step):
- Take your baby’s footprint using the inkless pad on a piece of white cardstock and set it aside to develop fully — while it sets, gather the small items you want to include in the shadow box: a tiny sock, the hospital bracelet if your baby is still very new, a printed wallet-size photo from today, and a small handwritten note that says something you want your child to read someday.
- Write that note now, while your baby is nearby — it doesn’t need to be long. “Today is your first 4th of July. You are eight weeks old and you slept through the fireworks and we watched them from the porch and I held you the whole time.” That is enough. That is everything. Fold it small and tuck it behind the backing of the shadow box where your child will find it when they disassemble the frame someday.
- Arrange your footprint card, the tiny photo, the handwritten label, and any small mementos inside the shadow box frame, playing with placement until it feels balanced and intentional — there’s no wrong arrangement, only the one that feels most like this baby, this day, this family.
- Tie a small bow from your patriotic ribbon and glue or pin it to one corner of the arrangement, then press star stickers into the remaining open spaces until the composition feels complete. Step back and look at what you’ve assembled — it is a portrait of a moment in time that will never exist again.
- Close the shadow box frame and hang it, or wrap it carefully as a gift for a grandparent who will place it somewhere in their home where they will see it every single day and think of your child.
The Moment to Savor: Writing the note tucked inside the shadow box — that private, unhurried moment of putting into words what this day felt like — is the part of this craft that most moms say they treasure most, because it forces them to stop and actually feel the weight of how significant this ordinary extraordinary day really is.
Display or Gift It: This is the perfect grandparent gift — wrap in tissue, place in a gift bag, and present at the 4th of July gathering so they can open it surrounded by family while your baby is right there in the room.
Save It Forever Tip: Choose a shadow box with UV-protective glass and an acid-free backing board to ensure every element inside remains bright and preserved for 50 years or more.
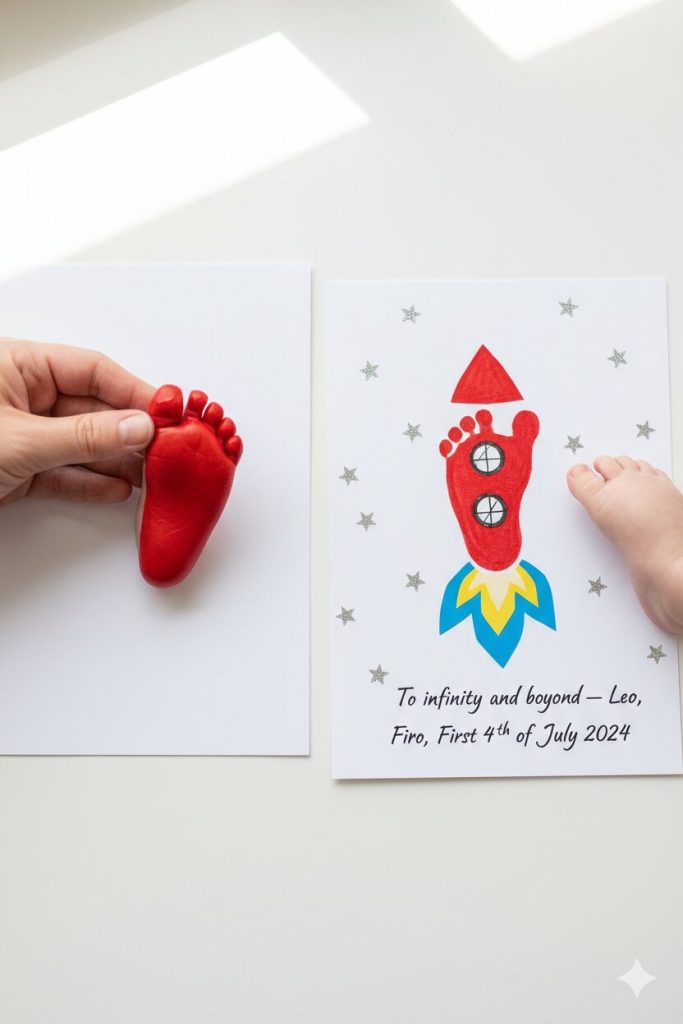
Patriotic Footprint Rocket Photo Prop
Baby’s age: 1 month and up
Time needed: 15 minutes
Who does the work: Adult-led with baby’s foot as the rocket body
Keepsake level: 💜 Frame-Worthy Forever Piece
Mess risk: 🟡 Minimal Mess
Safety note: Uses a minimal amount of baby-safe washable paint applied with a soft foam brush and removed immediately after printing — tested safe for skin contact in infants over 4 weeks old.
Supplies:
- White cardstock or small canvas board
- Baby-safe red washable paint
- Small foam brush and damp cloth
- Blue and yellow construction paper (adult cuts flame shapes)
- Glue stick (adult use)
- Fine-tip permanent marker
- Optional: glitter star stickers for background
How To Make It (Step by Step):
- Before your baby is involved, cut three small flame shapes from yellow and orange construction paper and glue them to the bottom of your cardstock — these will become the rocket’s exhaust flames once the footprint is placed above them, and having this base ready means your paint window is used entirely on the print rather than assembly.
- Paint your baby’s foot with a thin layer of red baby-safe paint using the foam brush, working quickly and gently — hold their ankle softly to keep the foot still, because at this age a baby’s involuntary kick is perfectly timed to happen exactly when paint is applied, and knowing this in advance will make you laugh instead of panic.
- Press the painted foot heel-first onto the cardstock just above your flame shapes, with the toes pointing upward like a rocket nose — hold for five seconds and lift cleanly, then immediately wipe the foot with your warm damp cloth. What you see on the paper is a rocket launching into a 4th of July sky, and it is made entirely from your baby’s foot, and that fact will delight every single person who sees it.
- Once dry, use your permanent marker to draw small windows on the “rocket body” of the footprint, add stars scattered across the white background, and write “To infinity and beyond — First 4th of July” or simply the date and your baby’s name in one corner.
- Photograph your finished rocket print as a flat lay alongside your actual baby’s foot for a side-by-side comparison — this is the photo that will stop everyone’s scroll when you post it, and it will make the craft itself feel even more meaningful when you look back at both images together.
The Moment to Savor: Placing the finished rocket print next to your baby and seeing their actual, real, living foot next to the preserved version on paper — the size comparison in that moment is one of the most visceral reminders of how tiny and new they are that you will ever experience.
Display or Gift It: This doubles as a stunning “Baby’s First 4th of July” photo prop — prop the finished print behind your baby during a quick phone photo session in their patriotic outfit for a social media moment your followers will absolutely love.
Save It Forever Tip: Scan the finished print at high resolution and save digitally before framing — that way you have a permanent digital backup that can be reprinted, turned into a birth announcement card, or enlarged to canvas at any future point.
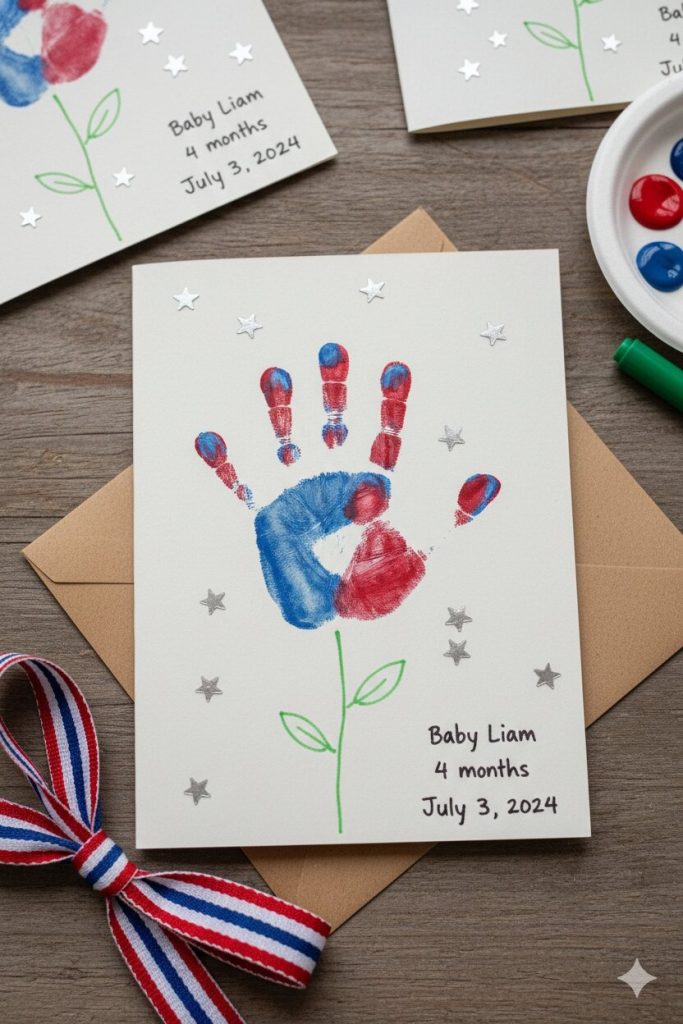
Daycare Patriotic Handprint Flower Garden Card
Baby’s age: Newborn and up
Time needed: 8 minutes per baby
Who does the work: 100% adult-led — perfect for daycare workers making multiples simultaneously
Keepsake level: 💛 Sweet Keepsake
Mess risk: 🟡 Minimal Mess
Safety note: Uses only inkless print pads or baby-safe washable paint — all materials are non-toxic, latex-free, and safe for newborn skin contact with immediate gentle wipe removal.
Supplies:
- White or kraft card blanks (A2 size, one per baby)
- Inkless print pads OR baby-safe washable paint in red and blue
- Green marker or paint pen (adult draws stems)
- Fine-tip permanent marker for names and dates
- Star stickers (one pack covers a full class)
- Envelope for sending home
How To Make It (Step by Step):
- Set up your station before any babies are involved — lay out all card blanks, have your inkless pads ready or small amounts of paint on foam plates, and pre-draw a simple green stem with two small leaves on the lower half of each card using your green marker. This prep work is what makes this craft achievable for a full room of infants without chaos.
- Take each baby’s handprint using the inkless pad or a thin layer of baby-safe paint, pressing the palm and fingers spread wide onto the top of the card just above the stem — the open hand becomes a blooming flower, and the five fingers become petals, and it works every single time regardless of how cooperative or uncooperative the baby is feeling about the whole endeavor.
- Write each baby’s name, age in months, and the date in permanent marker along the card’s bottom edge, then press two or three star stickers into the white space around the flower — the entire card takes under eight minutes per baby and produces something their parent will keep forever.
- Write a short printed or handwritten message inside each card — “Happy First 4th of July from your friends at [Daycare Name] — we are so honored to spend this milestone with your family” — and seal in an envelope to send home at pickup.
- For an elevated presentation, tie a small piece of red-white-blue ribbon around the sealed envelope before handing it to parents at the end of the day — the moment a parent opens this card and sees their infant’s handprint flower is one of the most genuinely moving pickup-time moments a daycare can create.
The Moment to Savor: The parent’s face at pickup when they open the envelope — that sharp inhale followed by immediate tears is the moment that makes every minute of prep work worthwhile for a daycare teacher.
Display or Gift It: Parents can frame the card as-is in a simple 4×6 frame, or press it flat in a baby memory book — either way it becomes a permanent record of how small their baby’s hand was on this exact day.
Save It Forever Tip: Suggest to parents that they store the card flat in an archival plastic sleeve inside the baby’s memory book — this prevents creasing, moisture damage, and the inevitable curiosity of future toddler siblings.
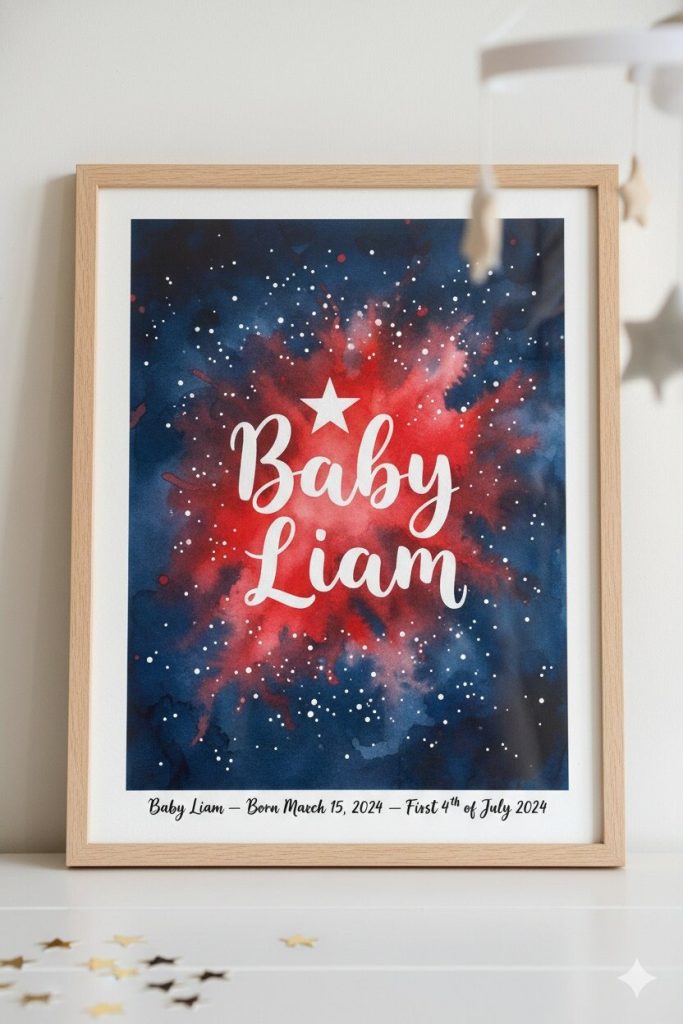
Watercolor Starry Sky Nursery Print
Baby’s age: Newborn and up
Time needed: 20 minutes
Who does the work: 100% adult-led — no baby skin contact required whatsoever
Keepsake level: 💜 Frame-Worthy Forever Piece
Mess risk: 🟡 Minimal Mess
Safety note: No materials touch your baby at any point — this craft is made entirely by the adult while the baby sleeps or watches from a safe nearby surface, making it ideal for newborns and parents who prefer zero skin contact.
Supplies:
- Watercolor paper (cold press, 8×10 inch)
- Watercolor paints in navy, red, and white
- Medium watercolor brush and small detail brush
- Fine-tip white paint pen or white gouache
- Pencil
- Fine-tip permanent marker for text
- Optional: gold star stickers for border
How To Make It (Step by Step):
- Lightly pencil your baby’s name in large letters across the center of the watercolor paper — then trace around each letter with a slightly wavy, organic line so the name feels hand-lettered rather than printed. This is the moment to take your time, because the name at the center of this piece is the most important element — it’s the reason the whole thing exists.
- Using your navy watercolor, wash a deep, rich background across the entire paper in loose, unpredictable strokes — let it pool and bloom and do what watercolor does when you let it, because the imperfection is the beauty. While it’s still wet, drop small amounts of red paint into the edges and watch it bleed and spread into the dark blue like fireworks dissolving into a night sky.
- Once the background is fully dry, use your white paint pen to carefully fill in your baby’s name so it glows against the dark watercolor background — the contrast is stunning, and seeing your child’s name emerge from the deep navy and red is a moment that will make you want to frame it before it’s even finished.
- Dot small white stars across the entire background using the tip of your white paint pen — vary the size, making some just pinpricks and others slightly larger, scattering them the way real stars scatter rather than evenly spacing them. Add one larger star above the first letter of your baby’s name.
- Along the bottom of the piece, write in small permanent marker: “[Baby’s name] — Born [birth date] — First 4th of July [year]” and then set the finished print flat to dry completely. What you have made is a piece of nursery art that could sell in a boutique shop for $45 — and you made it yourself, on your baby’s first Independence Day, while they slept nearby.
The Moment to Savor: Seeing your baby’s name glowing in white against a deep red-and-navy watercolor sky for the first time — the moment you realize it looks genuinely beautiful — is the moment this stops feeling like a craft and starts feeling like a piece of art you made for someone you love completely.
Display or Gift It: Frame in a simple white or natural wood frame and hang in the nursery as a permanent piece of wall art that will grow with your child from infant through childhood — it belongs in their room for years.
Save It Forever Tip: Frame under UV-protective non-glare glass to protect the watercolor pigments from light fading — watercolor is particularly vulnerable to sunlight and UV protection will keep those deep navy and red tones rich and vibrant for decades.
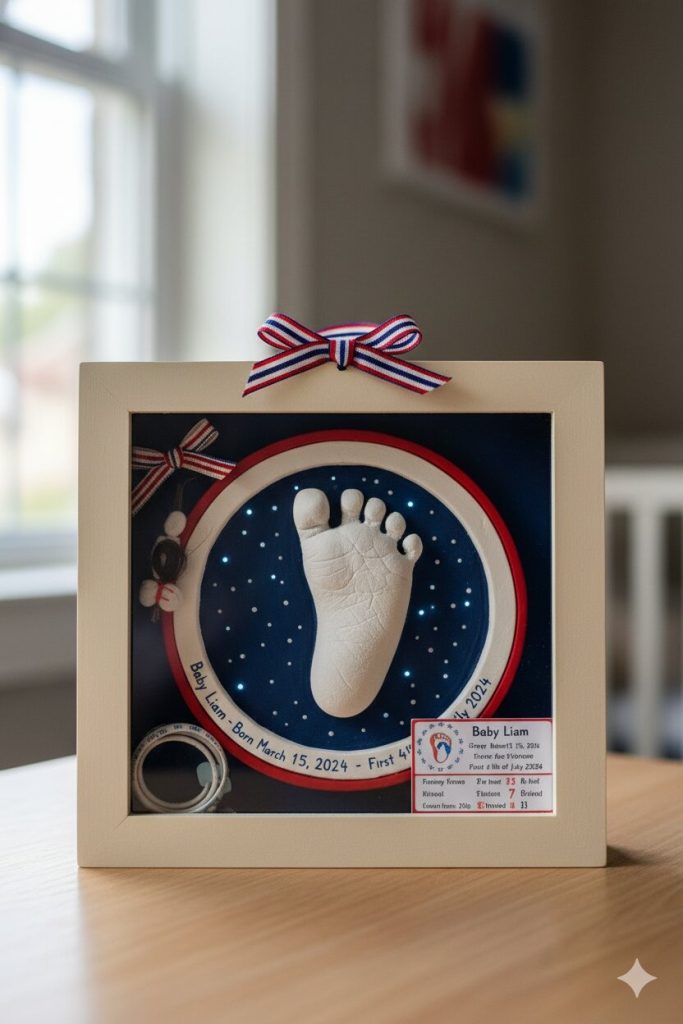
Tiny Toes 3D Impression Keepsake
Baby’s age: Newborn and up
Time needed: 25 minutes (plus 24-hour drying time)
Who does the work: Adult-led with baby’s foot as the forever impression
Keepsake level: ❤️ Heirloom Quality
Mess risk: 🟡 Minimal Mess
Safety note: Uses non-toxic, dermatologist-tested molding compound that is completely safe for newborn skin — the same material used in hospital keepsake programs across the United States.
Supplies:
- Tiny Ideas Baby Hand & Footprint Ornament Impression Kit
- Red and white acrylic paint (for painting dried impression)
- Small detail paintbrush
- Fine-tip permanent marker
- Optional: small red-white-blue ribbon for hanging
- Optional: shadow box for display
How To Make It (Step by Step):
- Mix your molding compound according to kit instructions until it reaches a smooth, consistent texture — press it into the provided frame or tray and smooth the surface flat with clean fingers. Have your baby nearby but not yet involved — this preparation takes about three minutes and you want the compound at the perfect consistency when your baby’s foot meets it.
- Gently press your baby’s clean foot into the center of the compound with steady, even pressure — hold for 20 to 30 seconds without shifting, then lift the foot cleanly and straight upward. The impression that remains is so detailed you can see every tiny ridge and wrinkle of your baby’s sole, and the first time you see it you will understand why parents have been making these for generations.
- Set the tray in a safe place where it won’t be disturbed for a full 24 hours — use this waiting time to take photos of your baby’s actual feet for comparison, because when they are a teenager you will look at this impression and find it almost impossible to believe their feet were ever this small.
- Once fully hardened, paint the raised impression with a thin coat of white paint and let dry, then add delicate red and blue details — tiny stars painted across the background, a thin red stripe along the border, or simply the date written in blue paint pen along the bottom edge of the frame.
- Add a small patriotic ribbon loop to the top if you’d like to hang it, or place it flat in a shadow box alongside a wallet-size photo from today — either way, what you are holding is a permanent, three-dimensional record of your baby’s foot at this exact size, on this exact day, and it will outlast everything else you own.
The Moment to Savor: Lifting the tray 24 hours later and seeing the fully hardened, permanent impression of your baby’s tiny foot for the first time — that moment of holding something solid and permanent that is unmistakably, perfectly, irreplaceably theirs — is unlike anything else this list has to offer.
Display or Gift It: Place in a deep shadow box alongside the hospital bracelet, a lock of hair from the first haircut, and a printed copy of their birth stats for a multi-layered heirloom display piece that your child will one day pass to their own children.
Save It Forever Tip: Store the impression in a cool, dry location away from direct sunlight — the molding compound is extremely durable but can discolor with prolonged UV exposure, so display in indirect light or behind UV-protective glass for lifelong preservation.
Final Thoughts
You will not remember every single day of your baby’s first year — no one does, and that is not a failure, it is simply what new parenthood is. But you will remember the days you stopped, slowed down, and made something.
You will remember the weight of their foot in your hand as you pressed it to the paper. You will remember the smell of that particular afternoon, the sounds in the background, the way the light looked when you held up the finished piece and felt something shift quietly in your chest.
These crafts are not about being crafty — they are about being present for something that is already almost over by the time you realize it’s happening. Your baby does not need to do a single thing to make these keepsakes meaningful.
They just need to be here, tiny and new and entirely themselves, while you do the work of remembering them. One day — sooner than feels possible right now — they will hold one of these little footprint prints in their grown hands and look at you with disbelief that they were ever that small.
And you will look back at them and feel, all over again, exactly what you felt on their first 4th of July. Keep making the memories, mama. Every single one is worth it.

Jenny is a passionate writer specializing in home decor, design, and styling. With years of experience in transforming spaces, she shares expert tips on creating beautiful, functional homes. From interior design trends to DIY decor ideas, Jenny’s work helps homeowners craft spaces that reflect their unique style. Whether it’s a cozy living room, a modern kitchen, or a serene bedroom, her articles offer practical advice and inspiration to elevate any home.