You deserve patriotic decor that actually reflects your style. Not plastic flags and paper tablecloths — but something you made yourself that stops guests in their tracks.
Whether you’re hosting a backyard gathering, decorating your home for the season, or planning a girls’ craft night with a glass of rosé, these projects deliver that satisfying mix of creativity and wow factor.
Each one is designed for adults who appreciate beautiful things and aren’t afraid to put in a little effort for stunning results. Before you start, grab these elevated supplies that make all the difference between “cute” and “seriously impressive.”
Table of Contents
Elevate Your Craft Game: Top Picks from Amazon
- Alcohol Ink Set – 24 Colors with Yupo Paper (Professional Grade) – Alcohol inks create fluid, jewel-toned effects that make every piece look like original art — perfect for patriotic coasters, tiles, and canvas work.
- Wood Burning Tool Kit with Interchangeable Tips (Professional Set) – A quality pyrography kit lets you etch fine detail into wood signs and trays with precision that paint simply can’t match.
- Clear Casting Resin Kit – 32 oz with Measuring Cups and Stir Sticks – Food-safe epoxy resin is the secret behind those gorgeous geode-style serving trays and decorative tabletop pieces that look custom-made.
- Vintage-Style Glass Lantern Bases – Set of 3 (Assorted Heights) – These elegant lantern frames are the ideal base for layered, styled vignettes that elevate any mantel, table, or entryway display.
- Wired Burlap Ribbon Assortment – Navy, Red & Ivory (6 Spools) – Premium wired ribbon holds sculptural bows and loops without flopping, giving your wreaths and arrangements a polished, professional finish.
The 7 Crafts
1. 🖤 Alcohol Ink Patriotic Coaster Set
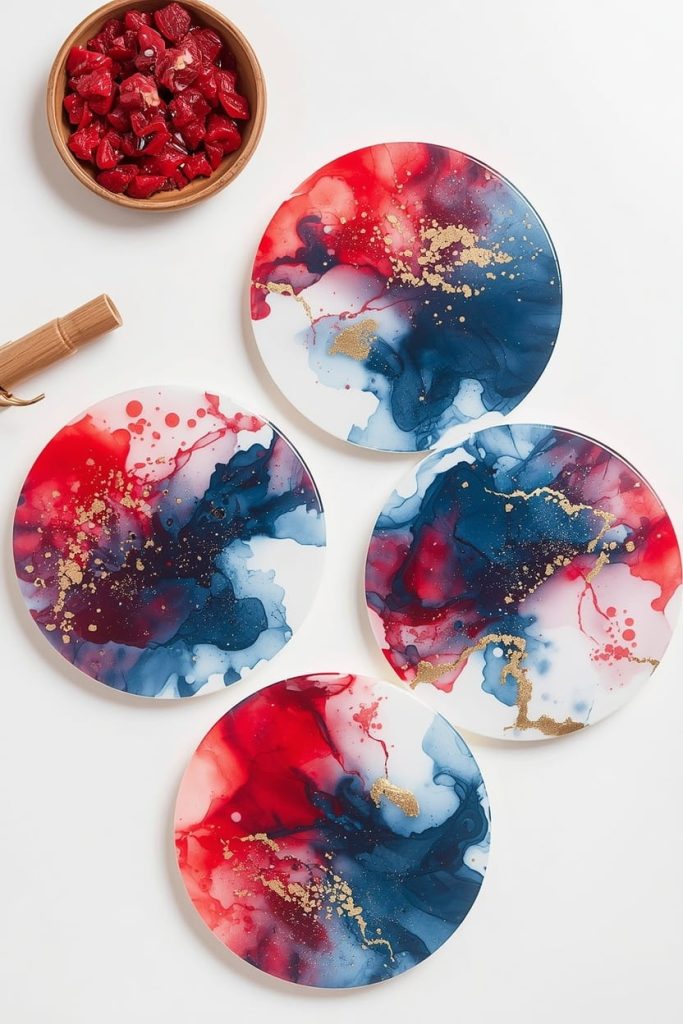
Difficulty: Beginner-Friendly | Time: About 60 minutes (plus drying)
Why you’ll love it: These coasters look like something from an upscale boutique — no two are identical, and the fluid ink movement creates a genuinely artistic result with very little technical skill required.
Materials needed:
- White ceramic tiles or Yupo paper rounds
- Alcohol inks in red, navy, and white
- 91% isopropyl alcohol in a spray bottle
- Felt pads for tile bottoms
- Resin top coat (optional, for sealing)
How to make it:
- Work on a protected surface — alcohol ink moves fast and stains everything.
- Drop ink colors directly onto your tile surface in loose clusters, letting colors overlap.
- Use a straw or spray isopropyl alcohol to push the ink into flowing patterns.
- Add white ink last to create contrast and separation between colors.
- Let dry completely (30–45 minutes), then seal with resin or a spray sealer for durability.
- Attach felt pads to the bottom and package as a set of four.
Style Tip: For a modern aesthetic, stick to navy and white with just a touch of red. For a boho look, add a drop of gold metallic ink to warm the palette. Display the finished set in a small wooden tray on your coffee table all season long.
2. 🪵 Wood-Burned Patriotic Serving Board
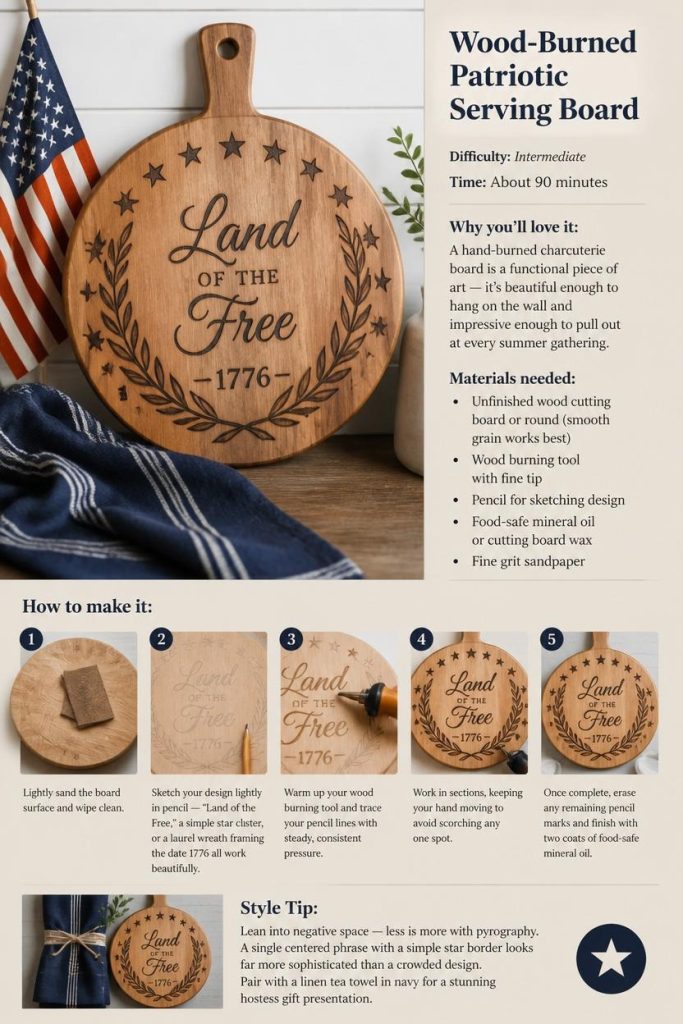
Difficulty: Intermediate | Time: About 90 minutes
Why you’ll love it: A hand-burned charcuterie board is a functional piece of art — it’s beautiful enough to hang on the wall and impressive enough to pull out at every summer gathering.
Materials needed:
- Unfinished wood cutting board or round (smooth grain works best)
- Wood burning tool with fine tip
- Pencil for sketching design
- Food-safe mineral oil or cutting board wax
- Fine grit sandpaper
How to make it:
- Lightly sand the board surface and wipe clean.
- Sketch your design lightly in pencil — “Land of the Free,” a simple star cluster, or a laurel wreath framing the date 1776 all work beautifully.
- Warm up your wood burning tool and trace your pencil lines with steady, consistent pressure.
- Work in sections, keeping your hand moving to avoid scorching any one spot.
- Once complete, erase any remaining pencil marks and finish with two coats of food-safe mineral oil.
Style Tip: Lean into negative space — less is more with pyrography. A single centered phrase with a simple star border looks far more sophisticated than a crowded design. Pair with a linen tea towel in navy for a stunning hostess gift presentation.
3. 🏮 Layered Patriotic Lantern Vignette
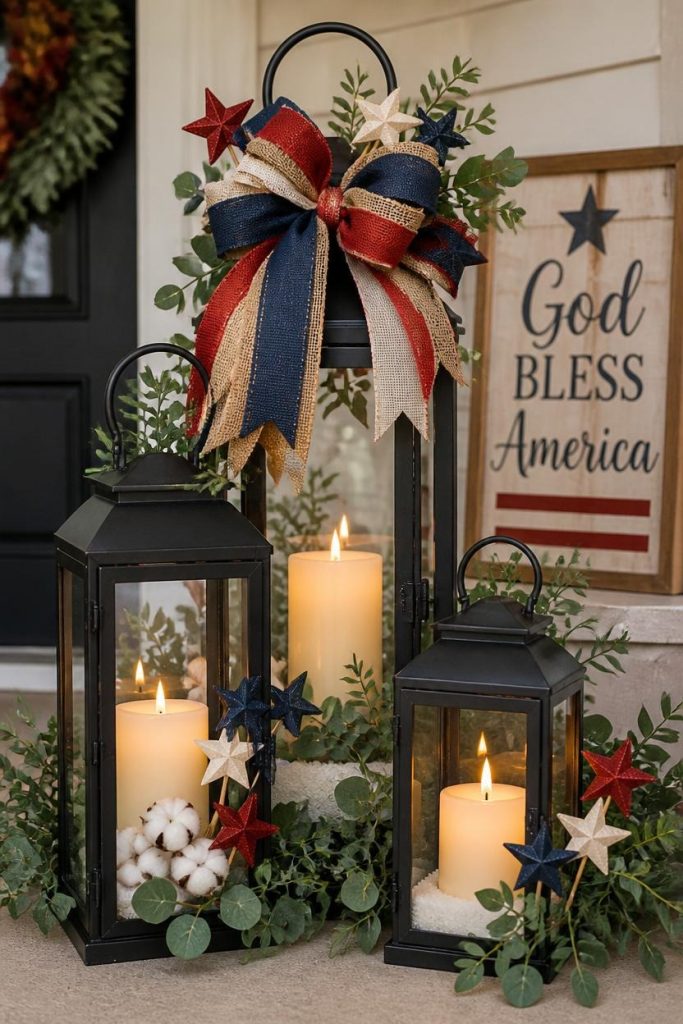
Difficulty: Beginner-Friendly | Time: About 30 minutes
Why you’ll love it: This is the craft that makes your entryway or mantel look like a styled magazine shoot — layered heights, warm candlelight, and rich patriotic textures all working together effortlessly.
Materials needed:
- 3 glass lanterns in varied heights
- Pillar candles or LED flameless candles
- Wired burlap ribbon in navy, red, and ivory
- Decorative filler (white sand, dried cotton stems, or star picks)
- Greenery sprigs (eucalyptus or boxwood)
How to make it:
- Arrange your three lanterns in a triangular grouping — never in a straight line.
- Place candles inside each lantern, using LED versions if displaying outdoors.
- Tie a generous, layered bow using two or three ribbon colors on the handle of the tallest lantern.
- Tuck greenery sprigs and star picks into the ribbon knot and around the base of the lanterns.
- Fill any open lantern bases with white sand or decorative filler for grounding visual weight.
Style Tip: For a farmhouse look, add a small “God Bless America” wood sign leaning against the back lantern. For coastal style, swap the burlap for navy nautical rope and add white shells to the base filler. Either way, always use odd numbers — three lanterns, five stems, seven stars.
4. 💫 Resin Patriotic Serving Tray
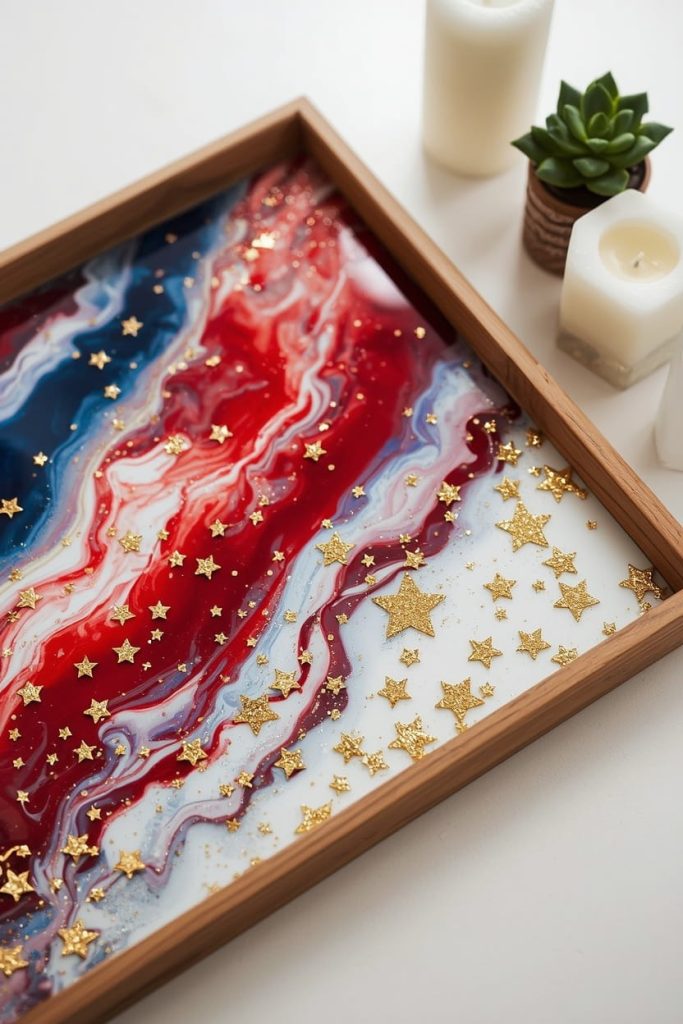
Difficulty: Advanced | Time: 2 hours active + 24 hours cure
Why you’ll love it: A resin tray with embedded stars, glitter, and swirling red and navy pigment is the kind of piece that makes people ask “where did you buy that?” — and you get to say you made it yourself.
Materials needed:
- Clear casting resin (two-part epoxy)
- Resin pigment in red, navy, and white
- Gold or silver star embeds and fine glitter
- Silicone tray mold or wood tray with sealed surface
- Nitrile gloves, stir sticks, and measuring cups
How to make it:
- Mix your resin according to package instructions — precision matters here.
- Divide into three cups and tint each with red, navy, and white pigment respectively.
- Pour colors into your mold in alternating streams, letting them naturally blend at the edges.
- Sprinkle star embeds and glitter across the surface immediately.
- Use a toothpick or skewer to drag swirl patterns through the colors before they begin to set.
- Cover loosely and allow to cure fully for 24 hours before demolding.
Style Tip: Keep your color ratio at roughly 40% navy, 35% white, and 25% red for a result that reads as sophisticated rather than costume-party patriotic. Style the finished tray on an ottoman or sideboard with a few white pillar candles and a small succulent.
5. 🌿 Elevated Patriotic Wreath with Texture Layers
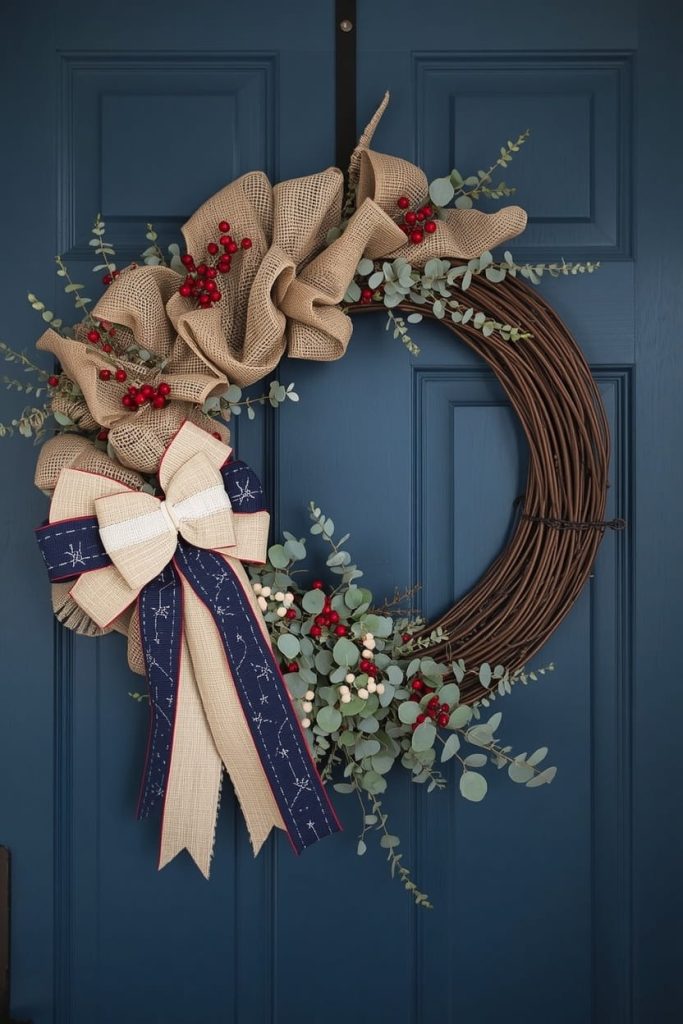
Difficulty: Intermediate | Time: About 75 minutes
Why you’ll love it: This isn’t a standard loop-ribbon wreath — layered textures, mixed materials, and intentional color placement make it the kind of front door statement your neighbors will actually compliment.
Materials needed:
- Grapevine or wire wreath base (16–18 inch)
- Wired burlap ribbon in navy and ivory
- Red velvet ribbon (thin, for contrast)
- Eucalyptus or preserved greenery
- Star and berry picks, small wood bead garland
- Hot glue gun and floral wire
How to make it:
- Begin by weaving burlap ribbon loosely through the grapevine base, securing with floral wire every few inches.
- Add navy ribbon loops throughout, varying their size for an organic, gathered effect.
- Build a focal point on the lower left third of the wreath using a layered bow — navy burlap, ivory burlap, then a thin red velvet center loop.
- Tuck eucalyptus branches around the bow and extend them along the bottom arc.
- Add star picks and bead garland in the greenery, keeping embellishments clustered rather than scattered.
Style Tip: Resist the urge to make it perfectly symmetrical — an asymmetrical focal point looks far more designer. For a modern home, skip the grapevine and use a black metal hoop base instead with the same ribbon and greenery treatment.
6. 🕯️ Hand-Poured Patriotic Soy Candle Set
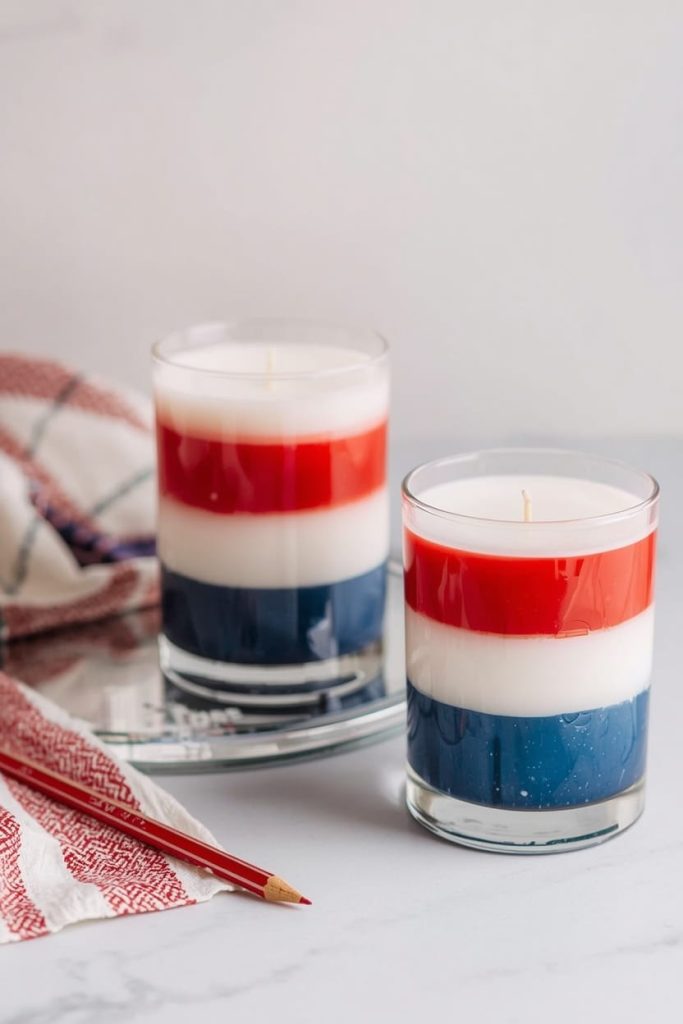
Difficulty: Beginner-Friendly | Time: About 60 minutes (plus cooling)
Why you’ll love it: Hand-poured candles are both a beautiful decor piece and a genuinely sensory experience — and a layered red, white, and blue candle in a glass vessel is almost too pretty to burn.
Materials needed:
- Soy wax flakes (natural, clean-burning)
- Pre-tabbed cotton wicks
- Candle fragrance oil (cedarwood, vanilla, or clean linen work beautifully)
- Candle dye in red and navy blue
- Clear glass vessels or mason jars
- Pouring pitcher and thermometer
How to make it:
- Melt soy wax to 170°F, then cool to 135°F before adding fragrance oil (about 1 oz per pound of wax).
- Divide melted wax into three portions — tint one red, one navy, and leave one white.
- Secure your wick centered in the vessel using a wick bar or two pencils across the top.
- Pour the navy layer first and allow to partially solidify (about 45 minutes) before adding the white layer.
- Repeat with the red layer on top once the white has set.
- Trim wick to ¼ inch once fully cooled and cured (24–48 hours).
Style Tip: Use straight-sided glass vessels for the cleanest layer lines — mason jars work but the shoulders blur the layers slightly. Group three candles in varying heights on a small mirrored tray for a mantel display that looks effortlessly curated.
7. 🎨 Distressed Americana Wood Sign
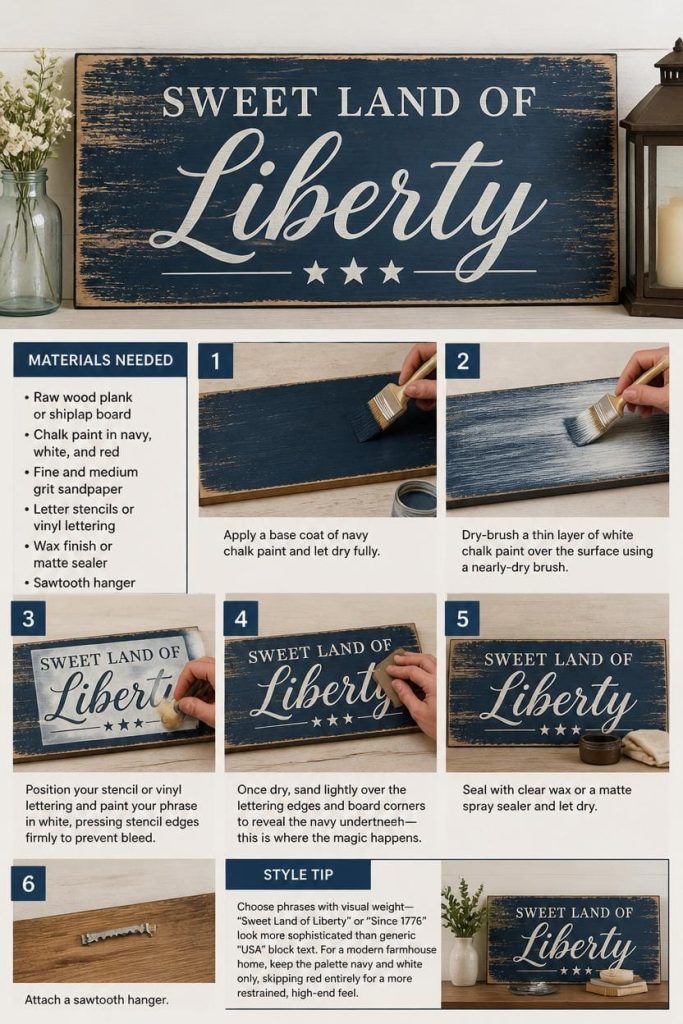
Difficulty: Intermediate | Time: About 60 minutes**
Why you’ll love it: A hand-painted, artfully distressed wood sign with a timeless phrase hits that sweet spot between rustic and refined — and it’s the kind of piece that works equally well on a gallery wall or leaning on a kitchen shelf.
Materials needed:
- Raw wood plank or shiplap board
- Chalk paint in navy, white, and red
- Fine and medium grit sandpaper
- Letter stencils or vinyl lettering
- Wax finish or matte sealer
- Sawtooth hanger
How to make it:
- Apply a base coat of navy chalk paint and let dry fully.
- Dry-brush a thin layer of white chalk paint over the surface using a nearly-dry brush — this creates that worn, layered look.
- Position your stencil or vinyl lettering and paint your phrase in white or red, pressing stencil edges firmly to prevent bleed.
- Once dry, sand lightly over the lettering edges and board corners to reveal the navy underneath — this is where the magic happens.
- Seal with clear wax or a matte spray sealer and attach a sawtooth hanger.
Style Tip: Choose phrases with visual weight — “Sweet Land of Liberty” or “Since 1776” look more sophisticated than generic “USA” block text. For a modern farmhouse home, keep the palette navy and white only, skipping red entirely for a more restrained, high-end feel.

Jenny is a passionate writer specializing in home decor, design, and styling. With years of experience in transforming spaces, she shares expert tips on creating beautiful, functional homes. From interior design trends to DIY decor ideas, Jenny’s work helps homeowners craft spaces that reflect their unique style. Whether it’s a cozy living room, a modern kitchen, or a serene bedroom, her articles offer practical advice and inspiration to elevate any home.