This is a complete guide on Liberty Pumps Pro 370 Installation. From this article, you will learn everything you need to know to install this system like a pro.
Table of Contents
- Instructions You Must Follow Before Installation
- Covers & Basins Dimensions
- In-Ground Basin Installation
- Liberty Pumps Pro 370 Installation [An In-depth Guide]
- Access Cover & Float Switch Control
- End-Note
Instructions You Must Follow Before Installation
Before installation, you must learn about some common features of each individual system & the way they work. Each pump (here means specific model) is factory tested to ensure proper performance.
Once you have a clear idea about them, you can easily avoid potential operating issues. As a result, you could operate the system trouble-freely for years.
ProVore Grinder Systems:
This pump series from Liberty Pumps features a unique cutter system.
With the help of this feature, it can grind difficult wastes found in typical residential applications and pump them through a 1-½” or 2” discharge line.
For example, the ProVore 380-series has a 2” discharge outlet. If you want to gain adequate flow rate for proper operation of the system, never increase the pipe size above 2”.
Yeah, you can reduce the discharge line size from 2” to 1-½” or 1-¼”. Regarding this, it will be best to consult Liberty Pumps for sizing up the pipe & system properly.
Pro-Series System:
It comes with an integral control system featured with an alarm and QuickTree float system. And pump and pump alarm are default on the QuickTree system at proper operating level.
You will find the QuickTree system under a separate access cover that makes the maintenance and service workflow easy.
The float it has for activating the pump and alarm is mounted on a stainless steel rod, separate from the unit. Because of the placement of the float, you don’t need to disconnect the piping or the pump itself to inspect, service, or replace the float.
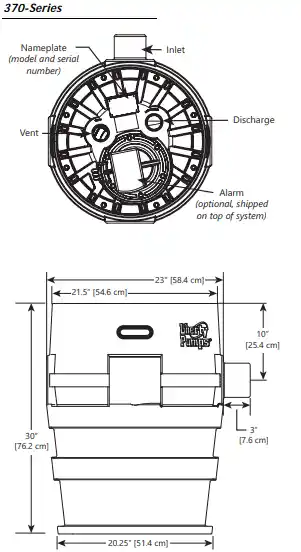
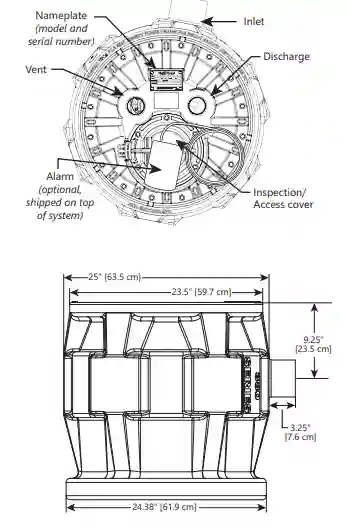
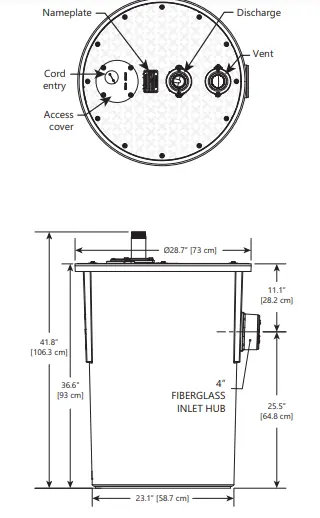
Covers & Basins Dimensions
Take your eyes at the following pictures that will show the cover and basin dimensions of 370-Series, 380-Series Vertical Discharge, 380-Series Side Discharge, and 700-Series.
370-Series:
380-Series Vertical Discharge:
380-Series Side Discharge:

700-Series:
In-Ground Basin Installation
You can install basins (from ProVore and Pro-Series) in both indoor and outdoor applications. However, the 700-Series basins can only be installed indoors.
Excavation
Dig the hole as small as possible by maintaining the recommended clearance of 8” around the tank. Be assured that the basin you place doesn’t come into direct contact with rocks or other sharp objects.
Place only fine pea gravel, washed & crushed stones as bedding between the basin and the hole walls. Never use sand or native soils as backfill. Otherwise, the basin won’t get a solid, level base that could rarely support the weight of the filled basin.
Ensure the top lip of the basin is aligned with the finished floor.
Initial Backfill
As mentioned above, you can only use fine pea gravel that size should be between 1/8” to 3/4” or 1/8” to 1/2” crushed stone around the bottom of the basin. This backfill will help hold the basin in place.
Inlet Connection
Pro-Series like Liberty Pumps Pro 37o have a 4” inlet fashioned to the side of the tank. And this inlet needs 4” no-hub type coupling, which you can use to connect the gravity drainage line from the fixtures to the hub.
Final Backfill
Foreign objects, large rocks, and clods must be kept from the backfill materials. Make sure you mound the backfill materials a bit and let it settle naturally.
Liberty Pumps Pro 370 Installation [An In-depth Guide]
Once you read all the pre-installation instructions I mentioned, it’s time to install your Liberty Pumps Pro 370. Keep in mind; you must call a qualified personnel to install the pump professionally.
On the other hand, if you are mechanically inclined, follow the installation guide below.
Note: Don’t forget to maintain and practice the electrical safety guidance in accordance with the National Electric Codes or local codes and ordinances.
1. Electric Connections
Shut off the main electric connections and complete the pump & control panel wiring according to the manufacturer’s wiring diagram. Once you make all the electrical connections, check all the wiring for unintentional grounds.
2. Discharge
Use an adapter for attaching the discharge pipe to the threaded 2” or 3” port included on the cover. Alternatively, connect the discharge line to the 2” PVC nipple used on the side discharge models.
Next, complete the installation of the remaining discharge line. If you have vertical discharge applications, you must install a union just above the cover to ensure pump removal.
Of course, a check valve is a must component you should install after the union to prevent the backflow of liquid after each pumping cycle. Also, set a gate valve or ball valve that will follow the check valve to make the check valve maintenance or pump removal easy.
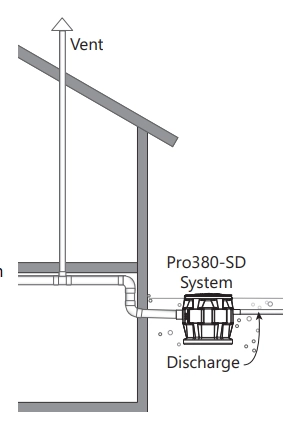
3. Vent
Either you have a pump with side or vertical discharge, size up the vent according to the applicable codes- but not less than the discharge size.
On a vertical discharge system, a threaded 2” or 3” connection is provided on the top of the cover. Pipe the vent to the existing vent of your building or extend it outside- on its own standpipe.
On the other hand, if you get a side discharge model, complete the venting through the inlet as shown in this picture:
4. Inlet
Attach the inlet line to the inlet hub as per engineer’s specifications. However, if you own a Liberty Pumps from 700-Series, you should use a 4” seal for inlet connection.
5. Piggyback Switch Operation
Every Pro370 and vertical discharge Pro380 model is equipped with the float switch mounted on the QuickTree assembly.
Generally, these models have two power cords- one attached to the float switch and the other one to the pump motor.
The switch cord comes with a piggyback plug that lets you plug the power cord into the back of the piggyback plug. Because of this design, you can operate the pump manually.
For automatic operation, what you need to do is- interconnect the two cords and plug them into a separate fuse, grounded outlet of proper capacity. Borth power cords are equipped with 3-prong plugs and you must plug them into a properly grounded 3-wire receptacle.
On the other hand, if you want to operate the pump manually or in the event of switch failure, just separate the pump cord and insert it into an electrical outlet directly. It will help you bypass the switch. Then, use the circuit breaker or panel disconnect to operate the pump.
Access Cover & Float Switch Control
As mentioned earlier, Liberty Pumps Pro 370 comes with QuickTree Technology. It’s the technology that mounts the floats (for activating the pump and the alarm) separately from the unit.
In this float system, a stainless steel mounting is used and designed cord clamping brackets to affix the pump float and the alarm float. And all the floats are factory pre-set at optimum operating levels. You can’t adjust them.
If you try to adjust the floats, you will experience malfunction of the system like it may turn off the pump or the alarm.
Though it’s recommended to not adjust the float, you can still inspect the float systems or service it.
In this case, locate the QuickTree system under the separate access cover. Unscrew the access cover and remove the QuickTree Assembly by lifting it out from its holder.
Once you inspect the floats thoroughly or make a replacement, it’s time to re-insert the Quicktree into its holder.
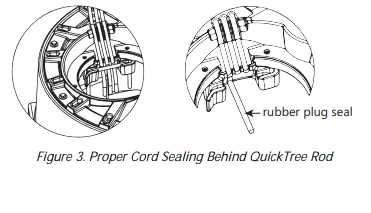
Keep in mind; cords from the pump motor, float switch, and optional alarm float are properly sealed in the rubber sealing channels under the access cover. Seal those cords properly to keep the sewer gas from leaking from the system.
Put the cords securely in the rubber channels as you can see in the following screenshots.
Finally, re-secure the access cover by tightening it up. Follow the below sequence to tighten up the access cover properly:
“With the imprinted “cord seal” on the left, tighten the two bolts furthest away (furthest to the right), the two middle bolts next, and the two closest bolts last. Torque each bolt to 40 in-lbs.”
End-Note
And that’s it. This guide on Liberty Pumps Pro 370 Installation is for the folks who are mechanically or electrically inclined. If you are a homeowner without any mechanical knowledge, I highly recommend you to call a certified plumber to complete the installation for you.
Read Also:

Eric Alvarez is the head of content on LilDutchUncle.Com. He is an HVAC guy based in El Paso, Texas, United States. He obtained his Bachelor of Science degree from the University Of Texas at El Paso. Years of experience in the HVAC field have taught him many lessons, not the least of which is that the value of quality and knowledge far exceeds any promised initial savings. He has a good standing reputation for superior skills in heating, air conditioning, hot water tanks, and indoor air quality systems.