On this troubleshooting guide on Rinnai Tankless Water Heater Code 12, what I am going to cover:
- What does code 12 mean on a rinnai tankless water heater?
- How to fix Rinnai tankless water heater code 12?
- How to reset Rinnai tankless water heater?
Without further ado, let’s dive in.
Table of Contents
- What Does Code 12 Mean On A Rinnai Tankless Water Heater?
- How To Fix Rinnai Tankless Water Heater Code 12 [5 Easy Solutions]
- How To Reset A Rinnai Tankless Water Heater?
- End-Note
What Does Code 12 Mean On A Rinnai Tankless Water Heater?
Code 12 on a Rinnai Tankless Water Heater means there is no flame or the flame sensor fails to detect any flame in the burner box. It happens if the gas is turned off at the water heater, gas meter, or gas tank. Turns out, incorrect gas type and gas supply pressure, dirty burner, and loose or damaged flame rod wire are other reasons that cause the error code 12.
Yes, it could be challenging or a pain in your neck to solve this issue yourself as there are more than one suspects that lead your water heater to throw the error code 12. In simple words, you need to inspect multiple water heater components to find out the main culprit.
But it is still easier than having a malfunctioning unit that gives no hot water on a freezing winter day. Fortunately, the step-by-step troubleshooting procedure I will describe in the next chapter will make it simple for you to troubleshoot this issue and clear the fault code.
So, keep scrolling.
How To Fix Rinnai Tankless Water Heater Code 12 [5 Easy Solutions]
It’s time to explore all the possible reasons that trigger your tankless water heater to throw the error code 12.
01. Gas Is Turned Off
Let’s start from the basics. The Rinnai Tankless Water Heater requires gas as the fuel to light the pilot. If you turn the manual gas control valve at the gas line off, the unit will get no gas for combustion. And when there is no fuel, expecting the unit to light the pilot is like starting a car without fuel. In short, no gas means no flame.
How To Fix:
The solution to this issue is simple. Check the manual gas control valve and ensure it’s in the on position. If not, turn the valve counterclockwise so that gas can flow to the unit, gas meter, and cylinders.
02. Incorrect Gas Type and Gas Supply Pressure
Rinnai offers tankless water heaters that can be operated either with gas or propane. If you have a propane unit, you must add the propane tank to the unit. Otherwise, you can’t ignite the water heater.
Similarly, correct gas supply pressure to the unit is a must to operate the water heater smoothly. For normal water heater operation, the gas supply pressure should be like the below chart:
| Water Heater Type | Minimum Supply Pressure | Max Supply Pressure |
| Natural | 3.5” WC | 10.5” WC |
| Propane | 8” WC | 13.5” WC |
How To Fix:
Ensure you feed your water heater with the right type of fuel. If it requires gas, power it up with gas. Otherwise, you should feed it with propane.
Next, ensure the inlet gas supply pressure is within limits. You should have a manometer to measure the gas supply pressure. Once you have a manometer, check this video below to learn the rest:
I suggest you call a qualified plumber to adjust the gas supply pressure if you don’t know how to do it.
03. Loose Gas Connections And Fittings
Loose joints, improper fittings, and improper vent terminal clearances can lead to recirculation of combustion gasses. Consequently, it will cause incomplete combustion. And guess what, this incomplete combustion causes the unit to trigger the error code 12.
How To Fix:
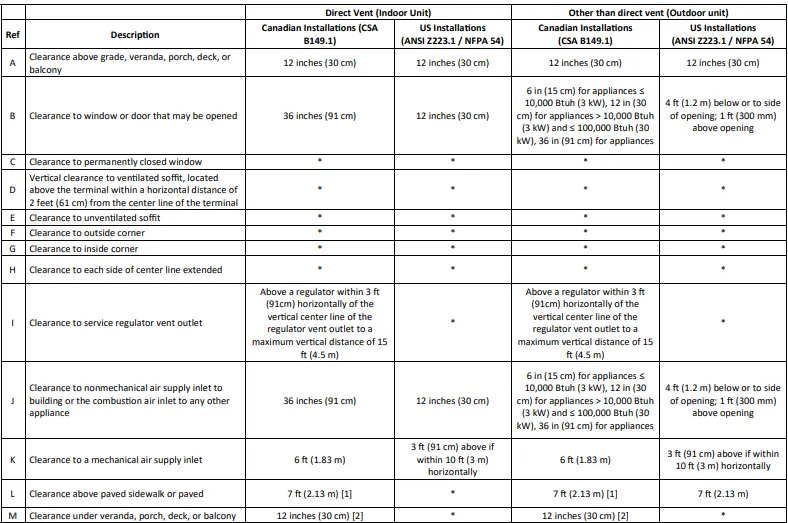
Inspect all the gas connections and fittings and ensure they are leak-tight. Then, check the manual and make the proper vent terminal clearances. It’s recommended to install the vent termination at least 12” above the ground.
The best bait is- call a certified plumber to vent the unit and check all the connections professionally.
04. Installer May Use Improper Venting Material
If your installer uses improper venting materials for the water heater at your location, the unit will pop up the error message 12.
How To Fix:
It will be best to check the Rinnai venting instructions to verify the installer uses the proper venting components. Make sure you use concentric venting material for class III appliances approved by Rinnai.
Keep in mind; the venting material at the unit’s vent connection should be fully engaged into the top of the water heater. If needed, separate connections to check for proper connection.
05. Gas Burner Gets Clogged
A clogged gas burner is another culprit that can prevent the unit from lighting the pilot. The gas burner may get clogged by dirt, debris, and gas residue. In this case, you must clean the burner for proper combustion.
How To Fix:
It’s just a piece of cake to release dirt blockage from the gas burner. Go along with the following steps to clean the burner:
- Shut the unit off by pushing the on/off button and disconnect the unit from electric power.
- Leave your water heater for several minutes to let the unit cool.
- Pull out the front panel by unscrewing four screws.
- Now, get a vacuum cleaner and use it to suck away dirt and debris from the main burner and fan blades. Avoid using a wet cloth or spray cleaners to clean the burner.
- Get a soft dry cloth to wipe the cabinet.
- Once you clean the burner, power up the unit and connect the electric power.
Apart from these, you should check other components like the flame rod wire, fan blower, and gas lines. Ensure the flame rod wire is connected. Then, inspect the fan blower and release the dirt blockage from it if needed. Also, don’t forget to bleed all air from gas lines.
How To Reset A Rinnai Tankless Water Heater?
Once you walk through the troubleshooting step and fix the culprits, you should reset the unit to clear the error code. To reset the Rinnai Tankless Water Heater, follow the below steps:
- Press the on/off button five times
- Remove the front panel and locate the up and down buttons at the PC board.
- Press and hold the both buttons simultaneously for five to eight seconds, which will reset the unit and remove the error code.
- Finally, replace the front panel and turn the unit on.
End-Note
I broke down every possible reason that can cause the unit to throw the error code 12. So, inspect all the components and fix if they have any issues. Finally, reset the unit to clear the error message from the controller. Best of Luck!
Read Also:

Eric Alvarez is the head of content on LilDutchUncle.Com. He is an HVAC guy based in El Paso, Texas, United States. He obtained his Bachelor of Science degree from the University Of Texas at El Paso. Years of experience in the HVAC field have taught him many lessons, not the least of which is that the value of quality and knowledge far exceeds any promised initial savings. He has a good standing reputation for superior skills in heating, air conditioning, hot water tanks, and indoor air quality systems.