This is a complete troubleshooting guide on Takagi Tankless Water Heater Code 111. From this guide, what you are going to learn:
- What does the error code 111 mean on Takagi Water Heater?
- 7 common reasons that cause the unit to pop up the fault code 111 and their solutions
- How to reset the Takagi error code 111?
So, stay in tune with us to learn how to override the error code 111 and bring the unit back to the normal operating condition.
Table of Contents
- What Does Error Code 111 Mean On Takagi Tankless Water Heater?
- How Do I Reset Takagi Error Code 111?
- End-Note
What Does Error Code 111 Mean On Takagi Tankless Water Heater?
Ignition failure- this is what the error code 111 means on Takagi Tankless Water Heater. Your Takagi tankless unit will pop up the code 111 when you fail to fire up the heater after three failed attempts at ignition.
Several reasons like tripped hi-limit switch, gas supply issue, and improper gas supply pressure are responsible for ignition failure.
Below, I will reveal all the possible culprits that cause your Takagi water heater to flash the error message 111.
1. Hi-limit Switch Gets Tripped
The hi-limit switch on Takagi water heater is a safety feature. When the water temperature exceeds the safety level, the hi-limit switch cuts off electric supply to the unit. So, you can’t ignite the unit if this switch gets tripped.
How To Fix:
Resetting the hi-limit switch will fix this issue easily. To access the switch, you must remove the front access panel. Before that, ensure you turn the unit off. Afterward, locate the hi-limit switch on the unit.
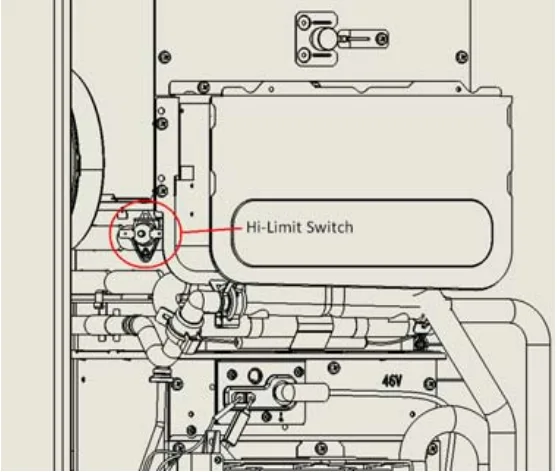
Then, push the white hi-limit switch in and you will hear a click, which indicates you reset the button successfully.
Now, turn on your water heater and test the unit. If the unit fires up, you must discover the reasons that cause the hi-limit switch to trip. In this case, you can call a certified plumber for further technical support.
2. Gas Supply Issue
Without sufficient or continuous gas supply to the unit, it’s not possible to ignite the water heater.
Gas won’t flow the unit due to the following reasons:
- You don’t open the gas control valve fully
- Air in the gas lines
- A defective pressure regulator at the gas meter
How To Fix:
First off, check the gas control valve position. If you open it partially, fully open it to let the gas flow to the unit uninterruptedly.
Secondly, don’t forget to bleed the air out of the gas lines. If you don’t know how to purge the gas line, follow these steps to purge the air out of the gas line:
- Shut off the unit.
- Set the gas valve to the Off position. It should be perpendicular to the gas line.
- Loose the gas line on the side of the gas valve.
- Slightly open the gas valve unless you smell the gas by wafting the air towards your nose. If you smell the gas, understand the air in the gas line has removed and there is now only the gas remaining.
- Set the gas valve to the off position and re-tighten the gas line.
- Turn on the gas valve again and check for leaks.
Thirdly, inspect the gas regulator at the gas meter. If it doesn’t function properly, you must replace it to let the gas flow to the gas meter.
3. Improper Gas Supply Pressure
For proper heater operation, the gas supply pressure should be within the specifications. Appropriate gas supply pressure for a functioning water heater should be as shown in the table:
| Gas Type | Gas Supply Pressure (Min) | Gas Supply Pressure (Max) |
| Natural | 5.00” W.C. | 10.5” W.C. |
| Propane | 8.00” W.C. | 14” W.C. |
Without checking the gas pressure with a manometer, you can’t say whether the gas pressure is within specification or not.
How To Fix:
To check the gas supply pressure, follow the below step-by-step procedure:
- Locate the manual gas inlet shut-off valve on the gas line and close it.
- Open a hot water faucet. You must turn on the unit and the gas in the pipeline should purge. Leave the faucet turned on and you should continue to run the unit until it shuts down due to lack of gas. Then, close the hot water faucet.
- Pull out the screw for the gas inlet pressure port.
- Attach a manometer to the pressure port.
- Open the manual gas valve.
- Open several fixtures that use the highest flow rate to turn on the unit.
- Now, notice the pressure reading on the manometer. The ideal gas pressure should be 5-10 inches W.C. for a gas-operated unit. On the other hand, the pressure should be 8-14 inches W.C. if you have a propane unit.
If the gas supply pressure goes out of range, call a certified technician to fix this issue.
4. Clear Tube Gets Detached
Takagi tankless water heater has a clear plastic tube that runs from the proportional gas valve to the combustion chamber. If this tube comes loose, no gas will flow into the combustion chamber. And without fuel in the combustion chamber, expecting the water heater to ignite is similar to starting a bike without fuel.
How To Fix:
Just remove the front access panel and find the clear plastic tube. This is where the clear tube located:
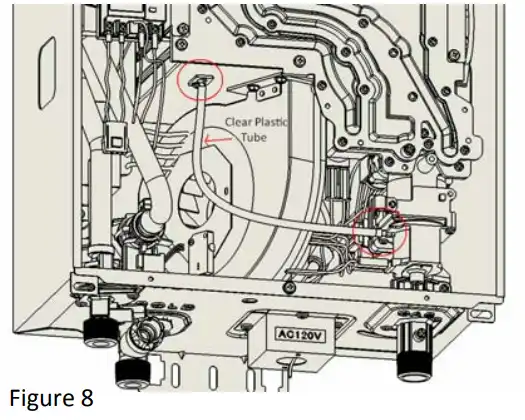
Make sure it doesn’t come from the connection between the proportional gas valve and the combustion chamber. If it comes loose, reattach it to make a connection between the proportional gas valve and the combustion chamber.
5. OHCF (Overheat Cut-off Fuse) Gets Compromised
If there is no continuity at the Overheat Cut-off Fuse (OHCF), you can’t ignite the unit. In short, your Takagi tankless unit will throw the error code 111 if this component gets damaged.
How To Fix:
Without testing the OHCF electrically, you can’t certainly say the OHCF is at fault. Go along with the following steps to check the OHCF:
- Find the OHCF, which wraps around the heat exchanger.
- Locate the white clip at the end of the two blue braided wires coming from the OHCF.
- Detach the connection.
- Take an ohmmeter and check the continuity at the end of the OHCF. If there is continuity, the Overheat Cut-off Fuse is still intact.
If you get no continuity at the OHCF, understand the OHCF is at fault. In other words, you must replace it. In this case, it will be best if you call a certified technician for further help.
6. Dirty Flame Sensor
Over time, the flame sensor gets covered with carbon buildups. Because of the dirty sensor, it can’t sense the flame. In other words, the flame sensor sends wrong information to the computer board. As a result, the unit won’t ignite the burner and end up throwing the error code 111.
How To Fix:
Cleaning the flame sensor is the only solution to this issue. Follow the below cleaning procedure to remove dirt & debris from the flame sensor:
1. Disconnect the power to the unit by unplugging it from the electric outlet.
2. Remove the front cover by unscrewing two nuts.
3. Pull out the rod assembly:
- Find the black, yellow, and orange wires in the center of the unit.
- Remove the screws that hold the rod assembly in place.
- Pull out the entire rod assembly
4. Now, it’s time to clean the flame sensor. Take a 100 grit sandpaper and gently scrub the flame sensor to remove carbon deposits.
5. After cleaning the flame sensor, re-install the rod assembly in its place and secure it with nuts.
6. Connect all the wires in the front of the burner and replace the front cover.
7. Restore the power to the unit.
7. Igniter Issues
If the igniter wire comes loose or the igniter itself is bad, you can’t ignite your Takagi water heater.
Inspect the igniter for a spark. The spark could be viewed through the sight glass, which you can find next to the igniter and flame sensor.
A functional igniter will give a strong blue spark, which will remain steady in place. If you see no spark through the sight glass or the spark seems weak, I bet the igniter wire comes loose.
So, check the igniter wire. If it comes loose, secure it. On the other hand, if the igniter wire connection is secured, you must replace the igniter.
How Do I Reset Takagi Error Code 111?
It’s a piece of cake to reset the error code 111 on Takagi Tankless Water Heater. In this regard, what you need to do first is- resolve all the possible reasons that cause the unit to throw the fault code 111.
Then, reset the unit. To reset the water heater code, remove the front cover. Next, locate the INC and DEC buttons on the computer board. Keep pressing those two buttons for a few seconds until the red LED lights up.
Once the red LED comes on, turn off the unit. Finally, turn on your water heater, which will reset the error code 111.
End-Note
No ignition means no hot water. I described all the reasons that are responsible for the Takagi Tankless Water Heater to pop up the error code 111.
To reset the error code 111, first resolve the issues that cause the unit to throw the fault code 111. Then, reset the unit by pushing the INC and DEC buttons for several seconds until the red LED comes on.
Once the LED lights up, shut down the unit. Finally, turn on the unit again, which will override the error code.
Read Also:

Eric Alvarez is the head of content on LilDutchUncle.Com. He is an HVAC guy based in El Paso, Texas, United States. He obtained his Bachelor of Science degree from the University Of Texas at El Paso. Years of experience in the HVAC field have taught him many lessons, not the least of which is that the value of quality and knowledge far exceeds any promised initial savings. He has a good standing reputation for superior skills in heating, air conditioning, hot water tanks, and indoor air quality systems.

Eric,
I have a new ignitor, but for the life of me cannot figure out how to attach an ignition wire. I see the cavity with the metal post??? in it. I disconnected the wire from the old ignitor (which I think broke it, the wire, that is). Any hints on how to attach the wire to a new ignitor (I also have a new wire coming though the picture does not seem to give me much of an answer).
Great article, thanks!
Geoff
Hey, Geoff.
I feel happy as you like my article.
I think solder the ignition wire to the cavity may bring luck for you. However, it’s highly recommended to call a qualified plumber to get professional solution.