The status light on the gas valve blinks three times, indicating that the water heater pressure switch has failed in the open position. The unit was probably running, but the pressure switch opened up.
It could happen for two reasons- maybe the pressure switch never closed, or it opened up during operation. The pressure switch is a safety feature. It helps ensure the water heater operates safely by expelling exhaust gasses out of the home. If it doesn’t happen, the pressure switch will open and warn you about the unsafe situation.
Your water heater will go into the lock mode and blink the status light three times (the pressure switch failed in the open position) due to one of the following reasons, including:
- Clogged Vent or Improper Vent Installation
- Pressure sensing tube gets restricted
- High-limit or thermal switch gets tripped
- Defective pressure switch
- Defective blower motor
Below, I will walk you through a step-by-step solution to help you resolve the problem and restore the hot water supply.
Table of Contents
Water Heater Pressure Switch Failed Open: Reasons & Solutions
Pressure switch failed in the open position, or the status light will blink three times because of:
- Clogged vent or improper vent installation
- Blocked pressure sensing tube
- The high-limit or thermal switch gets tripped
- Bad pressure switch
- Defective blower motor
1. Vent Gets Clogged or Improper Vent Installation
Let’s start with the simple! Most of the time, a clogged vent or improper venting is responsible for the 3-flash code.
If the exhaust vent gets clogged by debris, bird nests, or branch leaves, enough air won’t be drawn to close the pressure switch. As a result, the pressure switch will remain open and de-energize the solenoid valves.
So, ensure that the exhaust is free of debris or clear. Once you verify that the exhaust is clean but the error code persists, ensure the venting is correct.
Improper venting, for example, faulty vent termination, improper distance of vent lengths, and using non-standard elbows, can cause pressure switch failure. To resolve this issue, consult the user manual to ensure the vent is installed correctly. You can call a certified plumber to correct the vent installation.
2. Pressure Sensing Tube Gets Restricted
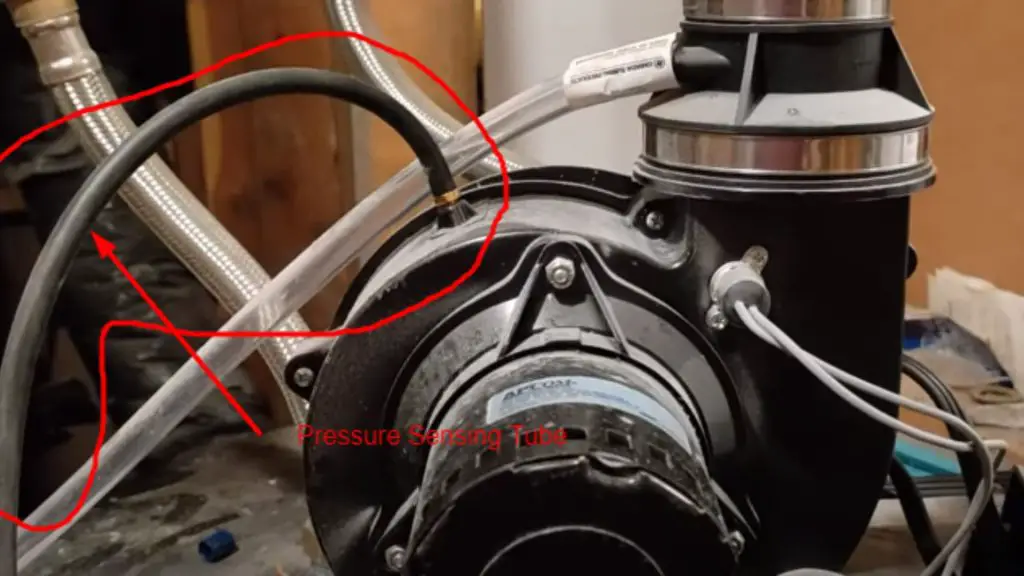
The next part I want to check is the pressure sensing tube once you verify that the vent is free of blockage.
Follow the pressure sensing tube from the blower to the pressure switch and ensure it’s intact. If the tube gets clogged by debris or water, the vacuum created by the blower won’t transfer down to the pressure switch.
As a result, no current will flow through the pressure switch, which signals to the control board that there is insufficient air.
Inspect the pressure sensing tube for blockage. Rip it off and blow up the tube to release restriction from it.
Also, check the nipple on the blower (where you attach the tube) and the port on the pressure switch (where you attach the end of the tube. Insert a paperclip into the port to remove debris from the port of the pressure switch. Besides, blow up the nipple to get rid of dirt.
Remember, you must shut off the electric supply to the system before performing the inspection workflow.
After the inspection, attach the pressure sensing tube, turn on the electric supply, and light the burner. If the blower motor starts, understand the problem is resolved.
3. High-Limit or Thermal Switch Gets Tripped
The vent is clean, and the pressure sensing tube is intact & clean, but the unit still blinks the three codes! Then, I blame the high-limit switch most.
Touch the vent pipe first. If it feels too warm, move forward to inspect the high-limit or thermal switch. Get a multimeter and set it for continuity. Then, place the leads on the spade connectors of the thermal switch. If it makes a beep, understand the thermal or high-limit switch is functional. Otherwise, you should replace the high-limit switch.
The high-limit or thermal switch is a safety feature. When the temperature exceeds 145 degrees Fahrenheit, the high-limit switch gets tripped, and it will cut off the electric supply.
If the vent gets clogged, the temperature will rise above the safety measure. That’s why I recommend you check the vent first.
4. Defective Pressure Switch

A malfunctioning pressure switch is also responsible for the three-blinking flash code on the gas valve.
If the pressure switch is at fault, the unit won’t ignite despite having sufficient airflow. It means the pressure switch won’t close and energize the solenoid to ignite the burner. Check the following tutorial to learn how to test the pressure switch on a water heater:
Feel free to replace the pressure switch if you find the switch is defective after inspection.
5. Defective Blower Motor
Lastly, I blame the blower motor if the status light blinks three times, which indicates that the pressure switch failed in the open position.
Luckily, it’s a piece of cake to check the blower motor. Turn off the power cord of the unit and restore the power again. If the blower motor doesn’t run, I bet the motor is at fault.
A faulty capacitor on the blower motor is responsible for the failure. So, replace the capacitor and see if the motor comes on. Otherwise, you should replace the blower motor to resolve this issue.
End-Note
Clogged or improper vent installation is the number one culprit behind this issue: Water Heater Pressure Switch Failed Open. So, check the vent at the exhaust and ensure there is nothing like a bird nest that may clog the vent. Then, consult the user manual and verify that you use the correct pipe, termination, and elbows. If the vent is correct, check the pressure sensing tube, pressure switch, and blower motor.
Read Also: Richmond Water Heater Troubleshooting

Eric Alvarez is the head of content on LilDutchUncle.Com. He is an HVAC guy based in El Paso, Texas, United States. He obtained his Bachelor of Science degree from the University Of Texas at El Paso. Years of experience in the HVAC field have taught him many lessons, not the least of which is that the value of quality and knowledge far exceeds any promised initial savings. He has a good standing reputation for superior skills in heating, air conditioning, hot water tanks, and indoor air quality systems.