Bradford White Water Heater pilot will not stay lit because of a faulty thermopile or thermocouple, a tripped thermal cut-off switch, and dirty burner.
If you want to bring your Bradford White Water Heater back into the operational state, you must address those issues and solve them.
Fortunately, I will describe each caveat and walk you through the troubleshooting steps to fix those issues that prevent the pilot light from staying lit. So, let’s dive in.
Table of Contents
Bradford White Water Heater Pilot Will Not Stay Lit [3 Quick Solutions]
Bradford White Water Heater Pilot won’t stay lit due to several reasons. Faulty thermopile, defective thermal cut-off switch, and dirty burner are some culprits that prevent the pilot light from staying lit.
Below, I will break down each caveat that causes the pilot light to not stay lit.
01. Thermopile Gets Dirty Or Faulty
Over time, the thermopile gets covered with carbon buildups and this carbon deposit will act like an insulator. It reduces voltage. In other words, the thermopile doesn’t get the amount of voltage it needs to light. Consequently, the pilot won’t light or stay lit.
How To Fix:
Before doing anything with the thermopile, you must check it electrically. This test will help you determine whether it’s a problem with the thermopile or not.
To test the thermopile, get a multimeter and set it to the volts DC option. Then, detach the two wires that lead into the control valve. Now, attach the two probes of your multimeter to the two wires.
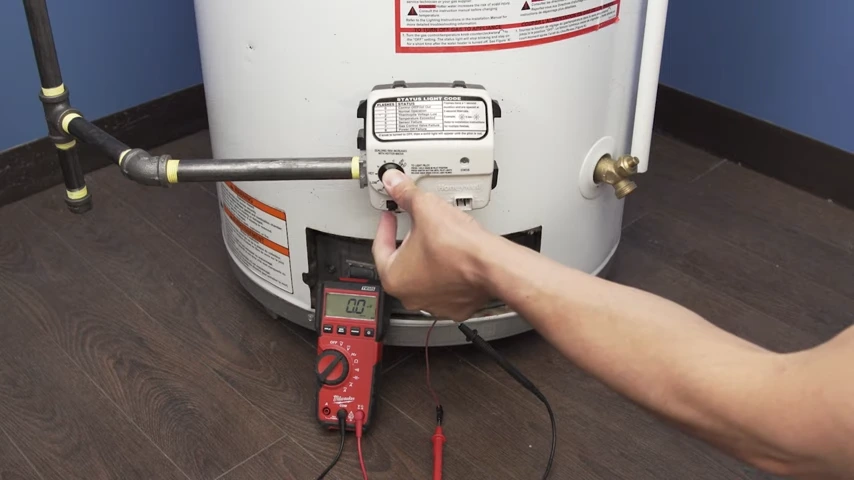
Relight the pilot and hold down the control knob inward. The voltage should start to rise over the next few minutes as the thermopile heats up.
A healthy or functioning thermopile will give you a reading between 650 to 850 millivolts. If you get a reading under 450 millivolts, you should either clean the thermopile or replace it. I suggest you replace the thermopile with a new one.
Note: You must remove the cover to test the thermopile. If the test gives you a negative result, you should replace the thermopile. In this case, you need to remove the burner assembly. Then, locate the thermoile. Finally, clean it with a fine emery cloth or replace if needed.
02. Faulty Thermal Cut-off Switch
The Thermal Cut-off Switch is wired in series with the thermopile. If the temperature in the combustion chamber gets too high, the switch will trip and cut power to the valve. As a result, sufficient gas will not be delivered into the chamber to light the pilot.
If your thermopile is healthy, my next suspicion goes to the thermal cut-off switch. The pilot won’t light if the TCO is at fault.
How To Fix:
Check the continuity of the thermal cut-off switch to see whether the electrical signal passes through it or not before changing the switch.
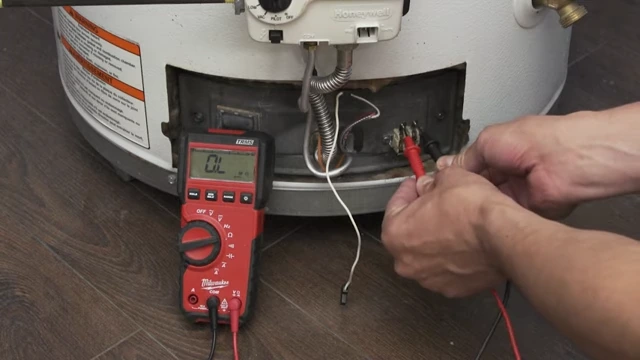
To test the TCO electrically, set your multimeter to Ohms setting. Next, disconnect the wires from the switch. Now, place the probes on the terminals. If the multimeter reads OL, understand there is no continuity and you should replace the thermal cut-off switch.
03. Dirty Burner
If your water heater pilot won’t stay lit, I bet the burner or combustion chamber gets dirty. Dirt or debris accumulation prevents the air from flowing into the chamber. This dirt buildup chokes out the oxygen level and smothers the flame.
How To Fix:
You must remove the burner assembly from the unit to clean the burner chamber. Follow the below steps to pull out the burner chamber:
- Start with shutting off the gas supply to your water heater. Then, remove the power cord from the electrical outlet.
- Then, remove the outer door from the bottom of the unit. Don’t forget to unscrew the inner door.
- Now, pull out all the electricals attached with the gas control valve. Remove the pilot tube and the main burner feed line from the valve.
- Remove the burner assembly from the unit.
- Use a vacuum cleaner to remove dirt, debris, and dust from the gas chamber area.
- Also, don’t forget to check the pilot electrode, pilot tube, and pilot orifice for a clog. Clean them if needed.
- Once you check everything and clean those parts I mentioned, put everything back into its place and reinstall the burner assembly. Keep in mind; you must replace the parts that get damaged.
- Finally, relight the pilot.
FAQs
The easiest way to know if the thermocouple gets broken is to check it electrically. Just get a multimeter and set it to the volts DC option. Now, remove the two wires connected with the gas control. Then, attach the probes of your multimeter to the thermocouple wires. Next, relight the pilot and the reading will start climbing as it heats the thermocouple. If you get the reading below 450 millivolts, understand the thermocouple is at fault.
You should remove the burner assembly from the water heater. Then, remove the pilot assembly and locate the thermocouple. Finally, use a fine emery cloth to remove the carbon buildup from the thermocouple.
How much does it cost to replace a water heater thermocouple?
You need to spend about $20 to $150 to replace a water heater thermocouple. It will cost you only $20 if you do it yourself. On the other hand, you should spend $150 to change the thermocouple professionally.
End-Note
You will get no hot water from your Bradford White Water Heater if the pilot light won’t stay lit. Dirty or faulty thermopile, dirt accumulation in the burner, and faulty thermal cut-off switch are the culprits that prevent the pilot from staying lit.
Luckily, I mentioned all the troubleshooting steps to solve those issues. So, follow the step-by-step guide I preferred and solve the pilot light issues.
Read Also:
- Rheem Water Heater Pilot Light Won’t Light
- Bradford White Water Heater Status Light Blinking
- Bradford White Water Heater Troubleshooting

Eric Alvarez is the head of content on LilDutchUncle.Com. He is an HVAC guy based in El Paso, Texas, United States. He obtained his Bachelor of Science degree from the University Of Texas at El Paso. Years of experience in the HVAC field have taught him many lessons, not the least of which is that the value of quality and knowledge far exceeds any promised initial savings. He has a good standing reputation for superior skills in heating, air conditioning, hot water tanks, and indoor air quality systems.


Did all that replaced assembly still won’t stay lit
Hey Alan,
I think the problem you are experiencing is a bit complex. I would recommend you to call a certified plumber to inspect the unit.