This is a complete guide on State Select Water Heater Thermocouple Replacement. From this article, what you are going to discover:
- How do you know if the thermocouple is bad on your water heater?
- 5 simple steps to replace the thermocouple on your State Select Water Heater
Without further ado, let’s get started.
Table of Contents
- How Do I Know If My Thermocouple Is Bad On My State Select Water Heater?
- State Select Water Heater Thermocouple Replacement [5 Easy Steps]
- FAQs
- End-Note
How Do I Know If My Thermocouple Is Bad On My State Select Water Heater?
The pilot light won’t stay lit if the thermocouple goes bad.
Standing Pilot Water Heaters like the State Select Water Heater use a pilot flame that burns continuously. And it will ignite the main burner whenever heat is needed.
The thermocouple on a water heater generates a small electrical current when heated by the pilot flame, which powers the gas valve.
This device also acts as a safety switch. If the pilot light goes off, the thermocouple will cool down. As a result, the voltage will drop and the gas valve will shut off. It prevents unburnt gas from being released into your home.
Now, if the thermocouple is at fault, it will also prevent the pilot light from staying lit.
You can also perform a voltage test to verify whether the thermocouple is defective or not.
In this case, you should have the following pieces of equipment at your fingertips:
- Alligator test lead
- A digital multimeter
First off, remove the front cover from the bottom of the unit.
Second, set the multimeter to the Volts DC option. Then, use an adjustable wrench to unscrew the thermocouple from the gas control valve.
Now, connect the probes to the copper and to the end of the thermocouple.
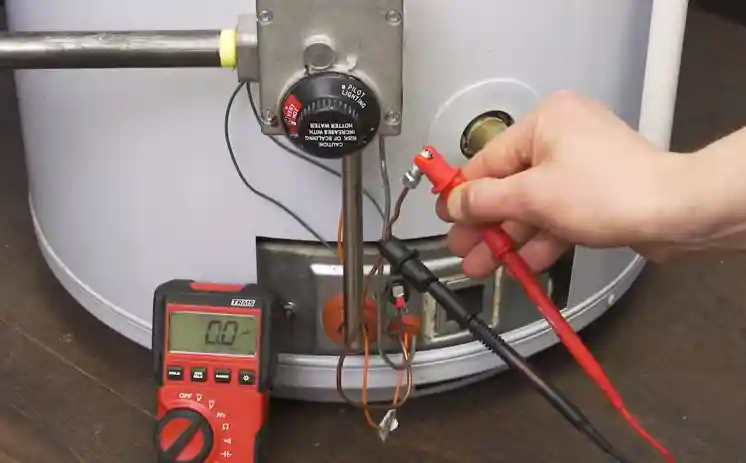
Light the pilot and hold down the igniter button. The voltage should start rising over the few minutes as the thermocouple heats up.
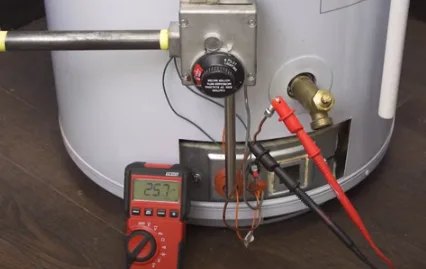
In an open circuit test, a healthy or functional thermocouple should read between 20 to 30 millivolts.
If the voltage reading goes out of the specification, I bet the thermocouple is at fault. In other words, you need to replace the thermocouple.
In the next chapter, I will walk you through every step to get the thermocouple replaced successfully. So, keep scrolling.
State Select Water Heater Thermocouple Replacement [5 Easy Steps]
This chapter will break down 5 simple steps to replace the thermocouple. It will save you up to $200 if you follow the steps below and do this task yourself.
1. Turn the Gas Supply Off
To begin with, turn the temperature dial to the lowest setting. Then, set the gas control or temperature knob to Off.
Afterward, shut off the gas supply to the unit at the manual gas shut-off valve. You can find this valve beside your water heater.
The shut-off valve should be perpendicular with the gas line, which indicates you position this valve to Off.
2. Remove the Connections That Lead Into The Gas Control Valve
Start with removing the front cover by pressing in at the left side of the cover and pull it away from the unit.
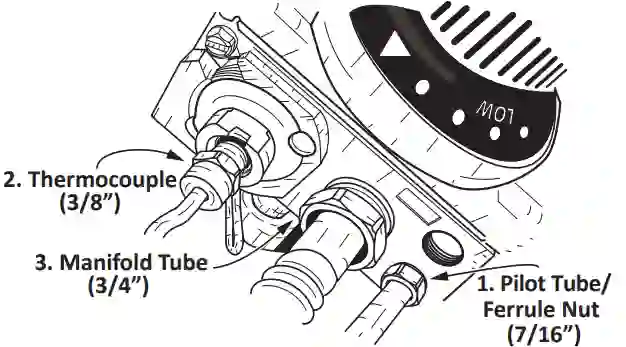
Now, uninstall the three connections like the pilot tube, thermocouple, and manifold tube.
You should have a 7/16” to remove the pilot tube from the gas control valve. To remove the thermocouple, a ⅜” wrench will come handy. On the other hand, you should use a ¾” to uninstall the manifold tube.
However, you can use an adjustable wrench instead of using those different types of wrenches to unscrew all the connections from the gas control valve.
Of course, don’t forget to detach the spark igniter wire from the igniter.
3. Remove The Burner Assembly
Once you disconnect every connection from the gas control valve, it’s time to remove the burner assembly out of the burner chamber.
Ensure you unscrew the burner door. Then, pull the burner assembly gently toward you and remove it from the water heater.
4. Install the New Thermocouple
Once you remove the burner assembly from the water heater, it’s time to uninstall the old thermocouple.
Afterward, get the new thermocouple and install it. Keep in mind; the thermocouple on the State Select Water Heater is unique compared to other water heater’s brands.
And the following screenshot will help in choosing the correct replacement parts.
Just match the part number with your old thermocouple and get one.
Once you receive your replacement part at your door, just follow the instructions mentioned in this tutorial to complete the workflow.
5. Reinstall the Burner Assembly and Reconnect Those Connections
Reinstall the burner assembly into the burner chamber. After that, install the burner door.
Finally, it’s time to reinstall the connections like the pilot tube, thermocouple, and manifold tube. Use an adjustable wrench to reconnection those connections.
Also, don’t forget to reattach the spark igniter wire. Before relighting the pilot, check those connections for leaks.
You can use the solution of dish wash soap and water. Apply the solution on the connections and look for bubbles to form up. If no bubbles come on, there is no leak.
Now, you are ready to use your State Select Water Heater.
FAQs
The length of universal thermocouples comes between 15 to 36 inches. Generally, an 18 or 24 inch thermocouple will be enough for every residential water heater using universal kits.
However, when it comes to thermocouple for State Select Water Heater, the universal kit won’t work for this unit. It’s because of the unique design of the State Select Water Heater thermocouples.
So, it’s better to check the part number and get one according to the old thermocouple.
Yes, you can replace the water heater thermocouple by yourself. In this case, just follow the step-by-step instructions I mentioned above.
Generally, a plumber will charge you at least $300 to replace a thermocouple as it involves a lot of tasks.
The life expectancy of a thermocouple can vary. In general, a thermocouple can last up to 3 years. Criteria like temperature, sensor design, calibration type, and thermal cycling will determine the overall life expectancy of the thermocouple.
End-Note
If the thermocouple goes bad, the pilot light won’t come on. In other words, you can’t light the unit to get hot water on the ice-cold day of winter.
To get hot water out of the unit, you must replace the thermocouple. And throughout this article, I mentioned how to replace the thermocouple. Just follow the 5 easy steps and have the thermocouple replaced.
It will save you up to $200, and of course, reward you with providing hot water. Good Luck!
Read Also:

Eric Alvarez is the head of content on LilDutchUncle.Com. He is an HVAC guy based in El Paso, Texas, United States. He obtained his Bachelor of Science degree from the University Of Texas at El Paso. Years of experience in the HVAC field have taught him many lessons, not the least of which is that the value of quality and knowledge far exceeds any promised initial savings. He has a good standing reputation for superior skills in heating, air conditioning, hot water tanks, and indoor air quality systems.

Thank you , that was very helpful and I was getting buy a universal thermocouple but I will pull the old one off and see if there is a part number , once again im glad I looked up for the same type water heater , now do u guys sell this part ?
Unfortunately, no….My key goal is to provide authentic information about water heater and other plumbing & DIY tips..