In this article:
- Can you replace the switch on a Zoeller Sump Pump?
- Zoeller Sump Pump Switch Replacement: The Procedure?
- Answer to some Frequently Asked Questions
Table of Contents
- Can You Replace The Switch On A Zoeller Sump Pump?
- Zoeller Sump Pump Switch Replacement: The Procedure
- FAQs
- End-Note
Can You Replace The Switch On A Zoeller Sump Pump?
Yes, you can replace the switch on your Zoeller Sump Pump.
Zoeller delivers replacement switches. As a result, you can change the defective switch with a new one without replacing the entire existing pump. It will help you save both money and time.
The next chapter will walk you through 6 simple steps to have the malfunctioning switch replaced like a charm.
Zoeller Sump Pump Switch Replacement: The Procedure
Let’s go to the point first- replacement procedure. But before starting, what I prefer most is to take safety precautions. It’s because there is nothing more important than keeping you safe.
A sump pump repair means involving with dirty water and electricity. If you are not careful, nasty things can happen. You cauld chalk yourself or get some crappy water in your eyes or mouth.
That’s why it’s important to maintain eye or mouth protection. Also, ensure you disconnect your sump pump from electricity.
Once you meet those safety requirements, follow the steps I mentioned below to replace the sump pump switch like a pro.
1. Remove the Sump Pump And Check The Resistance
To begin with, ensure you unplug your sump pump from the electrical connection. Then, remove the sump pump from its basin.
In my case, I found the switch housing is a bit warm. Because of this, I think it’s viable to test the resistance between the hot and neutral of the pump line cord.
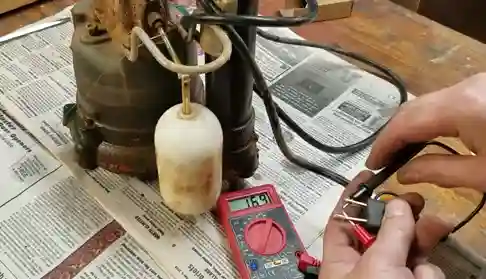
According to my test, there is about 1300 ohm resistance with the switch in the off position. The resistance with the switch in the Off position should be infinite.
2. Remove The Float & The Switch Housing
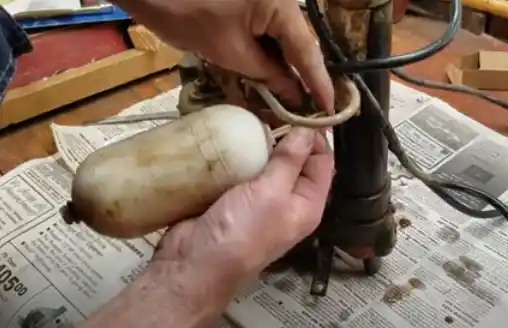
Take the float out of its place To do so, first stretch the rubber float rod, guide over the bottom of the float rod…
Then, turn the float rod 90-degree and unhook it from the switch arm assembly.
Next, unscrew the four screws that hold the switch housing to the pump. Once you remove those screws, tap the switch housing lightly to pop it off the pump end.
3. Clean The Switch Housing
Now, it’s time to clean the switch housing to get rid of messes. But, remove the wires between the switch and pump and between the line cord and the switch first.
Then, lean the pump a bit and get rid of all the dirty water that’s remaining in the switch housing and dry it out. You can use clothes to dry out the messes in the housing.
Also, remove the old switch and clean the top of the switch housing. Don’t forget to take the old rubbed gasket out as the new one came with the switch repair kit.
4. Clean The Switch Arm Seal
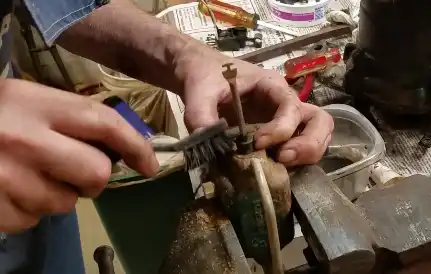
Clean the switch arm seal as well. In this case, you can use a soft rubber brush to get rid of gunk. To keep the switch dry, add a little silicone sealant around where the switch arm seal contacts the switch arm.
Pro Tips: Don’t use too much sealant because the switch arm needs to move freely.
5. Clean The Mating Surface of The Switch Housing
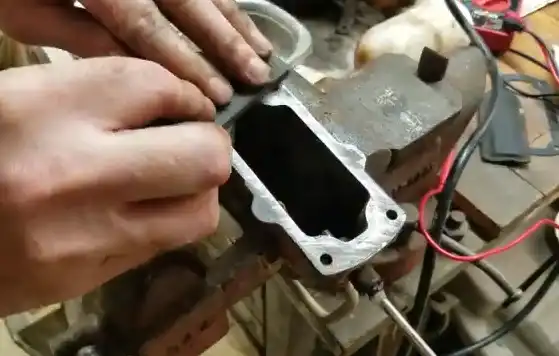
As it takes time to dry the sealant, use the time to clean the mating surfaces of the switch housing. It will help you prepare the switch housing for the new gasket to set in.
I recommend you to use the sharpening or honing stone to keep the the surface of the switch housing clean and flat as possible…
6. Install the New Switch
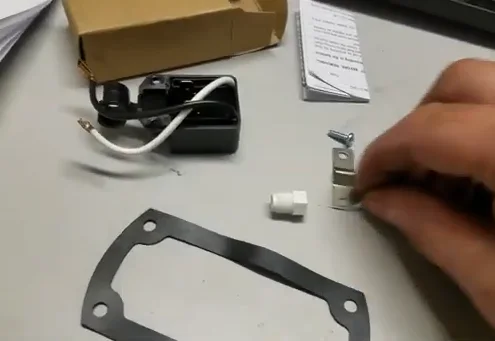
Ensure the switch repair kit you got includes: a new switch, a stabilizing bar, a couple of screws, and a new pressure test plug.
Install the new switch using the stabilizing bar to support the switch as shown in the instructions.
In short, place the switch in the switch housing and screw it up with the provided screws.
Next, add some blue hilamar gasket dressing between the switch housing and the gasket. Then, reinstall the wires between the line cord, switch, and pump and fit the switch housing top to the pump.
Make sure there is no wire in the way. Afterward, secure the switch housing with the four screws. Of course, don’t forget to reinstall the float and the float rod
After tightening up the four cover screws, check the resistance across the plug with the switch off.
And then, lightly pressurize the switch housing and use some soapy water to check for leaks.
Lastly, reinstall the pump into the sump to complete the workflow.
FAQs
Electronic switch is the most reliable sump pump switch. Sump Pumps Direct shares a complete guide in regarding to pick the best sump pump switch. You can read that article to learn why the electronic switch is the best.
The sump pump float switch won’t work if it gets stuck or tangled up. Turn out, if the float switch gets jammed, it will simply not function.
Your new sump pump will keep running due to these reasons:
- The switch is stuck in the On position
- A faulty switch
- Non-functioning check valve
- Restricted discharge pipe
- Inlet screen gets clogged
- Defective or broken impeller
- Undersized sump pump
It’s pretty simple. Just pour 5 gallon of water in a bucket or container. Then, pour water slowly into the sump pump basin. When the water rises at a certain level, it will lift the switch and send a signal to the motor to turn on. If the sump pump starts pumping water, understand the sump pump switch and the unit itself is in good condition.
Four types of float switch are available for sump pumps, including:
- Piggy-back float switch
- Tether float switch
- Vertical float switch
- Electronic float switch
End-Note
Throughout this guide, I broke down 6 simple steps to replace the switch on Zoeller Sump Pump. Just follow the those instructions and get the switch replaced. If you don’t feel comfortable with this workflow, don’t hesitate to call a professional.
Read Also:

Eric Alvarez is the head of content on LilDutchUncle.Com. He is an HVAC guy based in El Paso, Texas, United States. He obtained his Bachelor of Science degree from the University Of Texas at El Paso. Years of experience in the HVAC field have taught him many lessons, not the least of which is that the value of quality and knowledge far exceeds any promised initial savings. He has a good standing reputation for superior skills in heating, air conditioning, hot water tanks, and indoor air quality systems.