Rheem Tankless Water Heater Code 12: Reasons & Solutions
Table of Contents
- What Does Error Code 12 Mean On Rheem Tankless Water Heater?
- What Causes Error Code 12 On Rheem Tankless Water Heater?
- How To Fix Error Code 12 On Rheem Tankless Water Heater?
- 1. Clean the Flame Sensor
- 2. Replace The Flame Sensor
- 3. Inspect the flame sensor wiring and retighten it
- 4. Ensure the Unit Is Receiving Continuous Gas Supply
- 5. Ensure the Gas Pressure Is Within Specification
- 6. Ensure the Gas Lines Size Up According to the BTU Load
- 7. Release Blockage from the Vent Pipe
- How To Reset Rheem Tankless Water Heater?
- End-Notes
Rheem Tankless Water Heater Code 12 means flame failure. The flame sensor fails to detect the flame due to:
- A dirty or defective flame sensor
- Improper gas supply
- Insufficient gas pressure
- Gas lines are too small for the BTU load of the unit
- Clogged venting
Throughout this guideline, I will walk you through each troubleshooting step to reset the fault code 12.
Let’s dive in.
Relevant: Rheem Tankless Water Heater Error Codes
What Does Error Code 12 Mean On Rheem Tankless Water Heater?
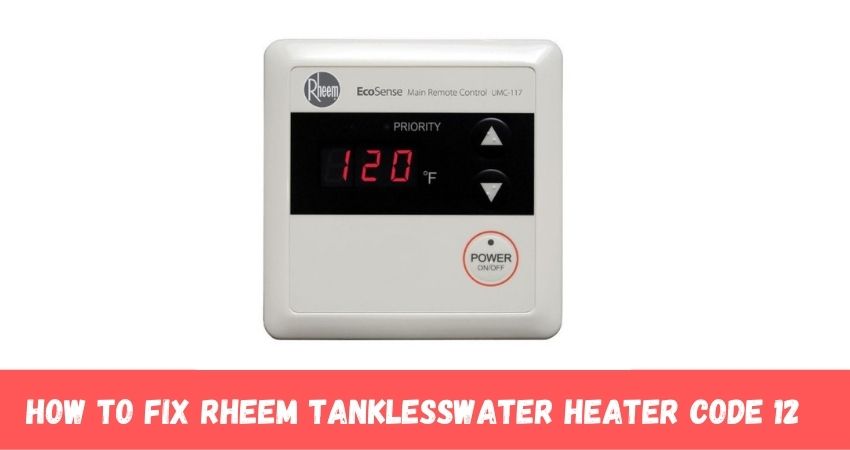
Error code 12 on the Rheem Tankless Water Heater means flame failure or indicates a problem with the flame sensor.
The error code 12 will appear on the control panel on your Rheem Tankless Water Heater when the unit fails to maintain a consistent flame. Or the flame sensor fails to detect a flame.
Generally, your Rheem tankless water heater can’t maintain a consistent flame because of the following four reasons:
- The tankless water heater isn’t receiving the gas at the right pressure and type.
- The flame sensor gets covered with carbon buildup.
- The flame sensor gets defective.
- The flame sensor wiring comes loose.
Due to those four reasons, the Rheem Tankless Water Heater fails to detect the flame and ends up flashing the error code 12 on the controller display.
What Causes Error Code 12 On Rheem Tankless Water Heater?
Error code 12 on the Rheem Tankless Water Heater flashes due to a dirty flame sensor, improper gas supply, and inappropriate gas pressure & type.
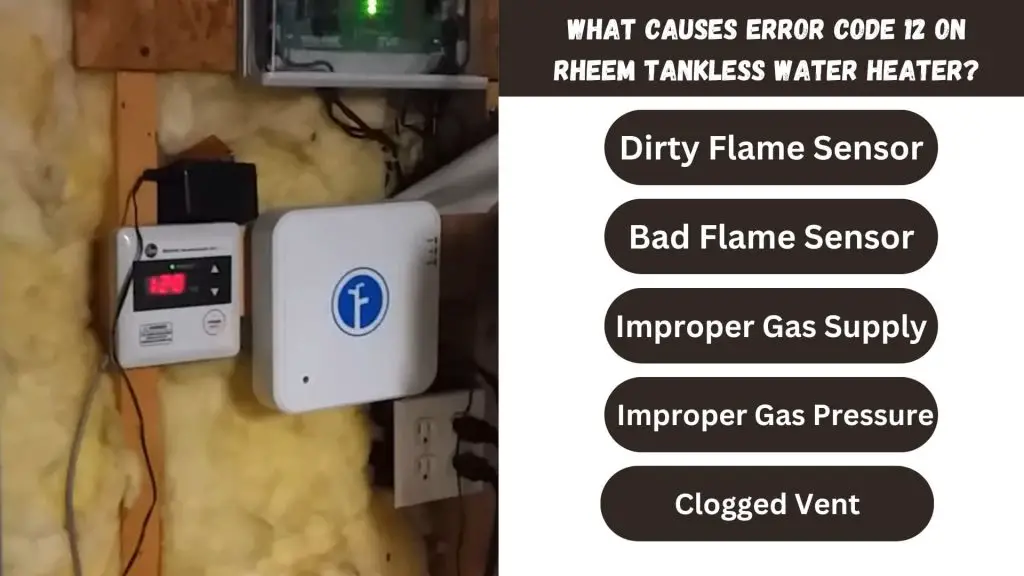
Dirty Flame Sensor
A dirty flame sensor is the main culprit that causes the tankless water heater to pop up the error code 12.
Generally, the flame sensor gets dirty from dust, dirt, soot, and other airborne particles.
When the flame sensor gets covered with carbon deposits, it fails to detect the flame, reducing its ability to generate the necessary electric current. The control board may interpret this as a lack of flame.
Consequently, the tankless water heater goes into the shutoff mode and flashes the error code 12 on the controller display.
Defective Flame Sensor
Due to a defective flame sensor, the unit can showcase issues like error code 12 on the controller display. A faulty flame sensor can’t detect the flame and send signals to the control board.
The flame sensor is fragile. A hairline crack on it can even cause issues. If the flame sensor becomes defective, it fails to detect the flame and produce the necessary electrical current.
Consequently, the control board fails to receive the proper signal from the flame sensor to ignite the burner.
Flame Sensor Wire Connector Comes Loose
Wire connectors coming loose from the flame sensor can also make the flame sensor fail to detect the flame.
As a result, the flame sensor sends no signal to the control board to ignite the burner, causing the unit to beep the error code 12.
When the error code 12 flashes on the controller display, your tankless water heater will remain turned off.
Improper Gas Supply
If the gas doesn’t flow from the tank to the burner, you can’t ignite the water heater. When you can’t ignite, how is it possible to get a flame?
The gas will not flow through the hose if the gas valve on the tank is closed. Besides, a clogged or kinked hose can also prevent the gas from flowing.
Lastly, insufficient fuel in the tank is also responsible for not getting a flame on your water heater.
To sum up, you will find your Rheem Tankless Water Heater beeping error code 12 due to improper gas supply.
Improper Gas Pressure
Without proper gas pressure, you can’t operate the water heater or get flames from it. Here gas pressure indicates both the inlet gas pressure and manifold gas pressure.
For proper water heater operation, the minimum inlet gas pressure should be 5.3″ WC for natural gas pressure or 11″ WC for LP gas.
When it comes to manifold gas pressure, it should be 2.52+ fan pressure (WC) for natural gas.
If you power your Rheem water heater by LP, the manifold pressure should be 7.36+ fan pressure (WC). If the gas pressure and the manifold gas pressure are improper, you must adjust them based on the fuel type.
Apart from this, if you feed your on-demand tankless water heater with improper gas type, it fails to generate flame detected by the flame sensor.
Consequently, the tankless water heater will go into the shut-off mode and flash the error code 12.
Gas Lines Too Small for the BTU Load
It’s indispensable that the gas supply lines should be properly sized to support the BTU load of your water heater. A small gas supply line can cause incomplete combustion and lets your water heater trigger the error code 12.
An undersized gas line isn’t only responsible for flame failure but also causes carbon mono-oxide.
Therefore, it may cause the burners to sooth, pilot lights and burners will go out intermittently, and form condensate in the heat exchanger.
To avoid these issues, you must size the gas supply line according to the BTU rating of your water heater.
The Venting Gets Clogged
A clogged or blocked vent pipe of your water heater may also trigger the error code 12. This pipe may get clogged by dirt, debris, and insects if you don’t clean it for a long time. If the vent pipe gets blocked, it will release carbon monoxide gas into your house.
How To Fix Error Code 12 On Rheem Tankless Water Heater?
To fix error code 12, try these seven troubleshooting steps:
1. Clean the Flame Sensor
To clean the flame sensor, try these steps:
- Turn the electric, gas, and cold water supplies off to your tankless water heater.
- Unscrew the access panel.
- Locate the flame sensor at the top left on the gas burner.
- Disconnect the flame sensor wire connector.
- Use a flat-head screwdriver to unscrew the bolt that secures the flame sensor in place.
- Remove the flame sensor and inspect it for dirt, carbon buildup, and residue.
- Gently clean the flame sensor with 100-grit sandpaper.
- Replace the flame sensor in its place and secure it with the provided bolt.
- Connect the wire connector to the flame sensor.
- Replace the access cover.
- Restore the power to the unit.
I have published a detailed guideline on Rheem Tankless Water Heater Flame Rod Cleaning.
You can read that article to learn more about cleaning the flame sensor.
2. Replace The Flame Sensor
If cleaning the flame sensor brings no luck, I bet the flame sensor is at fault.
To ensure that the flame sensor is functioning correctly, I recommend you test the flame sensor electrically.
Regarding this, turn all the power off to the unit and remove the burner cover.
Then, locate the flame sensor and disconnect the wire connector from it. Afterward, remove the flame sensor by unscrewing it.
Now, get a megohmmeter. Place one alligator clip on the megohmmeter to the rod and attach the other clip to the bracket of the flame sensor rod.
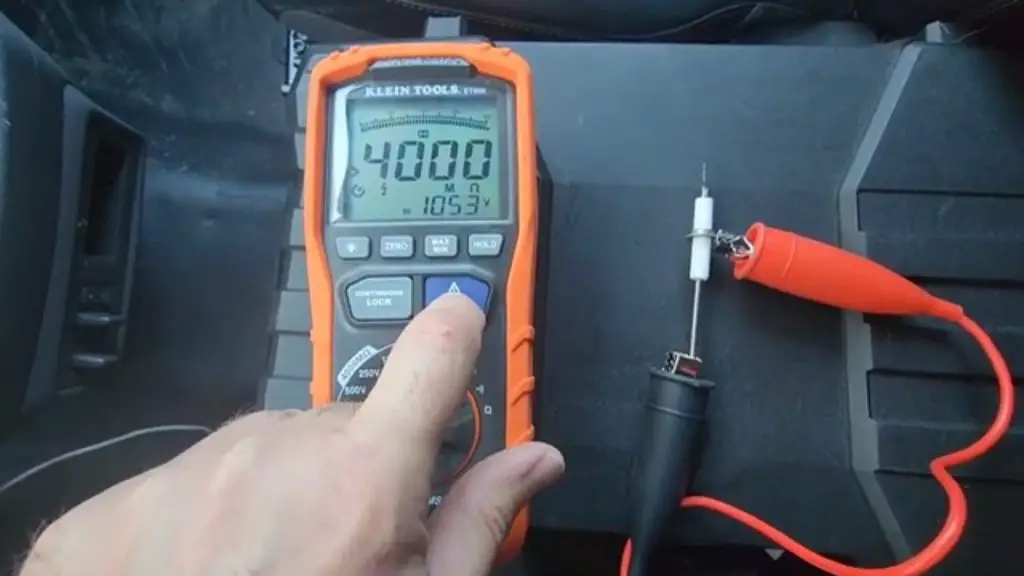
Set the megohmmeter to a thousand volts. Then, hit the Test button on your megohmmeter, and it should show reading up to 4000V if the flame sensor is healthy.
Otherwise, it requires you to replace the flame sensor as the component is at fault.
To replace the flame sensor, go along with these steps:
- Turn the power off to the unit and shut off the gas and cold water supply.
- Unscrew the access panel.
- Remove the wire connector from the flame sensor.
- Unscrew the flame sensor and pull it out gently.
- Install the new flame sensor and secure it with the provided nut.
- Attach the wire connector to the flame sensor.
- Replace the access cover in its place.
- Restore power to your water heater.
3. Inspect the flame sensor wiring and retighten it
Turn off the electric supply to your Rheem Tankless Water Heater. Then, shut off the gas supply and the cold water supply.
Then, remove the upper access panel and locate the flame sensor. Follow the wiring of the flame sensor and ensure it doesn’t come loose.
If it comes loose, retighten it. Don’t hesitate to replace the flame sensor wiring if required.
4. Ensure the Unit Is Receiving Continuous Gas Supply
Make sure the valve on the gas tank is open.
Next, go and check the gas hose for a clog. If it gets blocked, release the hindrance by washing away the gas hose with soapy water. Before doing that, make sure to turn the gas off.
On the other hand, straighten the hose if it gets bent. Finally, ensure there is sufficient gas in the gas tank.
5. Ensure the Gas Pressure Is Within Specification
You can’t tell or determine whether there is sufficient gas pressure or not without testing it. If you don’t know how to check the gas pressure on a water heater, check out this article.
Alternatively, you can watch the below tutorial from Rheem to check the high and low gas pressure.
The proper range of inlet gas pressure is between 4.0″ to 10.5″ w.c. for natural gas. On the other hand, the correct inlet gas pressure for LP should be between 8.0″ to 14.0″ w.c. So, adjust the gas pressure according to this measurement based on the fuel you use to power your water heater.
6. Ensure the Gas Lines Size Up According to the BTU Load
What will be the correct gas line size will depend on the BTU rating of your water heater, the other appliances, and where you will install them on each branch from the meter and regulator.
Two methods, the longest length method or the branch length method, will help you determine what size pipe you need for your tankless water heater. We recommend you follow the below charts to size the gas line correctly.
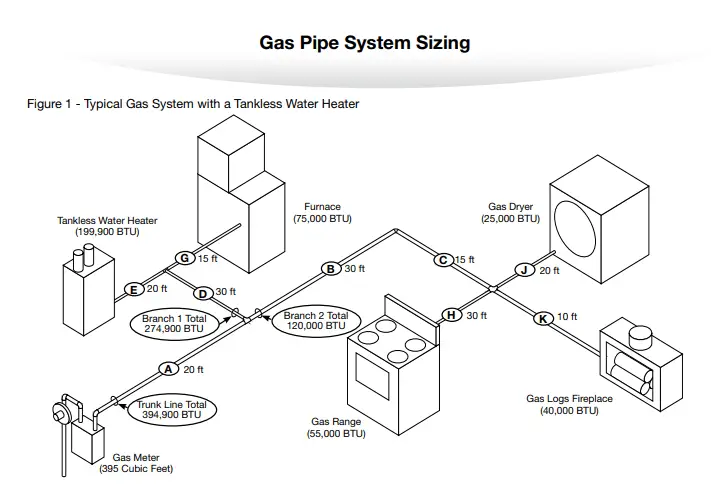
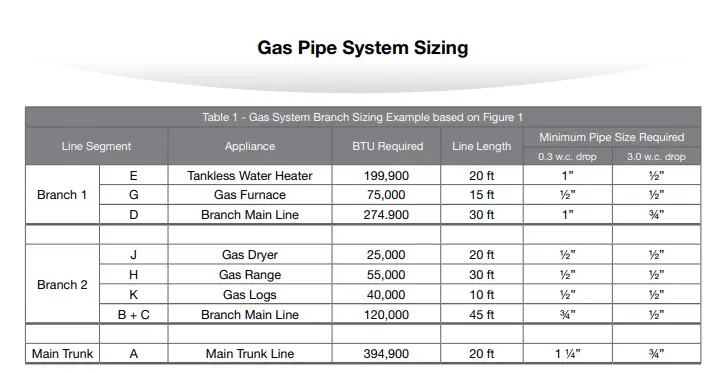
If you find these charts difficult to understand, check out this PDF file on Information for properly sizing gas lines for use with Tankless Water Heater.
We recommend you call a professional to do this task for you.
7. Release Blockage from the Vent Pipe
First, identify the vent pipe of your Rheem water heater. Typically, it’s the 3 or 4 feet pipe that extends from the top of your natural gas water heater connected with your chimney flue system.
Once you detect the vent pipe, it’s time to turn off the water heater and gas supply. Then, unscrew a section of the vent pipe and visually inspect it for a clog. You can run a plumbing snake through the pipe to release the blockage.
How To Reset Rheem Tankless Water Heater?
To erase the error code 12, reset your tankless water heater by following these four simple steps:
- Shut off both electric and gas supply to the water heater.
- Detach the power cord from the electric outlet
- Leave the water heater for several minutes
- Again, plug the unit into the electric outlet and turn the gas supply on. It should reset your tankless water heater.
End-Notes
Your Rheem Tankless Water Heater will trigger the error code 12 if the flame sensor gets dirty or fails to sense the flame. So, cleaning the flame sensor or rod will be an easy fix for the issue.
However, your tankless water heater may also display this error message due to gas supply issue, insufficient gas pressure, and a defective gas control valve. Fortunately, we mentioned every troubleshooting step to solve those problems.
On the other hand, if you fail to clear the error code 12 after trying all the steps, don’t hesitate to reach a professional.
Related:
- Rinnai Tankless Water Heater Code 12
- Rheem Tankless Water Heater Beeping
- Rheem Tankless Water Heater Troubleshooting Manual

Eric Alvarez is the head of content on LilDutchUncle.Com. He is an HVAC guy based in El Paso, Texas, United States. He obtained his Bachelor of Science degree from the University Of Texas at El Paso. Years of experience in the HVAC field have taught him many lessons, not the least of which is that the value of quality and knowledge far exceeds any promised initial savings. He has a good standing reputation for superior skills in heating, air conditioning, hot water tanks, and indoor air quality systems.

![AO Smith Water Heater No Status Light [Complete Guide]](https://lildutchuncle.com/wp-content/uploads/2022/08/AO-Smith-Water-Heater-No-Status-Light-768x384.webp)
![Zoeller Sump Pump Maintenance [Ultimate Guide]](https://lildutchuncle.com/wp-content/uploads/2023/03/Zoeller-Sump-Pump-Maintenance-768x384.webp)
![Rheem EcoNet Water Heater Troubleshooting [7+ Problems & Solutions]](https://lildutchuncle.com/wp-content/uploads/2022/07/Rheem-Econet-Water-Heater-Troubleshooting-768x384.webp)
