Gas valve problems on Richmond Water Heater mean you must repair or replace it to operate the unit smoothly.
This guide will walk you through:
- How to tell if water heater gas valve is bad?
- How to repair Richmond Water Heater Gas Valve?
- Step-by-step guide on replacing the Richmond Water Heater Gas Valve
- How to reset water heater gas valve on Richmond Water Heater
Without further ado, let’s dive in.
Table of Contents
- How To Tell If Richmond Water Heater Gas Valve Is At Problems?
- How To Repair Richmond Water Heater Gas Valve?
- Richmond Water Heater Gas Valve Replacement [How-To-Replace]
- Richmond Water Heater Gas Valve Reset [Step-by-Step Procedure]
- End-Note
How To Tell If Richmond Water Heater Gas Valve Is At Problems?
You can easily determine whether the gas valve of Richmond Water Heater gets bad or not by lighting the pilot and testing the thermocouple.
Let’s start with lighting the pilot. Follow the manual and attempt to light the pilot. Press the pilot knob all the way down and keep pressing the igniter button. If the pilot light doesn’t come on, inspect the gas supply.
Make sure the gas orifice doesn’t get clogged. If still the pilot light doesn’t come after releasing the igniter button, there may be a problem with the thermocouple.
I recommend you test the thermocouple electrically. To test it, remove the bottom access cover. Then, take a multimeter and set it to the Volt DC option. Now, use an adjustable wrench to unscrew the thermocouple from the gas control valve.
Next, attach the probes of the multimeter to the copper and to the end of the thermocouple. Light the pilot and hold down the button. The voltage should start climbing within a few minutes as the thermocouple heats up.
A healthy thermocouple should give a reading between 20 to 30 millivolts. It will cause the pilot light to stay lit. Read this article to learn how to make Richmond Water Heater Thermocouple Replacement.
If the Richmond water heater pilot light won’t stay lit, I bet the gas valve is at fault. In this case, you must replace the gas control valve. I will walk you through the step-by-step process to change the gas valve later in this article.
Read Also: Richmond Water Heater Troubleshooting
How To Repair Richmond Water Heater Gas Valve?
The gas valve on your Richmond Water Heater will be at fault due to a shorted ECO that prevents the voltage from going through the thermocouple. Below, I will walk you through the step-by-step process to repair the gas valve if it’s at fault due to a tripped ECO.
- Unscrew the thermal well from your old gas valve. Regarding this, unbolt the 3 T-25 bolts that hold the thermal well to the back of the gas control valve.
- Once you unbolt those T-25 bolts, the thermal well will come out of the gas valve. You can find some wires inside one of the pipes of the thermal well. Take away the wires and you can find a thermal fuse, which you need to replace.
- Cut the factory shrink wrap that covers the thermal fuse and crimp connections. You can use a sharp knife to cut the wrap.
- Remove the thermal fuse by unfolding the crimp.
- Crimp in your new thermal fuse so that it can make solid electric contact.
- After crimping in the new thermal fuse, insulate the crimp connections by covering it in heat shrink.
- Slide the new thermal fuse into the thermal well.
- Reconnect wires into the thermal well slot, secure with 3 T-25 bolts, and slide the ECO back into the thermocouple connector.
Richmond Water Heater Gas Valve Replacement [How-To-Replace]
If repairing the gas valve doesn’t bring any luck, replacement of the gas valve will be the only option. And this chapter will make the gas valve replacement simple. Before heading over to the workflow, ensure you have the following equipment:
- Adjustable pipe wrench
- A flathead screwdriver
- A garden hose
- Teflon Tape
- A new gas valve
Turn Off Both Water & Gas Supply
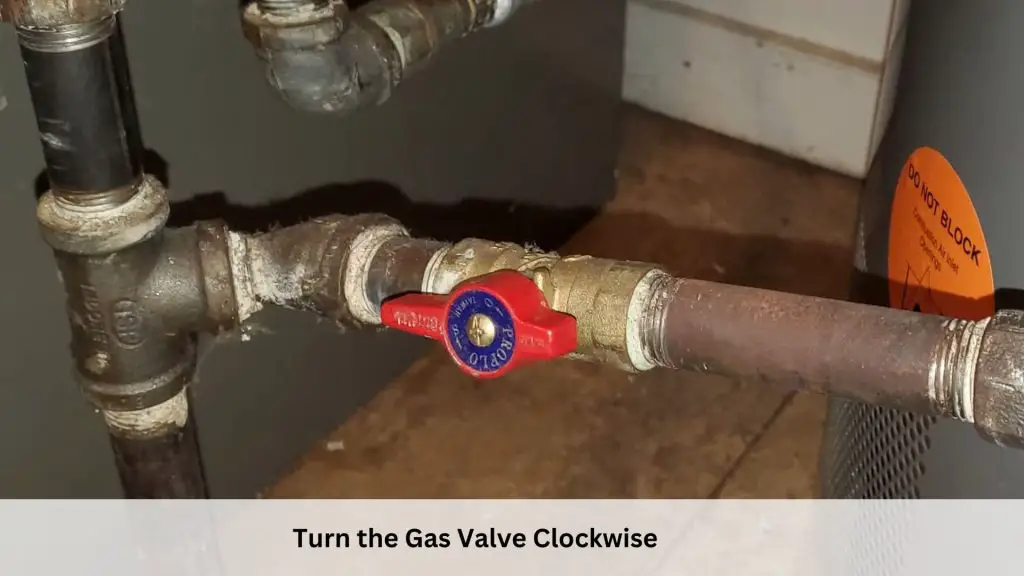
Start with turning off the water supply to the unit. Just set the cold water inlet valve at the perpendicular position to shut the water supply off. Then, shut off the gas supply to the unit.
Drain Your Richmond Water Heater
You must drain the water. Otherwise, the hot water will burn your skin as the water comes out when you remove the gas valve. To drain the water, get a garden hose and attach it to the drain valve at the bottom of the unit. Then, place the other end of the hose to the nearest floor drain. Now, open the drain valve to let the water drain.
Read Further: How To Drain Richmond Water Heater
Detach Everything Leading To The Gas Control Valve
After draining the tank, disconnect everything that is attached to the gas control valve. For example, you need to remove the thermocouple, gas line, pilot line, and main burner supply line.
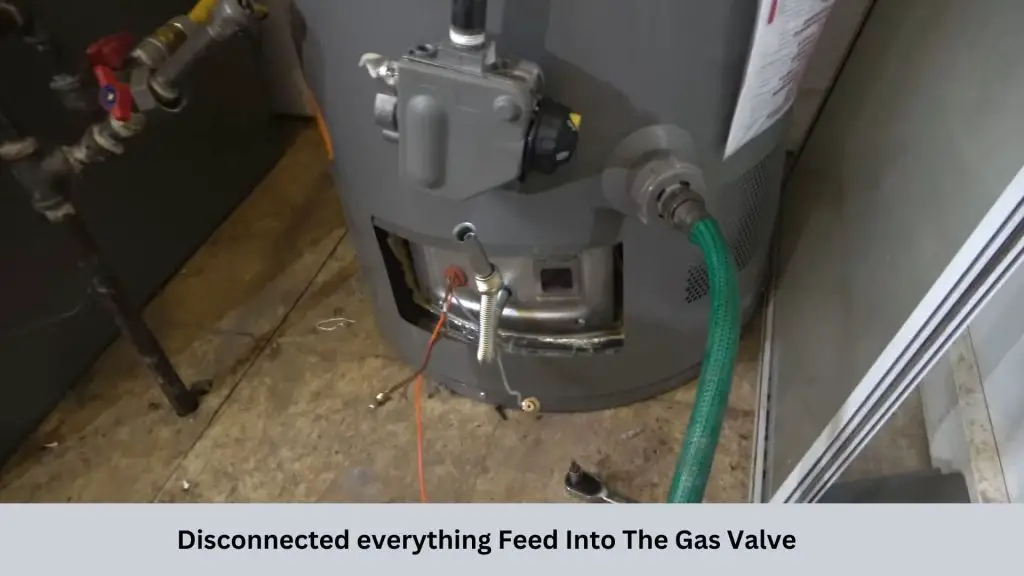
When it comes to removing the gas line, you should use an adjustable pipe wrench to remove the union between the shut-off valve and the gas valve. You can find a horizontal pipe feed into the side on the gas line. The other end of the pipe is attached to a tee. I recommend you remove the nipples from both sides of the tee. Now, pull out the gas line from the gas valve.
Afterward, remove other connections like the pilot light line and the thermocouple from the gas valve.
Remove The Gas Valve
Now, what you need to do is- remove the gas valve from the unit. You can loosen up the valve by holding the pipe attached to the valve. Ensure you turn the pipe counterclockwise. Once the gas valve comes loose, remove the pipe from the valve. Finally, take off the gas control valve from the unit.
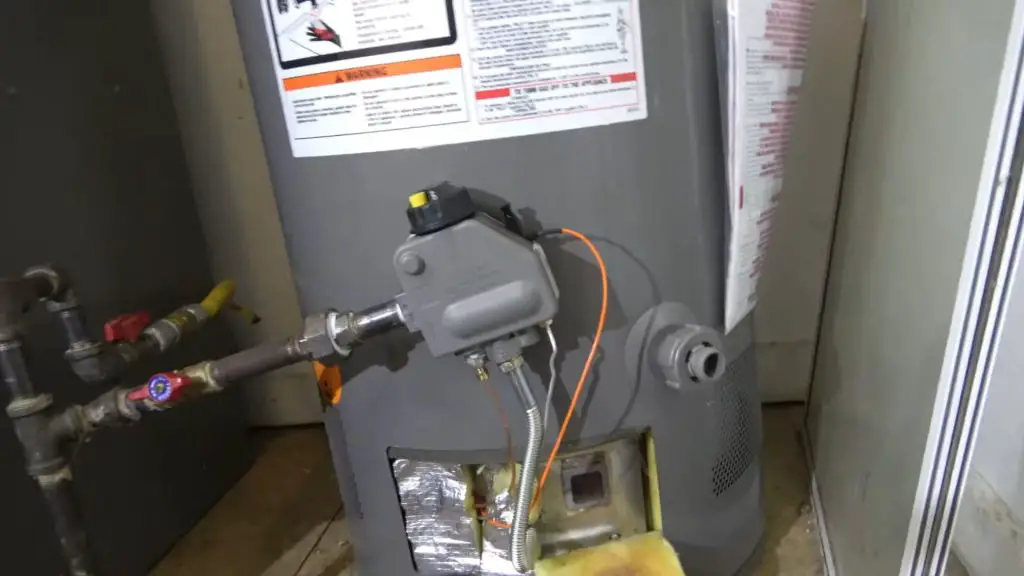
Install A New Gas Control Valve
Finally, it’s time to install a new gas control valve. You can find a universal gas valve in the market. Alternatively, you can see the part number on the old gas valve and use the number to search on Amazon to get the exact gas valve.
Before installing the valve, use Teflon tape. Wrap up the threaded portion of the pipe that goes to the gas supply line. Then, attach the pipe to the control valve. Now, install the gas valve and hand-tighten it by holding the pipe.
Next, use an adjustable pipe wrench to tighten up the valve. Don’t forget to attach the gas line using the tee and nipples. Finally, connect every line like the thermocouple, pilot line, and others to the gas control valve to finish the installation.
Fill the water tank with water. Ensure you shut off the drain valve and detach the garden hose from the drain valve. Once you fill up the tank, turn the gas supply on. Finally, light the pilot following the instructions mentioned in the manual.
Richmond Water Heater Gas Valve Reset [Step-by-Step Procedure]
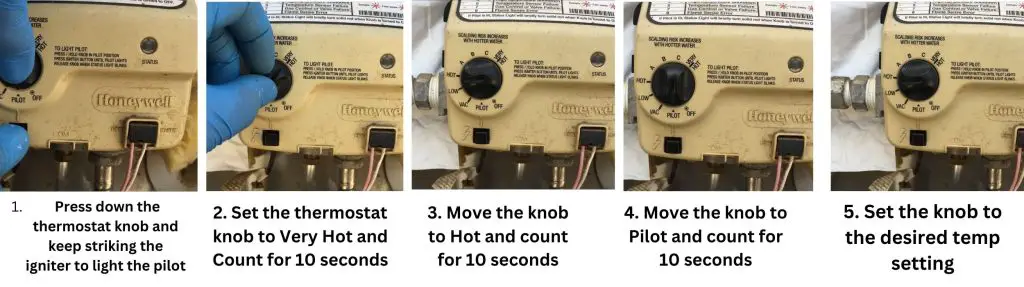
Go along with the step-by-step procedure below to reset the gas valve on your Richmond Water Heater:
- Move the gas control/thermostat knob to Off position for several minutes to clear unburned gas.
- Turn the thermostat knob to Pilot. Then, press down the thermostat knob and start striking the piezo igniter button simultaneously. You can check out this article to learn how to light Richmond Water Heater.
- Once the pilot light comes on, release the gas control/thermostat knob. If the pilot light doesn’t come on, read this article: Richmond Water Heater Pilot Light Won’t Stay Lit.
- Turn the thermostat knob to Very Hot and wait for 10 seconds.
- Move the thermostat knob to Hot and count another 10 seconds.
- Set the temperature control knob to Pilot and count from 1 to 10.
- Finally, set the thermostat knob to your desired temperature setting. If the pilot light comes on, understand you reset the gas valve successfully.
End-Note
Follow the repairing procedure to repair the gas control valve on your Richmond Water Heater. If the pilot light won’t light after repairing the gas valve, you must replace the old gas control valve. And I already mentioned the step-by-step guide to change the gas control valve. So, follow the steps I mentioned and solve the gas valve issues. Good Luck!
Read Also:
- Richmond Electric Water Heater Troubleshooting
- Richmond Water Heater Reset Button
- Rheem Water Heater Gas Valve Problem

Eric Alvarez is the head of content on LilDutchUncle.Com. He is an HVAC guy based in El Paso, Texas, United States. He obtained his Bachelor of Science degree from the University Of Texas at El Paso. Years of experience in the HVAC field have taught him many lessons, not the least of which is that the value of quality and knowledge far exceeds any promised initial savings. He has a good standing reputation for superior skills in heating, air conditioning, hot water tanks, and indoor air quality systems.