This is a complete guide on Bosch Tankless Water Heater Error Codes.
In this guide, I will break down:
- 22 common Bosch Tankless Water Heater error codes & the way you can reset them
- How do you reset your Bosch Tankless Water Heater
Without further ado, let’s dive in.
Table of Contents
- Bosch Tankless Water Heater Error Codes [A Complete List]
- 1. Error Code AO
- 2. Error Code A1
- 3. Bosch Tankless Water Heater Error Code A2
- 4. Error Code A3
- 5. Error Code A4
- 6. Error Code A5
- 7. Error Code A6
- 8. Error Code A7
- 9. Error Code A8
- 11. Error Code AD
- 12. Error Code BB
- 13. Error Code BC
- 14. Error Code C1 or C2
- 15. Error Code C3
- 16. Error Code C5
- 17. Bosch Tankless Water Heater Code C7
- 18. Bosch Tankless Water Heater Error Code E0
- 19. Bosch Tankless Water Heater E1 Error Code
- 20. Bosch Tankless Water Heater Error Code E9
- 21. Bosch Tankless Water Heater Error Code EA
- 22. Bosch Tankless Water Heater Error Code EC
- How Do You Reset A Bosch Tankless Water Heater?
- End-Note
Bosch Tankless Water Heater Error Codes [A Complete List]
From this chapter, you can learn the meaning of each error code, the reasons behind this issue, and the way you can reset those codes.
1. Error Code AO
Water temperature sensors come loose completely or they get damaged are responsible for the error code AO to throw on the controller display.
How To Fix:
First off, inspect the sensor wire connections and ensure they don’t come loose. If yes, tighten up the sensor wire connections.
If the problem persists, don’t hesitate to replace the water temperature sensor. You can call a certified plumber if you don’t know how to make that replacement.
2. Error Code A1
The Bosch Tankless Water Heater will flash the error code A1 on the display when air temperature inside the cabinet goes above 158 °F. In this case, the appliance will regulate power to protect it against overheating.
How To Fix:
Ensure the external air temperature is above 140 °F. Then, take a look for flue leakages inside the water heater or in the concentric vent. I highly recommend you to call a professional to resolve the flue leakage issue.
3. Bosch Tankless Water Heater Error Code A2
Your tankless water heater will showcase the error code A2 if the external water temperature sensor comes loose.
Turns out, installing that sensor improperly can also cause the unit to flash the error code A2 on the controller.
Nonetheless, faulty external water temperature or problem with that sensor itself is another culprit behind this issue.
How To Fix:
To begin with, check the wire connection of the external water temperature sensor and tighten it if it comes loose. Alternatively, you can replace the wiring if wire connections get damaged.
Also, don’t forget to check the temperature sensor for proper installation.
And lastly, replace the sensor if tightening up wire connection or reinstalling the temperature sensor doesn’t bring any luck.
4. Error Code A3
When the flue gasses temperature sensor gets disconnected or damaged, the unit will throw the error code A3.
To resolve this issue, just check the temperature sensor wire connections and reconnect the wiring tightly.
Finally, replace the sensor if needed and have the error code reset.
5. Error Code A4
Error code A4 means the air temperature sensor comes loose or it gets defective. To erase this faulty code from the controller, just take a look at the sensor wire connections and tighten it up. If retightening the wiring doesn’t bring any luck, replace the sensor with a new one.
6. Error Code A5
If the condensing unit flue sensor gets disconnected or defective, you can see the diagnostic code A5 on the controller display.
The simple solution to this issue is- inspect the flue sensor wiring and ensure it doesn’t come loose.
After reconnecting the sensor wiring, re-ignite the water heater. If the problem persists, don’t bother to replace the flue sensor with a new one.
7. Error Code A6
Inlet cold water temperature sensor gets disconnected or bad is what causes the tankless unit to throw the fault code A6 on the controller display.
The solution to this issue is similar to other error codes I mentioned above like A6, A5, and A4. Just check the wiring of the water temperature sensor and retighten the wire connection if required.
And last not the least, replace the inlet cold water temperature sensor if tightening up the wiring brings no luck to you.
8. Error Code A7
I need to write down almost similar words to describe the error code A7- except for a few differences.
It’s also related to the sensor or its wiring issue. Your tankless unit will throw this diagnostic code when the heat exchanger hot water temperature sensor gets detached or the sensor itself is bad.
To fix this issue, inspect the hot water temperature sensor wiring or the sensor itself. Then, either replace the sensor wiring or the sensor to erase the error code.
9. Error Code A8
If you observe the error code A8 on the controller display, understand there is an issue with the outlet hot water temperature sensor. The unit literally throws this error message if the sensor wire comes loose or the sensor gets faulty.
To remove the error code, check the sensor wiring and verify it doesn’t come loose. Next, change the sensor if needed.
10. Error Code A93)
This diagnostic code A93) indicates the output power is incorrect. Your tankless unit will showcase this error message due to the following reasons:
- Incorrect inlet gas pressure
- Issue with water temperature or water flow sensor wiring
- Defective sensor
How To Fix:
To let the unit operate optimally, the minimum gas pressure should be 5” W.C. for natural gas. On the other hand, if you own a tankless unit operated by LPG, the gas pressure should be 8” W.C.
If the inlet gas pressure goes out of specifications, you must adjust the gas pressure.
Now, the question is- how can I come to the decision that I need to adjust the gas pressure without measuring it?
It’s simple.
Follow the below procedure to learn how to measure the inlet gas pressure and decide whether you need to adjust the pressure or not:
- Shut the gas supply off to the unit at the manual shut-off valve for your water heater.
- Locate the inlet gas pressure port.
- Unscrew the inside test port fitting and attach a manometer to it.
- Now, turn the gas supply back on and note the pressure you are reading on the manometer display. The pressure you measure in this stage is known as static pressure.
- Next, test the dynamic pressure. In this case, turn on your water heater and go to the P1 Max. Power mode.
- Turn on all other gas appliances (except the heater) on the same gas piping system at maximum output.
- Open all the hot water faucets to gain a flow rate of at least 6 GPM. If the unit goes back to P2, open for hot water fixtures to allow sufficient flow to keep the water heater in P1.
- Record the lowest operating gas pressure and note it down. The pressure you measure in this stage is known as dynamic pressure. Ensure it doesn’t go below 5” W.C for natural gas or 8” W.C. for LP.
- Turn off your water heater.
- Shut off the gas supply to the unit.
- Disconnect the manometer from the test port.
- Tighten the screw inside the test point fitting.
If the dynamic pressure goes below 5” W.C for natural gas, you must adjust the inlet gas pressure.
I highly recommend you to call a certified plumber to let him adjust the gas pressure.
Apart from this, inspect the wiring of the temperature sensor or flow sensor. If needed, replace the sensor itself.
11. Error Code AD
Flue blockage detected during startup due to insufficient combustion air! This is what causes your tankless unit to throw the error code AD.
How To Fix:
The first step I suggest you to erase this error code is to reset the water heater. Regarding this, hold down the power (on/off) button for 3 seconds which will reset the error code by beginning the startup sequence.
If resetting the water heater will bring no luck, check the air opening and exhaust opening for restrictions.
Also, make sure the flue length is within specification. Nonetheless, verify the air filter is free from blockage.
12. Error Code BB
Fan calibration triggered due to missed ignitions is the culprit behind the error code BB, popping up on the controller display.
How To Fix:
You can easily erase this error message by adjusting the gas inlet pressure or performing gas and air tuning.
Above, I already mentioned the way you can measure and adjust the gas inlet pressure. So, check the instructions above and measure the gas inlet pressure.
For performing gas and air tuning, you can follow two methods to complete this task:
- Automatic: UC- Auto Adjust
- Manual: MA- Manual Adjust
Below, I will show you how you can perform gas and air adjustment automatically.
To perform the UC Auto Adjust, enter the CA Combustion Settings menu.
Next, tap the Up or the down button to select the UC menu. Then, press the Ok symbol to enter the UC menu.
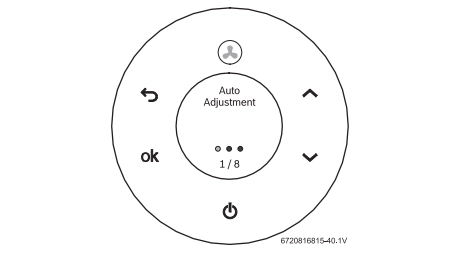
And guess what, the automatic adjustment has initiated right off the bat when you press the Ok symbol.
Open hot water faucets when the message Open Taps will pop up on the display.
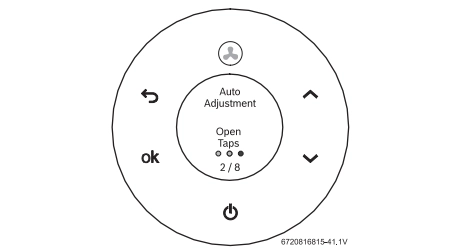
Generally, this message will be displayed 5 minutes after initiating the automatic adjustment.
Wait until a green check mark is displayed, which indicates the successful conclusion of the automatic adjustment.
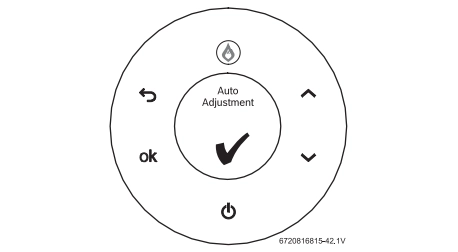
Finally, touch the back symbol to exit the UC menu.
13. Error Code BC
The error code BC means successive fan calibration with similar learned values. The remedy I mentioned for resetting the diagnostic code BB is applicable to erase this code as well.
In plain english, adjust the inlet gas pressure or make gas and air adjustment to reset the error code BC.
14. Error Code C1 or C2
The Bosch Tankless Water Heater will flash the error code C1 or C2 if it detects excessive blockage during startup. Generally, insufficient combustion air is responsible for this occurrence.
How To Fix:
First off, check the air intake & exhaust pipes and terminals for restrictions. If needed, clean those piping to let the air flow for proper combustion.
Once you free the blockage out of the exhaust piping, reset the water heater by holding down the on/off button for 3 seconds.
Turns out, ensure the flue length is within specification. Of course, don’t forget to inspect the air filter for dirt and debris.
15. Error Code C3
If the flow sensor fails to detect water recirculation, your water heater will throw the faulty code C3.
It actually happens when there is an obstruction in the recirculation circuit. Similarly, the unit will showcase this diagnostic code on the controller if there is a problem with the pump or its connection.
How To Fix:
To resolve this problem, start with checking the pump and its connection. If the pump connection comes loose, retighten up the connection. Or, replace the recirculation pump.
Of course, don’t hesitate to verify the recirculation circuit for blockage.
16. Error Code C5
Error Code C5 is the result of a disconnected or defective bypass water valve.
In other words, if this diagnostic code appears on the controller display, I bet the wire connection of that valve comes loose or the valve itself goes bad.
How To Fix:
First, take a look at the bypass water valve wire connection. If the wiring comes loose, retighten the wire connection or replace the wiring.
However, you can proceed to replace the bypass water valve if tightening or replacing its wiring brings no luck for you.
I suggest hiring a qualified technician to replace the bypass water valve professionally.
Once you or your plumber makes that replacement workflow, follow the below steps to calibrate the bypass water valve.
First off, you need to access the AU technical settings menu. In this case, press the back symbol and the display will show P4 Information.
Next, tap on either the up or the down option to access the AU technical Settings.
Now, press the Ok symbol and it will bring the authentication menu. Input the password (1886) and complete the authentication process.
Secondly, open a hot water faucet and verify there is water flow before moving to the next step.
Thirdly, access the PA menu and choose the Ok symbol. Then, select the MF main valve by choosing the up or the down option.
What you need to do now is- just press the Ok symbol and it will start the auto calibration of the main valve.
Note: Water flow will shut off.
Wait until the green check mark of successful auto calibration for the main valve appears on the display.
And lastly, press the return symbol to go back to the main menu.
17. Bosch Tankless Water Heater Code C7
Fan wiring gets disconnected or the fan itself is at fault causing the tankless unit to throw the fault code C7.
How To Fix:
Begin with checking the fan wire connections. If the wiring comes loose, tighten it up or replace the wiring.
However, if replacing the wiring brings no luck to you, go ahead to change the fan with a new one. In this regard, it will be better to call a professional to replace the fan.
18. Bosch Tankless Water Heater Error Code E0
This error code represents an internal issue of the control unit. In simple words, if there is a problem with the control unit, the fault code E0 will appear on the display.
How To Fix:
First off, try to resolve this issue by resetting the water heater. To reset the unit, hold down the on/off button for three seconds.
Then, move forward to replace the control unit if resetting the tankless unit will fail to reset this error message.
19. Bosch Tankless Water Heater E1 Error Code
When the hot water temperature goes over 194° F, the water heater will flash the diagnostic code E1.
Keep in mind; the water heater will cut off the burner to prevent scalding. Once the unit cools down, it will reactivate the water heater.
How To Fix:
If your water heater displays the error code E1, disconnect the unit both from electric power and gas supply. Then, purge the hydraulic circuit to remove air.
You can also reduce setpoint temperature to minimize temperature instabilities if the problem still persists.
20. Bosch Tankless Water Heater Error Code E9
A broken thermal fuse is the main culprit that causes the unit to pop up the error code E9 on the controller display.
The only option you have to resolve this issue is to replace the thermal fuse. If you don’t know how to replace the thermal fuse, it will be better to hand over this task to a professional.
21. Bosch Tankless Water Heater Error Code EA
The error code EA means ignition failure.
Ignition failure is a result of improper inlet gas pressure. Turns out, feeding the unit with incorrect gas type can also cause ignition issues.
How To Fix:
First off, measure the gas inlet pressure and adjust the pressure according to that. Fortunately, I described everything you need to know to measure the gas pressure at the beginning of this guide.
Next, verify you feed the water heater with the correct gas type. If it requires gas, fuel up the unit with natural gas. Otherwise, you should power up the unit with LP gas.
22. Bosch Tankless Water Heater Error Code EC
Flame lost during operation is the meaning of the error code EC. You will experience this issue with your water heater due to improper gas inlet pressure.
Besides, improper gas and air adjustment can cause the water heater to throw this error message on the controller display.
How To Fix:
Firstly, measure the gas inlet pressure by connecting a manometer and verify the gas pressure is within specifications. If not, call a professional to let him adjust the gas inlet pressure.
Secondly, perform gas and air tuning which will also help in erasing the error code EC.
How Do You Reset A Bosch Tankless Water Heater?
A simple remedy to reset an error code? Of course, resetting your water heater is the simplest way to erase an error message from the controller display.
Fortunately, Bosch makes it easy for the user to reset the water heater. To reset the unit, hold down the on/off button for 3 seconds and it will cause the water heater to begin the startup sequence.
Read more about: Bosch Tankless Water Heater Reset Button
End-Note
Over time, you will encounter the error code issue with your Bosch Tankless Water Heater.
And this guide on Bosch Tankless Water Heater Error Codes broke down everything you need to know like, the meaning of each code and the way you can erase them.
However, if I missed any error code that you are experiencing with your water heater, let us know by leaving a comment below.
I feel happy to help.
Read Also:

Eric Alvarez is the head of content on LilDutchUncle.Com. He is an HVAC guy based in El Paso, Texas, United States. He obtained his Bachelor of Science degree from the University Of Texas at El Paso. Years of experience in the HVAC field have taught him many lessons, not the least of which is that the value of quality and knowledge far exceeds any promised initial savings. He has a good standing reputation for superior skills in heating, air conditioning, hot water tanks, and indoor air quality systems.