Rinnai Tankless Water Heater Flush [Complete Guide]
Flushing a tankless water heater is not rocket science. And this guide on Rinnai Tankless Water Heater Flush will introduce you to 5 simple steps to flush the unit like a pro.
Apart from breaking down the flushing procedure, I will also describe:
- What happens if you don’t flush your tankless water heater?
- How often should you flush your tankless water heater?
- And how much does it cost to flush the unit?
In short, it’s a complete guide that will let you know everything about flushing a tankless water heater- from start to finish.
So, let’s get started right here.
Table of Contents
- What Happens If You Don’t Flush Your Tankless Water Heater?
- Rinnai Tankless Water Heater Flush [5 Flushing Steps]
- How Often Should I Flush My Rinnai Tankless Water Heater?
- How Much Does It Cost To Flush A Rinnai Tankless Water Heater?
- FAQs
- End-Note
What Happens If You Don’t Flush Your Tankless Water Heater?
Failure to flush the water heater in time will cause damage to the heat exchanger. Damage to the heat exchanger because of late flushing is not covered by Rinnai water heater’s warranty. In short, lime or scale builds up within the unit and clog the water heater if you don’t flush your tankless water heater, which leads to a failure or damaged heat exchanger.
According to the manual, Rinnai recommends you flush the unit once a year. But you should flush the water heater twice a year if you live in a hard water area. Otherwise, mineral deposits settle in the unit and prevent your heater from functioning properly. It may even overheat the system and affect the heating efficiency of the water heater.
To avoid these issues and maximize the water heater efficiency, you should flush your tankless water heater once or twice a year. And the following chapter will make it easy for you to flush the unit.
Rinnai Tankless Water Heater Flush [5 Flushing Steps]
This chapter will walk you through 5 simple steps to flush your Rinnai tankless water heater like a pro.
Step 1. Flushing Kits You Need
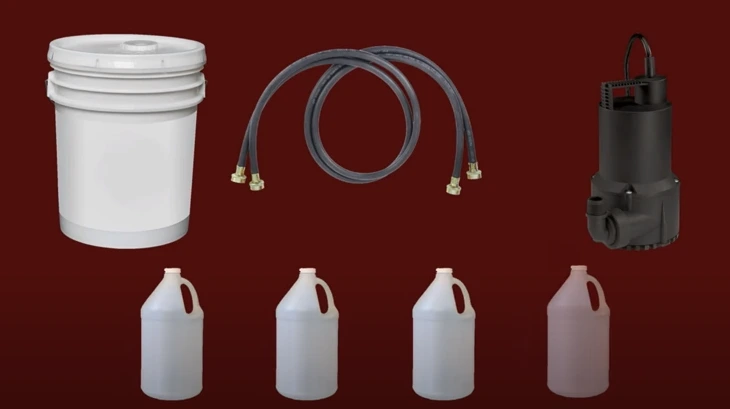
First off, ensure you have the following Rinnai Tankless Water Heater flush kits:
- A 5-gallon plastic bucket
- Two washer hoses
- A sump pump
- 4 gallons of food-grade white vinegar
Note: You can also use CLR cleaner instead of white vinegar to flush out lime or scale buildup efficiently.
Step 2. Shut Off the Unit and Close Shut-off Valves
After having those flushing kits at your fingertips, turn the power off at the temperature controller first. Regarding this, just push the On/Off button on the controller and the controller panel will blank.
Next, turn off all the electric power to the unit. You can do it either by unplugging the power cord from the outlet or at the circuit breaker.
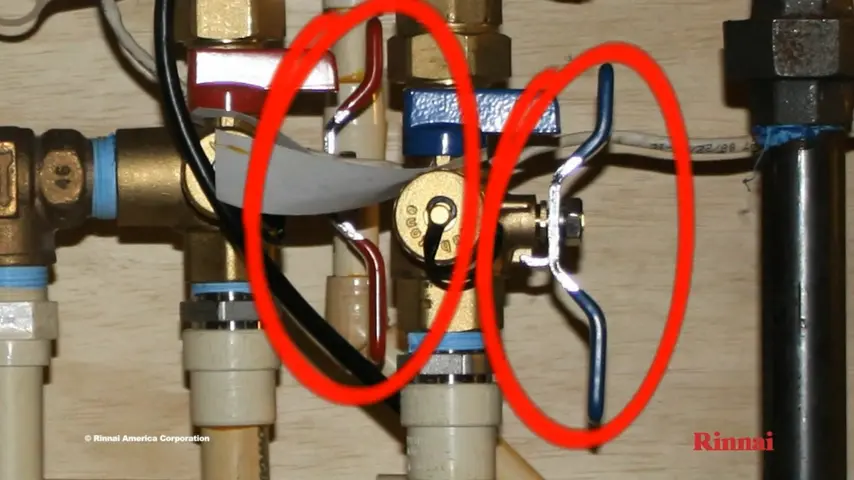
Then, locate the shutoff valves on the hot water and the cold water lines and close them to isolate water flow from the cold inlet and the hot outlet.
Step 3. Hook Up The Washer Hoses
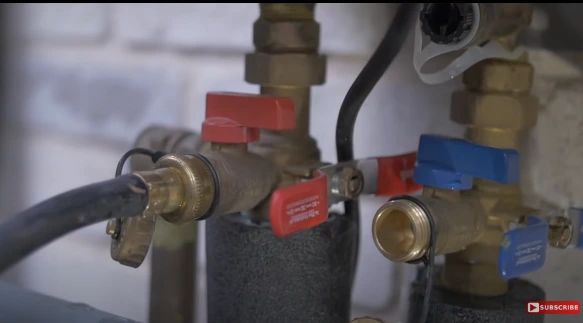
In this stage, you need to connect the washer hoses to the service ports on the isolation valves. The hose you connect with the cold water line should attach to the circulation pump. And the other end of the hose that you connect to the hot water line needs to place in the plastic bucket.
Step 4. Pour Vinegar Into The Bucket And Turn On Pump
After hooking up the hoses, it’s time to pour 4 gallons of food-grade white vinegar into the plastic bucket. Now, turn on the submersible pump to let it circulate the vinegar through the water heater.
I recommend you run the pump for at least an hour. It will break down all the lime or scale buildup and flush them away properly. Make sure you operate the pump at a rate of 4 gallons per minute. After running the sump pump for an hour, turn it off.
Step 5. Rinse The Vinegar Residue
Once you thoroughly flush the unit, you should rinse the vinegar residue from the water heater. For this, ensure you turn the sump pump off.
Then, close the valve at the cold inlet. Detach the hose from the cold water inlet and make sure you place a bucket to catch the flushed water from the hot outlet. Be sure you maintain the local codes for disposal.
Now, open the cold isolation valve and let fresh or clean water run through the unit for five minutes. After that, close the cold side again, close the service valve from the hot side, and remove the hose from the hot side.
And finally, you are done and end up the flushing workflow successfully.
How Often Should I Flush My Rinnai Tankless Water Heater?
It mostly depends on the water condition of your area and how you use the water. But the manual highly recommends you to flush the unit once a year.
If the water quality of your area is fine, it will be okay to flush your tankless water heater once a year. Some of my neighbors say they even flush the hot water heater every 2 years.
But your tankless water heater demands frequent flush (two times a year) if you live in a hard water area. So, check out the following map and know in what area (soft or hard water area) you live.

Besides, the usage of the water heater can also quicken the scale formation at the bottom of the unit. For example, if you have a family of two or three and make minimal use of hot water, flushing the unit annually will be ok. But heavy use of the hot water accelerates the lime or scale formation within the heat exchanger.
Also, operating the water heater at a high temperature setting (like at 140-degree) can also cause the mineral deposits to form quickly. In this case, you need to flush the unit every six month.
How Much Does It Cost To Flush A Rinnai Tankless Water Heater?
Generally, it will cost you around $150 to flush a Rinnai tankless water heater. But if you flush the unit by yourself, it may reduce the cost to $120.
A flushing kit that includes a plastic bucket, two hoses, a submersible pump, and food-grade white vinegar will eat up to $120 or $130 from your wallet. And the labor cost will add another $30 or $50 for flushing the unit.
I highly suggest you flush the water heater by yourself as it’s simple. Just follow the flushing instructions I mentioned above.
FAQs
How long does it take to flush a Rinnai Tankless Water Heater?
It will take up to an hour or 1.3 hours to flush your Rinnai tankless water heater that includes both the set up time and the flushing time.
How do I know if my water heater needs to be flushed?
The following signs will let you know when you need to flush your water heater:
- Get not enough hot water as intended
- Sludge or mineral deposits in the water
- Unit may get clogged or overheated
Can a hot water heater last 20 years?
Yes, a hot water heater can last up to 20 years if you maintain and service it according to the manual.
How long do Rinnai water heaters last?
Basically, the average life expectancy of Rinnai water heaters is 20 years. But it can be affected due to the water hardness, usage, and proper maintenance.
End-Note
If you want to prolong the life of your Rinnai tankless water heater and gain the best heating efficiency, you must flush it according to the manual. Fortunately, I broke down how to flush the unit following five easy steps. So, follow the guideline and remove mineral deposits from the water heater.
Read Also:

Eric Alvarez is the head of content on LilDutchUncle.Com. He is an HVAC guy based in El Paso, Texas, United States. He obtained his Bachelor of Science degree from the University Of Texas at El Paso. Years of experience in the HVAC field have taught him many lessons, not the least of which is that the value of quality and knowledge far exceeds any promised initial savings. He has a good standing reputation for superior skills in heating, air conditioning, hot water tanks, and indoor air quality systems.

![Richmond Water Heater Element Replacement [7 Easy Steps]](https://lildutchuncle.com/wp-content/uploads/2024/02/Richmond-Water-Heater-Element-Replacement-768x432.jpg)
![Rheem Water Heater Reset Button [Complete Guide]](https://lildutchuncle.com/wp-content/uploads/2023/05/reset-button-on-rheem.png)
![AO Smith Water Heater Reset Button [Complete Guide]](https://lildutchuncle.com/wp-content/uploads/2022/08/AO-Smith-Water-Heater-Reset-Button-768x384.webp)
