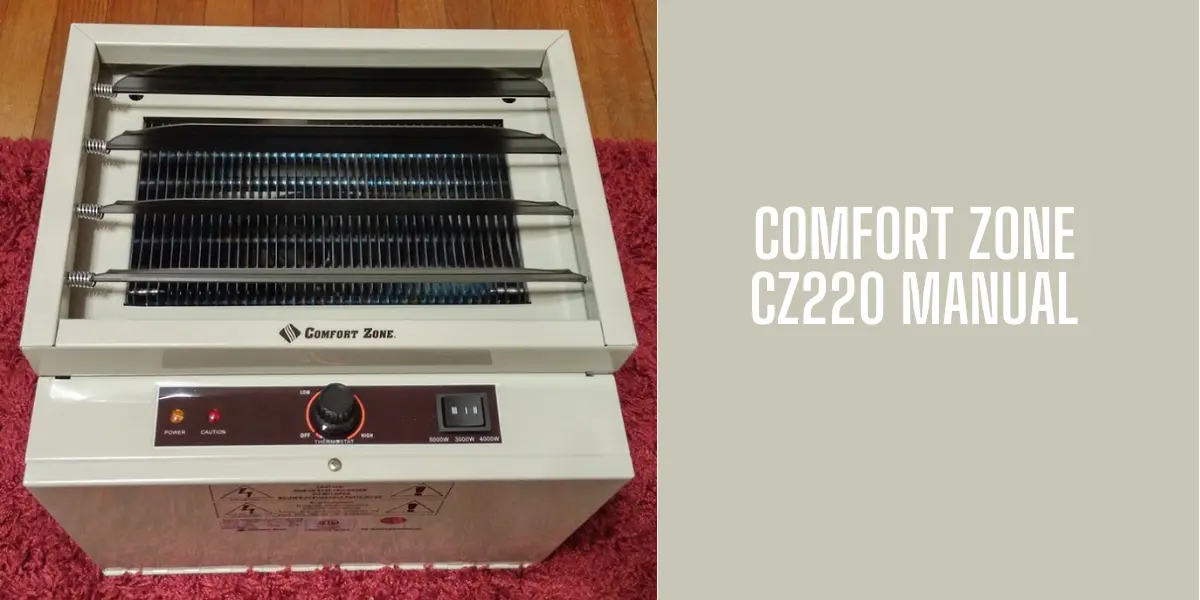
Comfort Zone CZ220 Manual
This guide on Comfort Zone CZ220 Manual will walk you through:
- Comfort Zone CZ220 Installation Manual
- Comfort Zone CZ220 Operational Manual
- General safety tips & instructions
- Maintenance
- End-note
Comfort Zone CZ220 Installation Manual
Read and understand the exact step-by-step instructions I mentioned below to install the heater like a pro.
1. Locating the Heater
Ensure you install the heater out of traffic areas maintaining the clearance shown on the following picture:
Also, remove the columns or machinery out of the way of your space heater as they restrict the direction of the airflow. When you install or use multiple heaters in an area, arrange the heater like this:
It will help air discharge of each heater and support the airflow of the others. As a result, you will gain the best air circulation of warm air from both heaters.
2. Mounting The Bracket
Refer to the following pictures that will help you mounting the bracket:
1. Discover a stud in the ceiling joist.
2. Loosen up the bracket thumb screws and pull out the mounting bracket from the heating unit.
3. Drill a ¼” pilot hole in the ceiling joints. Place a washer on screws before inserting through the holes in the mounting bracket. Then, screw them into a ceiling joist.
Note: I recommend you add a washer to both sides of the bracket if you want to swivel the heater either to the right or left. In addition, you may need a longer Lag bolt to secure the unit properly.
4. Tighten up the screws to hold the unit securely with air flow pointed in the proper direction.
3. Connecting The Power
To connect the power to your heater, follow the below instructions- step-by-step:
- Unfasten the screw from the front of the unit to connect the power to your heater.
- Attach the cable connectors to the unit and slide the 10 gauge wire through the cable connector.
- Attach the wire to the power block located in the base of the unit.
- Turn on the power at the main service.
4. Hanging The Heater
Once you connect the power to the heater, it’s time to hang the heater. Regarding this, go along with the following steps:
- Attach your heater to the mounting bracket.
- Lift the heater a bit and into the mounting bracket.
- Align the bracket screws with the keyhole slots in the mounting bracket.
- If you want to tilt the heater, you should position in the keyhole slots.
- Use a wrench to tighten the bracket screws so the heater is securely suspended at horizontal or vertical level.
Comfort Zone CZ220 Operational Manual
Following the below guidelines you can easily operate the unit:
Setting The Thermostat
- Turn the thermostat knob clockwise to high position
- Once the room reaches the comfort level, turn the thermostat knob counterclockwise until the thermostat clicks off.
Note: This heater will cycle on and off continuously to maintain room temperature. Turns out, the heater may smoke slightly for the first time you operate it. It’s because of residual cleaning agents used to clean the heating element when the unit is manufactured.
It’s normal and does indicate no problem with the unit. The condition will disappear soon after the heater has been in operation for a few minutes.
Adjusting Airflow Direction
You can adjust the direction of the airflow in three ways, including:
- If you install the heater with a single lag bolt, you can adjust the airflow direction by turning the entire unit.
- Tilting is another method you can apply to adjust the airflow. Just loosen the bracket screws and tilt the unit. Keep in mind; you must mount the heater in bottom keyhole slots of mounting brackets to tilt the unit.
- Adjust the louvers to desired position which will help you adjust the airflow as well.
Thermal Cutout
This heater is equipped with a safety feature called thermal cutout. It shuts off the unit automatically in the event of overheating. The unit will come on again when the abnormal temperature returns to normal.
I highly recommend you discover the cause of overheating and take corrective actions before further operation.
General Safety Tips & Instructions
Read all the installation & operational instructions I mentioned in this chapter and observe all the safety instructions:
- Use the copper wire only for supply connections. Use 10 AWG wires or larger wires suitable for at least 167-degree F.
- The direction of airflow should be parallel to or away from adjacent walls.
- Maintain floor, wall, and ceiling clearance requirements.
- Wire your heater according to national and electrical codes in the United States and ground the heater properly to prevent possible electric shock.
- Ensure the mounting structure and the anchoring hardware can support the weight of the heater.
- Before inspecting or servicing the heater, you must disconnect all the electric connections and lock the main service box.
- Don’t use this heater in a corrosive atmosphere.
- Keep combustible materials like clothes, paper, pillows, and furniture at least 3 feet from the front of the heater and keep those away from the sides and rear.
- Never operate the heater in areas like the bathroom, laundry room, and similar indoor locations.
Maintenance
Comfort Zone Heater CZ220 requires a little maintenance due to its rugged design, superior engineering, and high-quality craftsmanship. Proper care to the heater will increase longevity of the heater. But seasonal cleaning is a must to maintain the efficiency of the heater.
Cleaning The Heating Element
First, loosen the four Phillips head screws instead of removing them completely. You can find these screws behind the louvers in the corners of the louver housing on both sides.
Second, lift up the louver housing and pull it out.
Now, you can easily get access to the heating element. Take a soft brush or a vacuum cleaner to clean the lint or dust from the heating element.
Once you clean the heating element, replace the louver housing and tighten the Phillips head screws.
Note: Take precautions when cleaning the heating element so that the internal wiring doesn’t get damaged. Ensure all wire connections remain tight and they are routed away from the element fins when reassembling the heater. Otherwise, it could cause fire hazards.
Cleaning The Fan & Motor
Just pull out the protective grille from the rear of the heater. This will provide access to the fan and the motor. With a soft brush or cloth, wipe off the dust from the fan and the motor. Finally, replace the protective grille in its place.
End-Note
Keep this manual or instructional guide in your browser. It will help you in installing, operating, and maintaining the heater like a pro. Needless to say, don’t hesitate to call a certified technician if you are not mechanically inclined to install or servicing the heater.

Eric Alvarez is the head of content on LilDutchUncle.Com. He is an HVAC guy based in El Paso, Texas, United States. He obtained his Bachelor of Science degree from the University Of Texas at El Paso. Years of experience in the HVAC field have taught him many lessons, not the least of which is that the value of quality and knowledge far exceeds any promised initial savings. He has a good standing reputation for superior skills in heating, air conditioning, hot water tanks, and indoor air quality systems.


![Lasko Heater Won’t Turn On Red Light [3 Reasons & Solutions]](https://lildutchuncle.com/wp-content/uploads/2023/06/Lasko-Heater-Wont-Turn-On-Red-Light-768x384.webp)


![Comfort Zone Heater Keeps Shutting Off [5 Easy Solutions]](https://lildutchuncle.com/wp-content/uploads/2023/08/Comfort-Zone-Heater-Keeps-Shutting-Off-768x384.webp)
![Vornado Heater Blowing Cold Air [How To Fix]](https://lildutchuncle.com/wp-content/uploads/2023/09/Vornado-Heater-Blowing-Cold-Air-How-To-Fix-768x384.webp)
