This complete guide on Comfort Zone Cz220 Troubleshooting will take you through:
- 7 common problems of the heater and how you can troubleshoot them
- Installation & operational instructions
- How To Operate Comfort Zone CZ220?
- General safety tips you should follow
- End-note
Comfort Zone CZ220 Troubleshooting [7 Easy Solutions]
Let’s troubleshoot these 7 common problems of your Comfort Zone CZ220 Ceiling Heater.
1. Heater Won’t Turn On
The ceiling heater won’t turn on if:
- You wire the heater incorrectly
- Incoming power problem
- The circuit breaker gets tripped
How To Fix:
I highly recommend you to have a certified electrician to wire your Comfort Zone Cz22o Ceiling Heater.
1. To connect the power to the heater properly, remove the screw from the front of the unit.
2. Connect the cable connectors to the unit and slide the 10 gauge wire through the cable connector.
Note: For certain applications, conduit may be required. Regarding this, it will be best to have your eyes on local electrical codes. If you run the wiring in conduit and wish to turn the heater, ensure you purchase enough flexible conduit to allow the heater to be turned on.
3. Attach the wire to the power block located in the base of the heater.
4. Turn on the power at the main service.
Secondly, the heater won’t come on if there is an issue with incoming power. Here the incoming power problem means a bad outlet. You can easily verify whether the outlet is at fault or not.
Just plug another appliance into the same outlet you used to juice up your space heater. If it doesn’t come on, understand the outlet is at fault.
Thirdly, check the circuit breaker and ensure it’s in the On position.
2. The Unit Vibrates Like Mad
You bring the Comfort Zone Cz220 in home, assemble it, and turn it on. Once you turn the unit, it vibrates like crazy. If this is the issue you are experiencing, I bet the nut that holds the fan blade on is loose.
How To Fix:
The nut that keeps the fan blade in place is loose from the factory. To tighten up the nut, just take the front panel off and fasten the nut using a screwdriver. Also, make sure other components on the unit are secure and tight.
3. Overheating
Overheating is another common yet hazardous space heater problem. Basically, the internal components of the unit reach a high temperature condition if the air filter (if one is equipped with) gets dirty or the fan and the motor become dusty.
How To Fix:
You can easily pass the overheating issue. Just detach the heater from the electric power source and leave it for 20 minutes to let it cool down. Then, restore the power to the unit and turn on the heater.
However, the best bait will be to clean the internal parts like the fan and its motor, which we will describe later.
4. Thermal Cut-out Gets Blown Out
The heater is equipped with a safety feature called thermal cutout. It will turn off your heater automatically in the event of overheating. In other words, when the unit gets overheated, thermal cutout gets blown out.
How To Fix:
In regard to this issue, the unit will turn on when the abnormal temperature returns to normal. But the best bait is to discover the cause of overheating and you should take the corrective actions according to that.
5. Dirty Heating Element
A dirty heating element is also responsible for intermittent heater issues. If the heating element gets covered with debris, this component won’t perform its job and could cause overheating.
How To Fix:
A good cleaning of the heating element doesn’t only resolve functional issues of the heater but it also increases the longevity of the unit.
To clean the heating element, loosen the four Phillips screws located behind the louvers in the corners of the louver housing. Keep in mind, don’t remove those screws completely.
Then, lift the louver up and pull it out. It will help you get the heating element. Now, use a vacuum cleaner or a soft cloth to remove the accumulated dust or lint on the heating element.
Once you clean the heating element, put the louver back into place and secure it by tightening up those nuts.
6. Dirty Fan & Motor
The next culprit that could cause overheating is a filthy fan and motor. You must clean the fan and the motor to sustain its heating efficiency. In the following chapter, I will take you through the step-by-step guide of cleaning the fan and the motor.
How To Fix:
What you need to do to clean the fan and the motor is- unscrew the protective grill from the rear of the unit. This provides access to the fan and the motor. Then, take a soft cloth or brush and wipe off the fan and the motor to remove debris. Never try to lubricate the motor as it requires no lubrication.
7. Heater May Smoke Slightly
This problem will occur if you operate the heater for the first time. It happens due to residual agents used to clean the element when the heater is manufactured.
It’s not a problem at all. This condition will stop when you operate the unit for a few minutes.
Installation & Operational Instructions
Follow these guidelines to avoid possible installation or operational difficulties:
- The manufacturer recommends copper wire for supply connections. Use 10 AWG or larger wires that are suitable for at least 167-degree F.
- Direct the heater airflow parallel to away from the adjacent wall.
- Ensure the clearance requirements between the heater and the wall, ceiling , and floor are fulfilled.
- Wire the heater according to the national and local electrical codes in the United States. Ground the heater properly to avoid possible electric shocks. Don’t forget to use proper fuses to protect the heater circuit.
- Ensure the mounting structure and the anchoring hardware you use is capable of supporting the weight of the ceiling heater.
- You must disconnect the heater from the electric power source before performing any inspection or maintenance workflow. Of course, be sure that you lock up the main service box. Never use this heater in areas where gasoline, paint, or flammable objects are used or stored.
- This heater won’t be a perfect bait if you want to use it in corrosive areas like marine, greenhouses, or chemical storage areas.
- Never install the heater closer than 8 inches to a vertical surface or less than 6 feet from the floor.
How To Operate Comfort Zone CZ220?
Once you install the heater and connect it to the power according to the instructions, it’s time to operate the unit.
Adjusting the Airflow Direction
You can adjust the airflow direction of the heater in three ways:
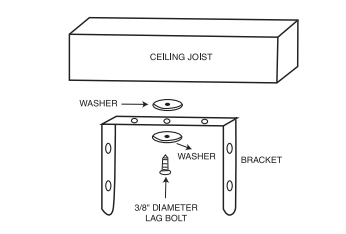
1. Turning: If you install the heater with a single lag bolt as shown in the following picture, just turn the entire unit as necessary to adjust airflow.
2. Tilting: Just loose the bracket screws and adjust the airflow by tilting down the heater.

Note: To tilt the heater, you must mount it in the bottom keyhole slots of mounting brackets. It will help maintain adequate clearance and prevent possible overheating.
3. Adjusting the louvers to the desired position
Setting the Thermostat
- Turn the thermostat knob clockwise to high position.
- Once the room reaches the desired comfort level, turn the thermostat knob counterclockwise until the thermostat clicks off.
General Safety Tips You Must Follow
Maintain the following safety instructions to avoid potential dangers:
- This unit remains hot when using. So, don’t let bare skin touch the hot surfaces. Use the handle, if provided, to move the heater from here to there. Keep combustible materials paper, clothes, or curtains at least 3 feet from the front of the unit and from the sides and rear.
- The heater from the Comfort Zone is not designed to be used in areas like bathroom, laundry areas, or similar indoor locations. Never install this heater in areas where it may fall into a bathtub or other water containers.
- Never use this heater with an extension cord as it’s designed to be directly wired to 240V electric power.
End-Note
No electric appliance in your house is beyond operational malfunctions. And this Comfort Zone CZ220 Heater is not an exception to that. Overheating, dirty heating elements, and blown out thermal cutouts are some common problems of this heater.
Throughout this troubleshooting guide, I showed how to troubleshoot those issues and resolve them. So, follow the steps I mentioned and bring the unit into operating conditions.
Don’t hesitate to call a certified service guy if you fail to resolve a specific issue of the heater following guidelines mentioned in this article.
Read Also:

Eric Alvarez is the head of content on LilDutchUncle.Com. He is an HVAC guy based in El Paso, Texas, United States. He obtained his Bachelor of Science degree from the University Of Texas at El Paso. Years of experience in the HVAC field have taught him many lessons, not the least of which is that the value of quality and knowledge far exceeds any promised initial savings. He has a good standing reputation for superior skills in heating, air conditioning, hot water tanks, and indoor air quality systems.